How to Sell Personalized Embroidered Dog Bandanas on Shopify
Set up a personalized embroidered dog bandana on Shopify with size pricing, a paid embroidery add-on, thread colors, fonts, pet icons and live preview.
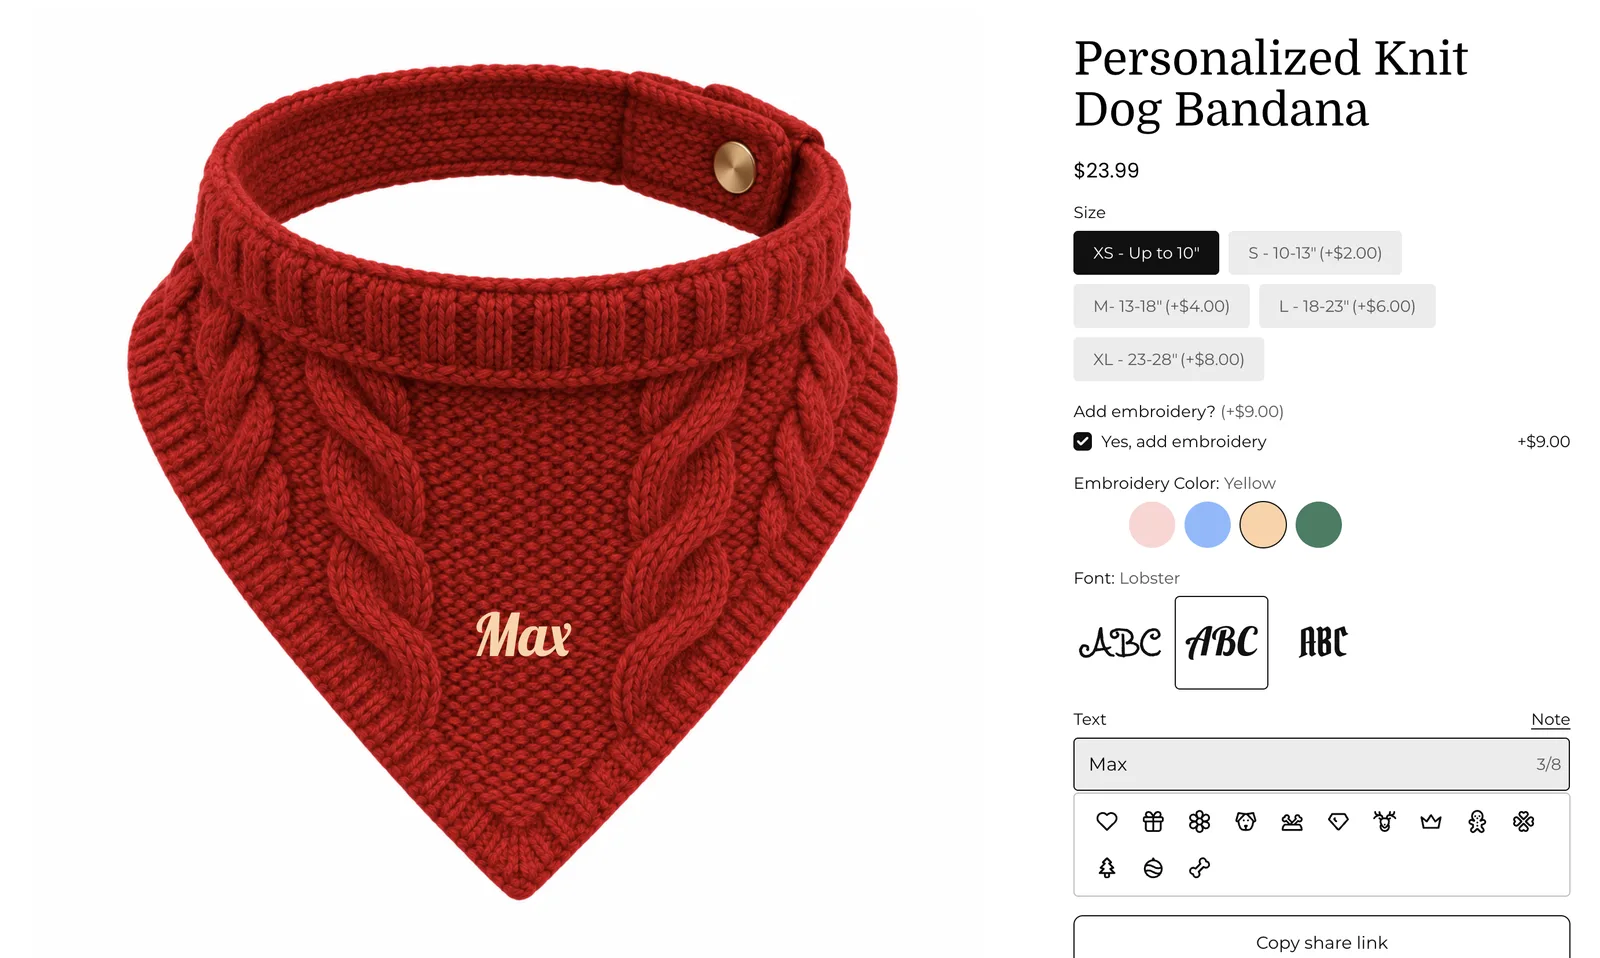
TL;DR: To sell embroidered dog bandanas with Podifai, add five options to one Shopify product: size buttons with add-on prices, a paid embroidery checkbox, thread colors, fonts and a name field with pet icons. Show the embroidery fields only after the checkbox is ticked, and link the name's preview to the chosen color and font. The fastest start is the ready-made Personalized Dog Bandana template, and every feature used here is on the Free plan.
What does the shopper see?
- Pick a size. Larger sizes show their extra price on the button, for example S (+$2.00).
- Tick "Yes, add embroidery" to add the embroidery fee (+$9.00 in the demo). The price at the top updates.
- Choose a thread color (White, Pink, Blue, Yellow or Green) and a font (Sunshiney, Lobster or Pirata One).
- Type the dog's name, up to 8 characters, and optionally tap an icon such as a heart, paw or crown.
- Drag or resize the name on the bandana if they want it placed differently, then add to cart.
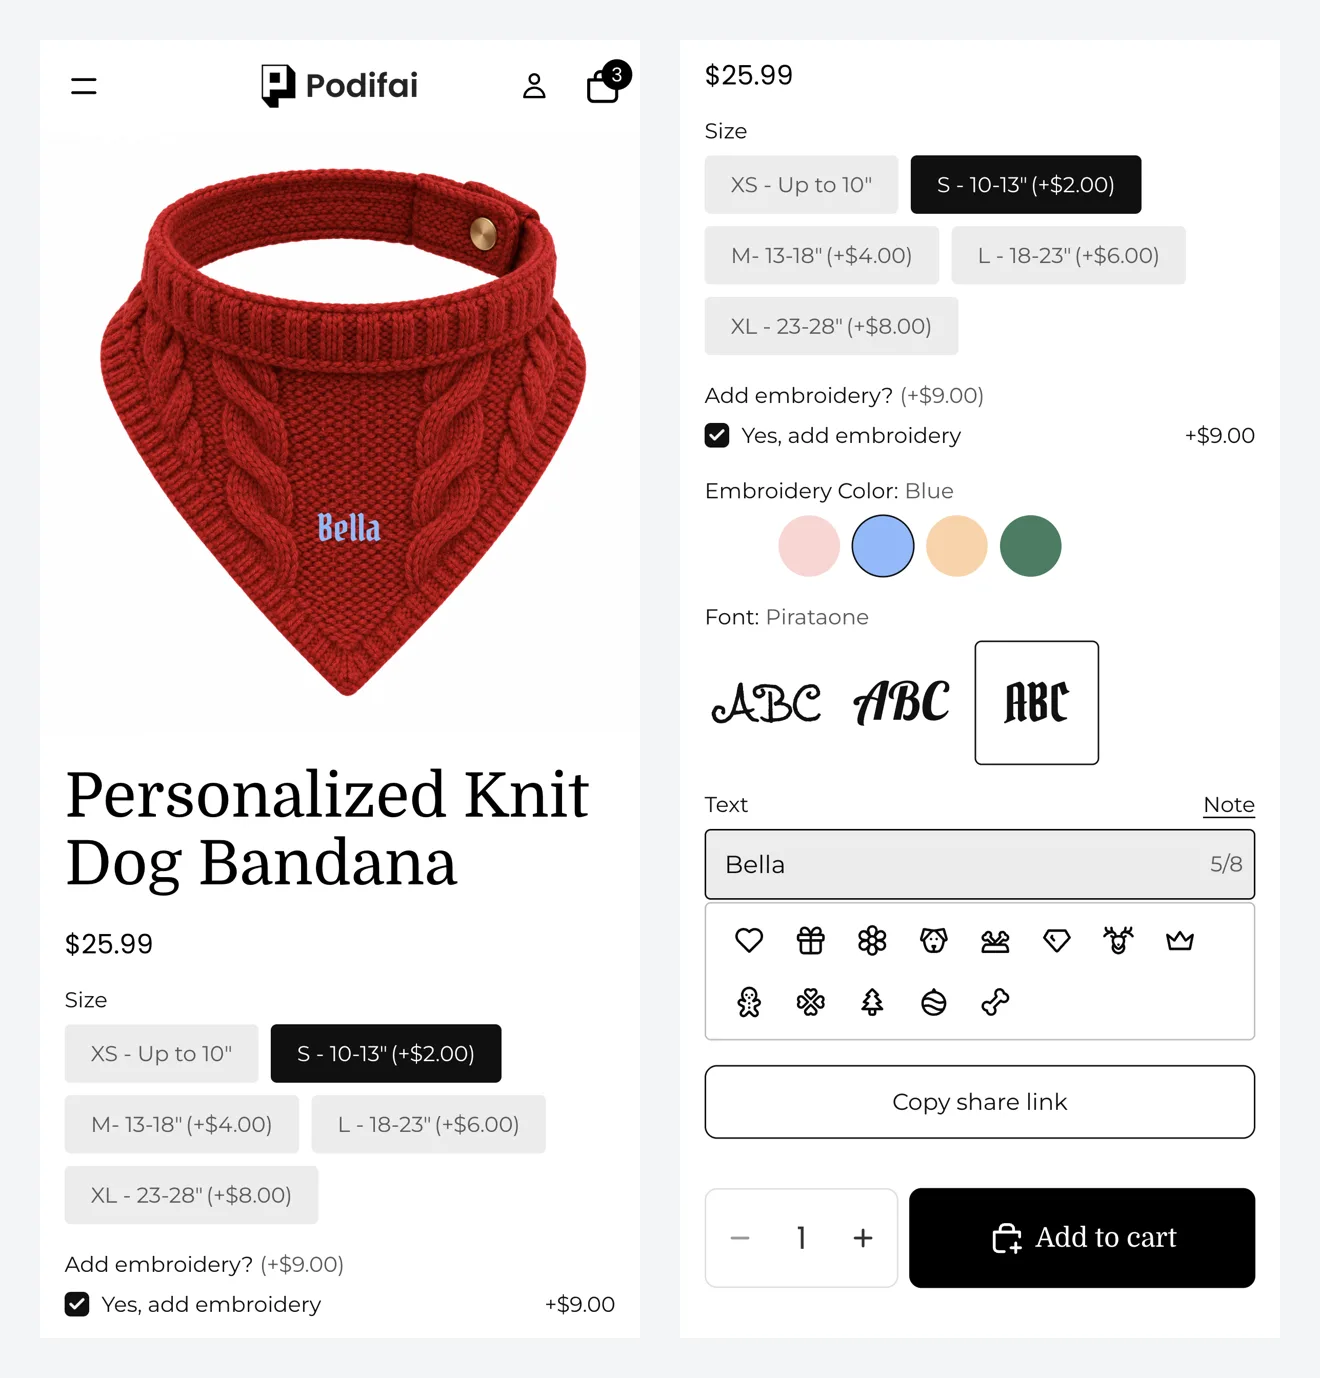
Try it yourself on the live demo product.
What do you need before you start?
1. Install Podifai and turn on the app embed
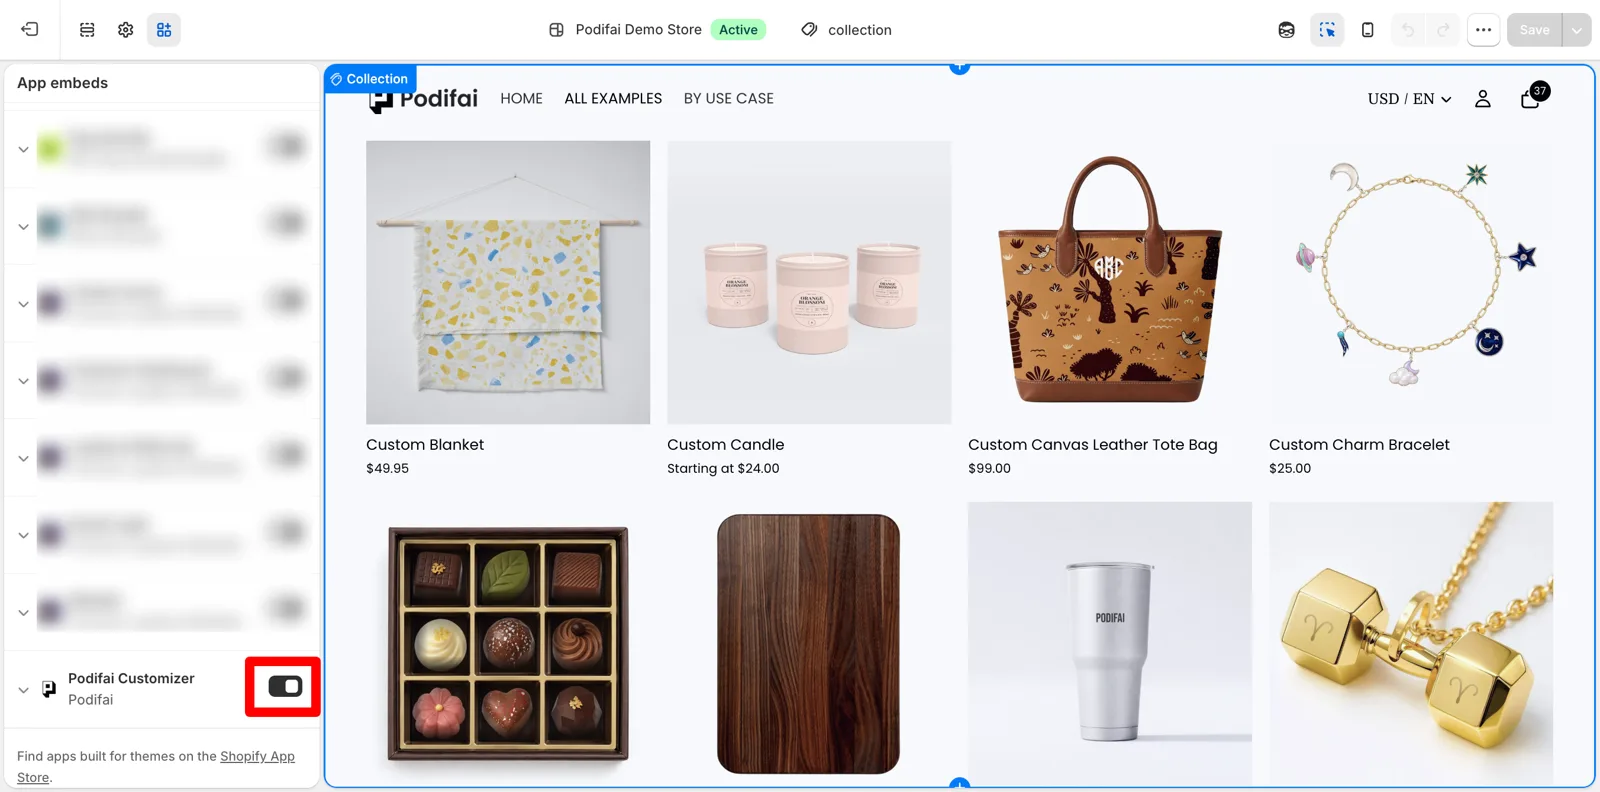
Install Podifai from the Shopify App Store, then open Online Store > Themes > Edit theme > App embeds and switch on Podifai Customizer. App embeds are theme-specific, so repeat this if you change or duplicate your theme. If the customizer does not appear on your product page later, check this first. See Enable App Embed.
2. Create the bandana product in Shopify
Add the bandana as a normal Shopify product with its base price (the demo uses $14.99). Podifai adds the personalization on top of this product, so title, description and SEO stay in Shopify.
3. Prepare one clean preview photo
Use a front-facing photo of the bandana on a plain background, ideally square, with the stitch area clearly visible and nothing printed on it. If you sell several bandana colors, shoot every color at the same size and angle so the name stays in the same place. See Image & Asset Requirements.
Should sizes be Shopify variants or Podifai options?
The demo uses a Podifai Badge Group for size, which is quick to set up and lets you add a price per size. If each size is a separate stock item with its own SKU, use Shopify variants instead. A simple rule:
| Your situation | Use | What it gives you |
|---|---|---|
| Each size has its own SKU or stock count | Shopify variants | Shopify tracks stock and SKU; Podifai only adds the personalization |
| Sizes share one SKU and you only charge more for bigger sizes | Podifai Badge Group (as in the demo) | One product, price added per size |
| Sizes share one SKU but you still want to stop overselling | Podifai Badge Group with Track inventory | Set a Custom count per size, or link each size to a Shopify variant |
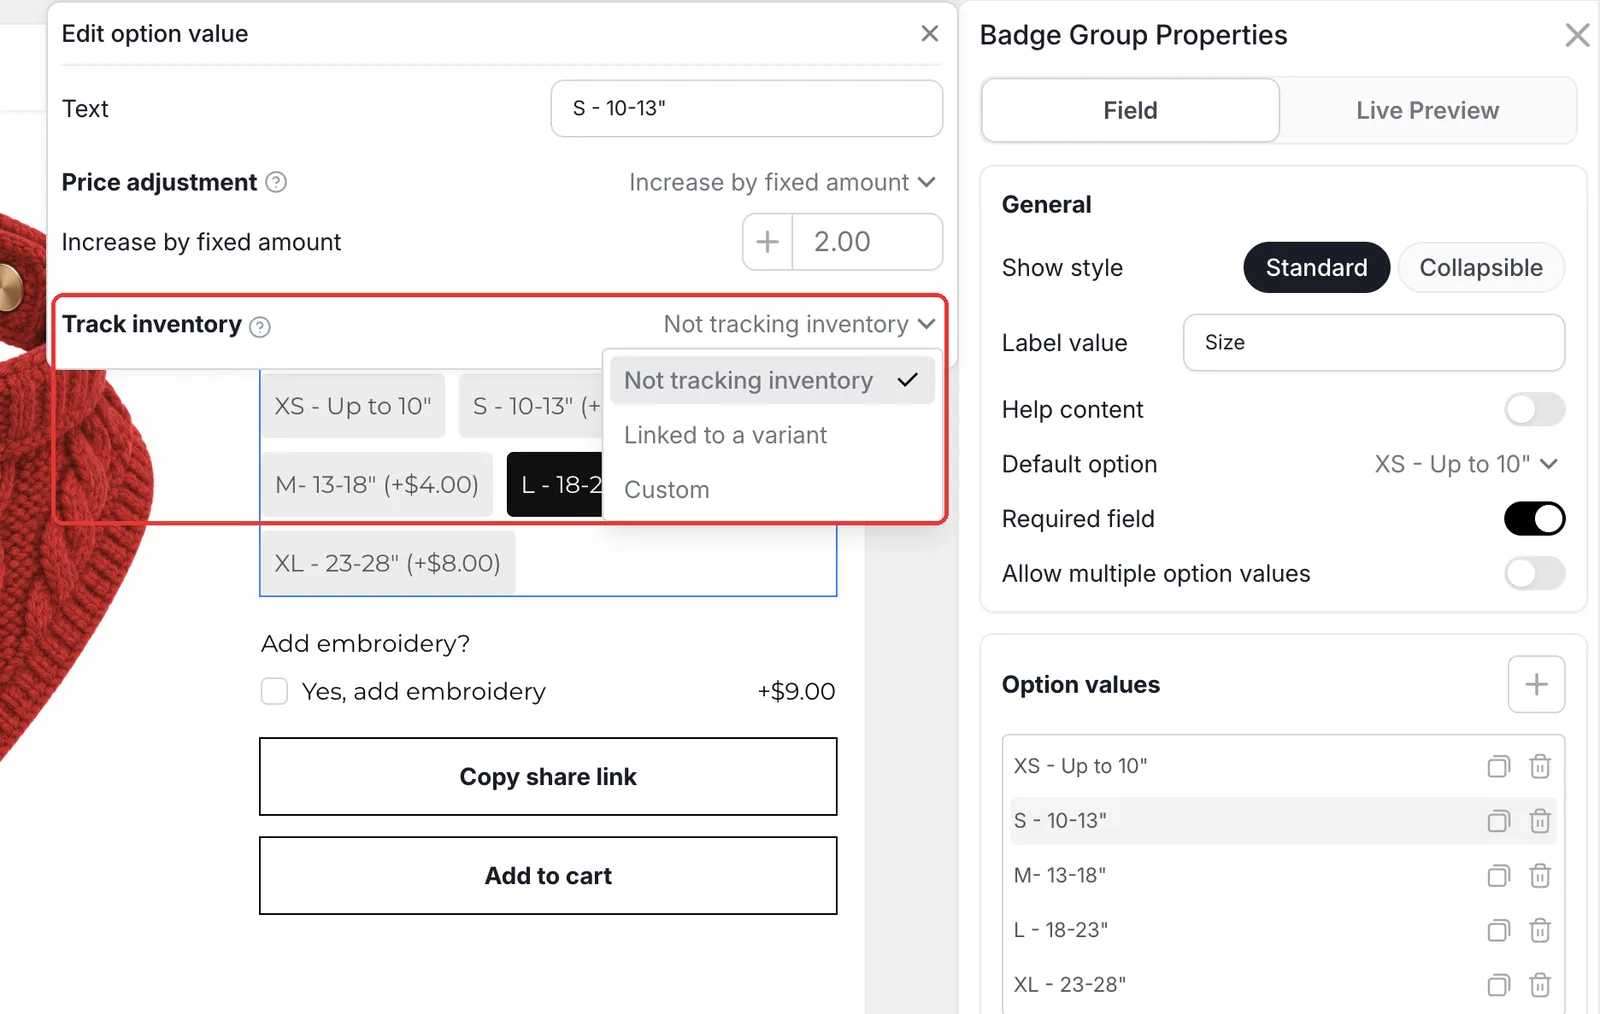
Podifai deducts tracked stock when Shopify creates the order. Cancelled or refunded orders do not restore it automatically, so adjust the count by hand.
What is the fastest way to set this up?
Podifai ships a ready-made Personalized Dog Bandana template with the same options as the demo. Open Templates > Podifai Templates, find Personalized Dog Bandana and click Copy to Product. In Choose a product, find your bandana and click Apply. If the product already has Podifai options, the button reads Override and the template replaces them, so save the existing setup as a template first if you still need it. This is a one-time copy: later template edits do not change your product. Afterwards, replace the preview photo with your own (step 2 below), check the prices and thread colors, and save. The steps below explain every setting, so you can change anything the template does differently from your shop.
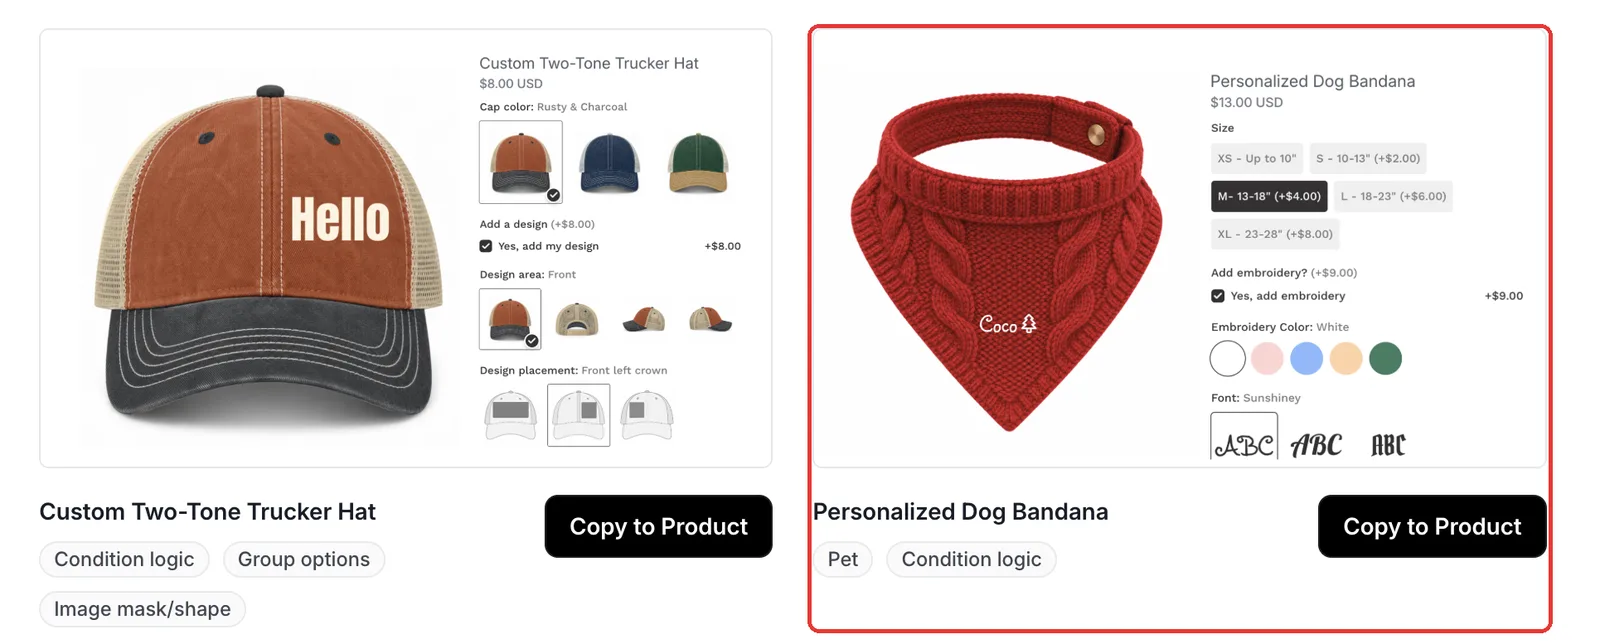
Which options do you need?
The whole customizer is 5 Podifai options on one Shopify product:
| Option | Podifai type | Key settings | Price |
|---|---|---|---|
| Size | Badge Group | One value per size, Required field on | +$0 to +$8 per size |
| Add embroidery? | Checkbox | One value: Yes, add embroidery | +$9 flat |
| Embroidery Color | Color Swatch | 5 thread colors, condition: embroidery selected | No charge |
| Font | Font Swatch | 3 fonts, condition: embroidery selected | No charge |
| Text | Text Input | Max 8 characters, icon selector, live preview | No charge |
How to set it up in Podifai, step by step
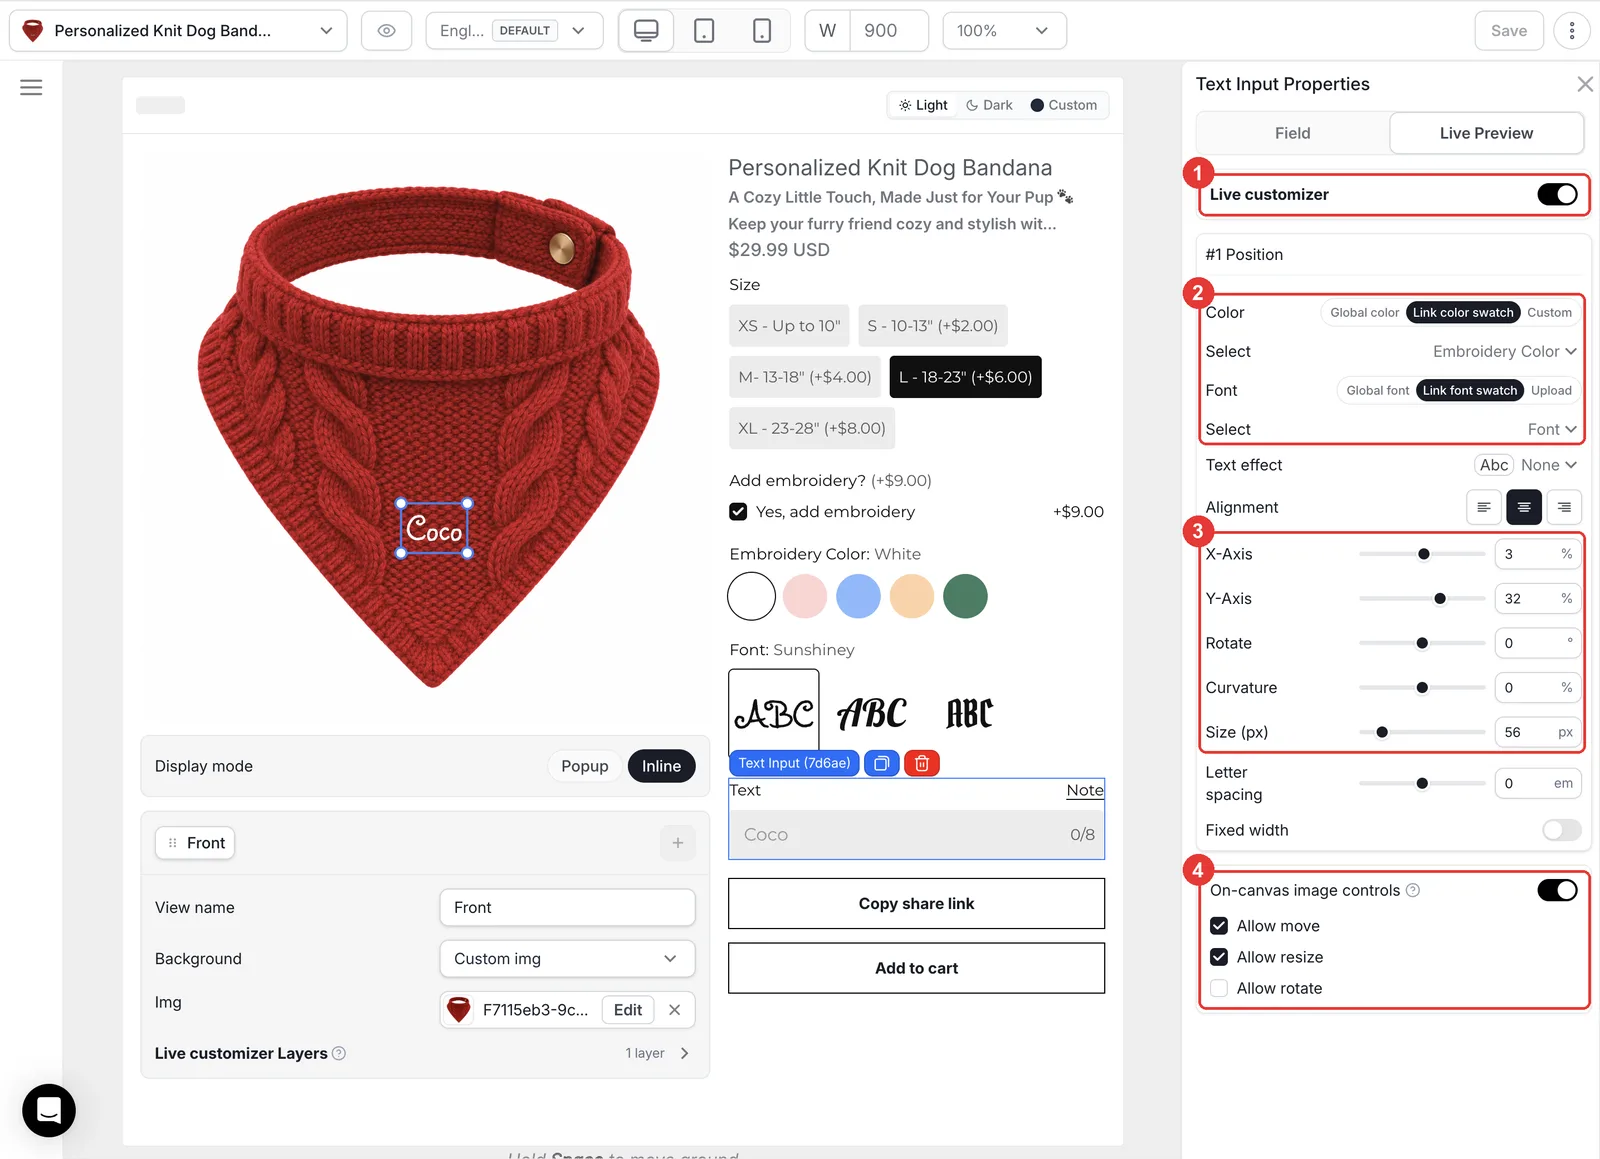
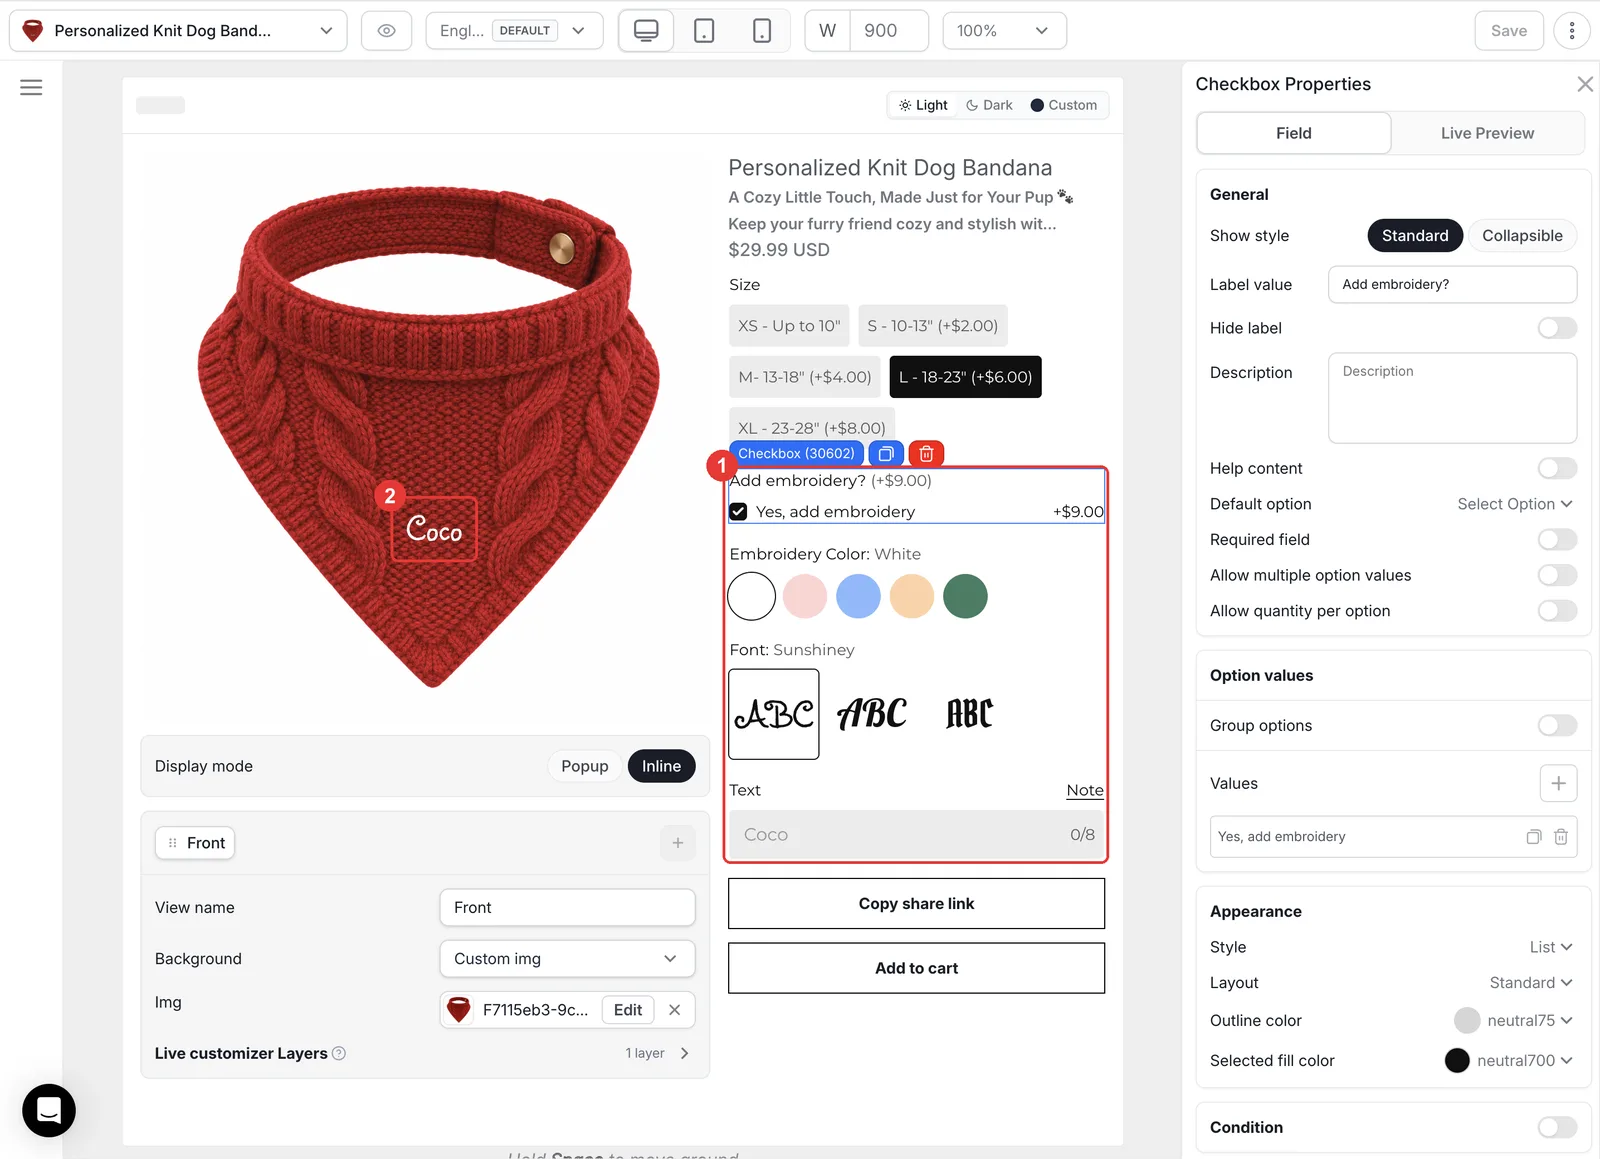
These steps match the live demo product. Red boxes mark what to change; numbers follow the order in the step text.
Step 1: Add the five options
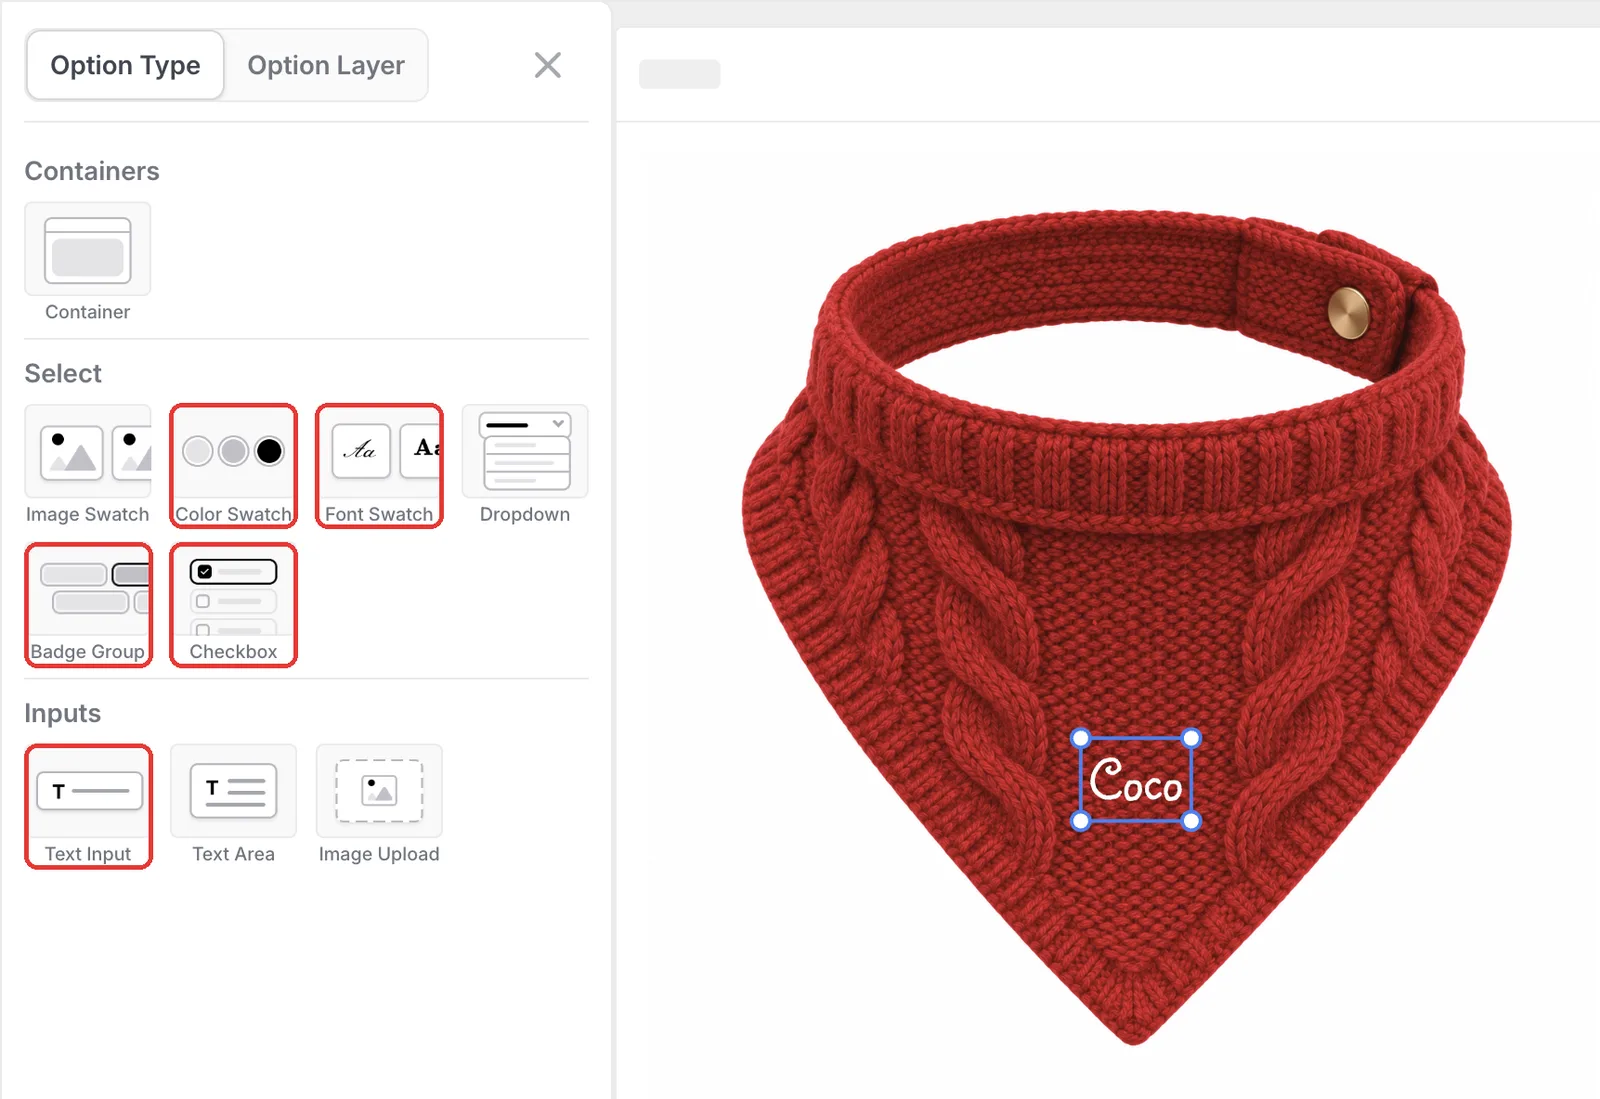
Open the product in the Podifai editor and click the menu icon on the left. From Option Type, add a Badge Group for size, a Checkbox for embroidery, a Color Swatch for thread color, a Font Swatch for the lettering style and a Text Input for the name. Drag them into that order, since shoppers fill the form from top to bottom.
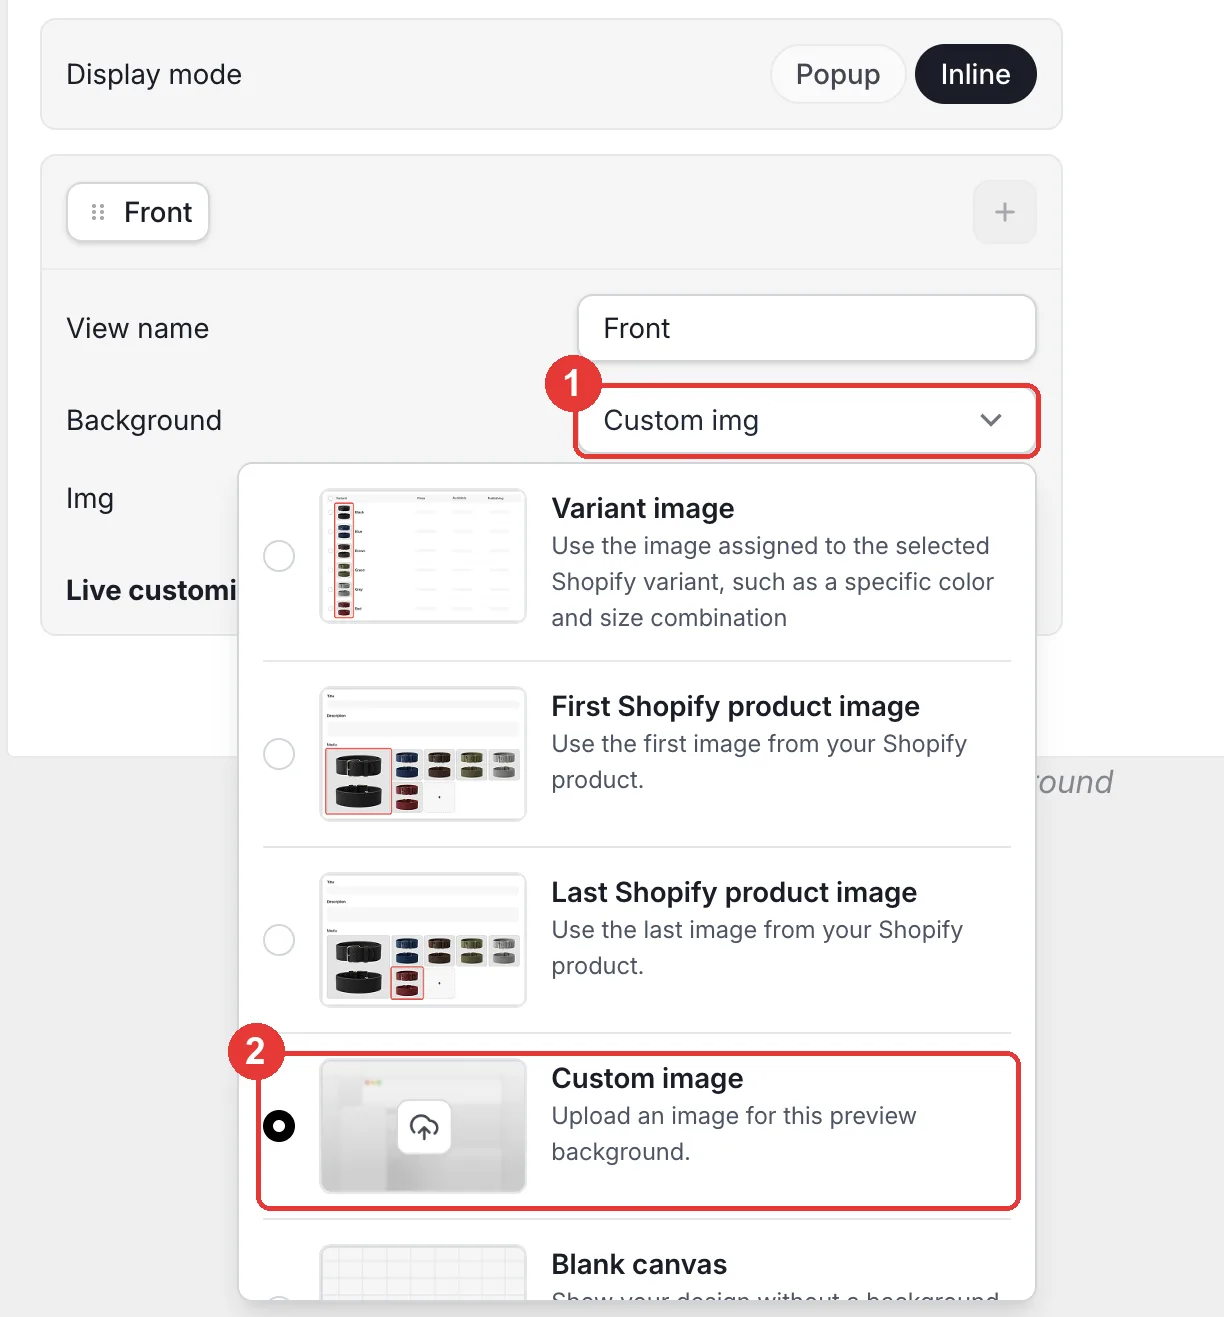
Step 2: Set the preview photo
In the view panel under the preview (named Front), open Background and choose Custom image, then upload your bandana photo. If the bandana comes in several colors as Shopify variants, choose Variant image instead, so the preview follows the color the shopper selects.
- Square images work best. Keep every variant photo at the same size and angle.
- Leave space around the stitch area so longer names are not cut off.
- Changing to a photo with a different shape later can move the name, so recheck the position after any swap.
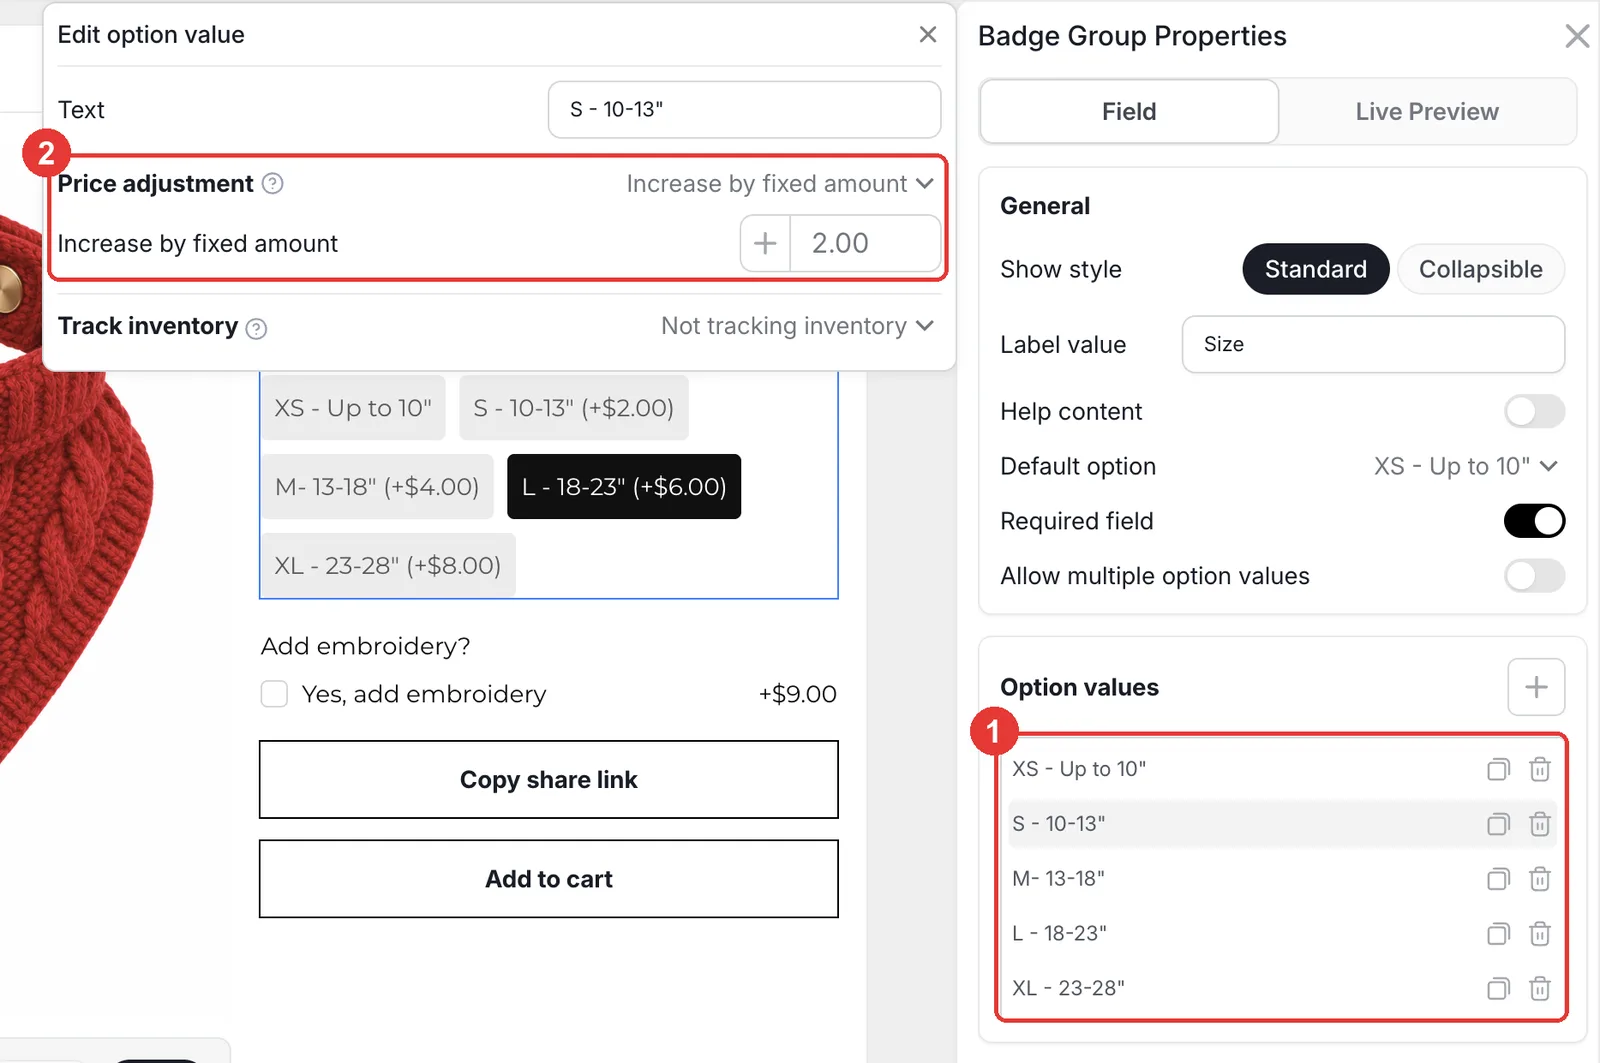
Step 3: Charge more for bigger sizes
Select the Size badge group and add one value per size (XS to XL). Click a value to open Edit option value, set Price adjustment to Increase by fixed amount and enter the extra cost. The storefront shows the amount next to each size. Keep Required field on so every order has a size.
Step 4: Make embroidery a paid add-on
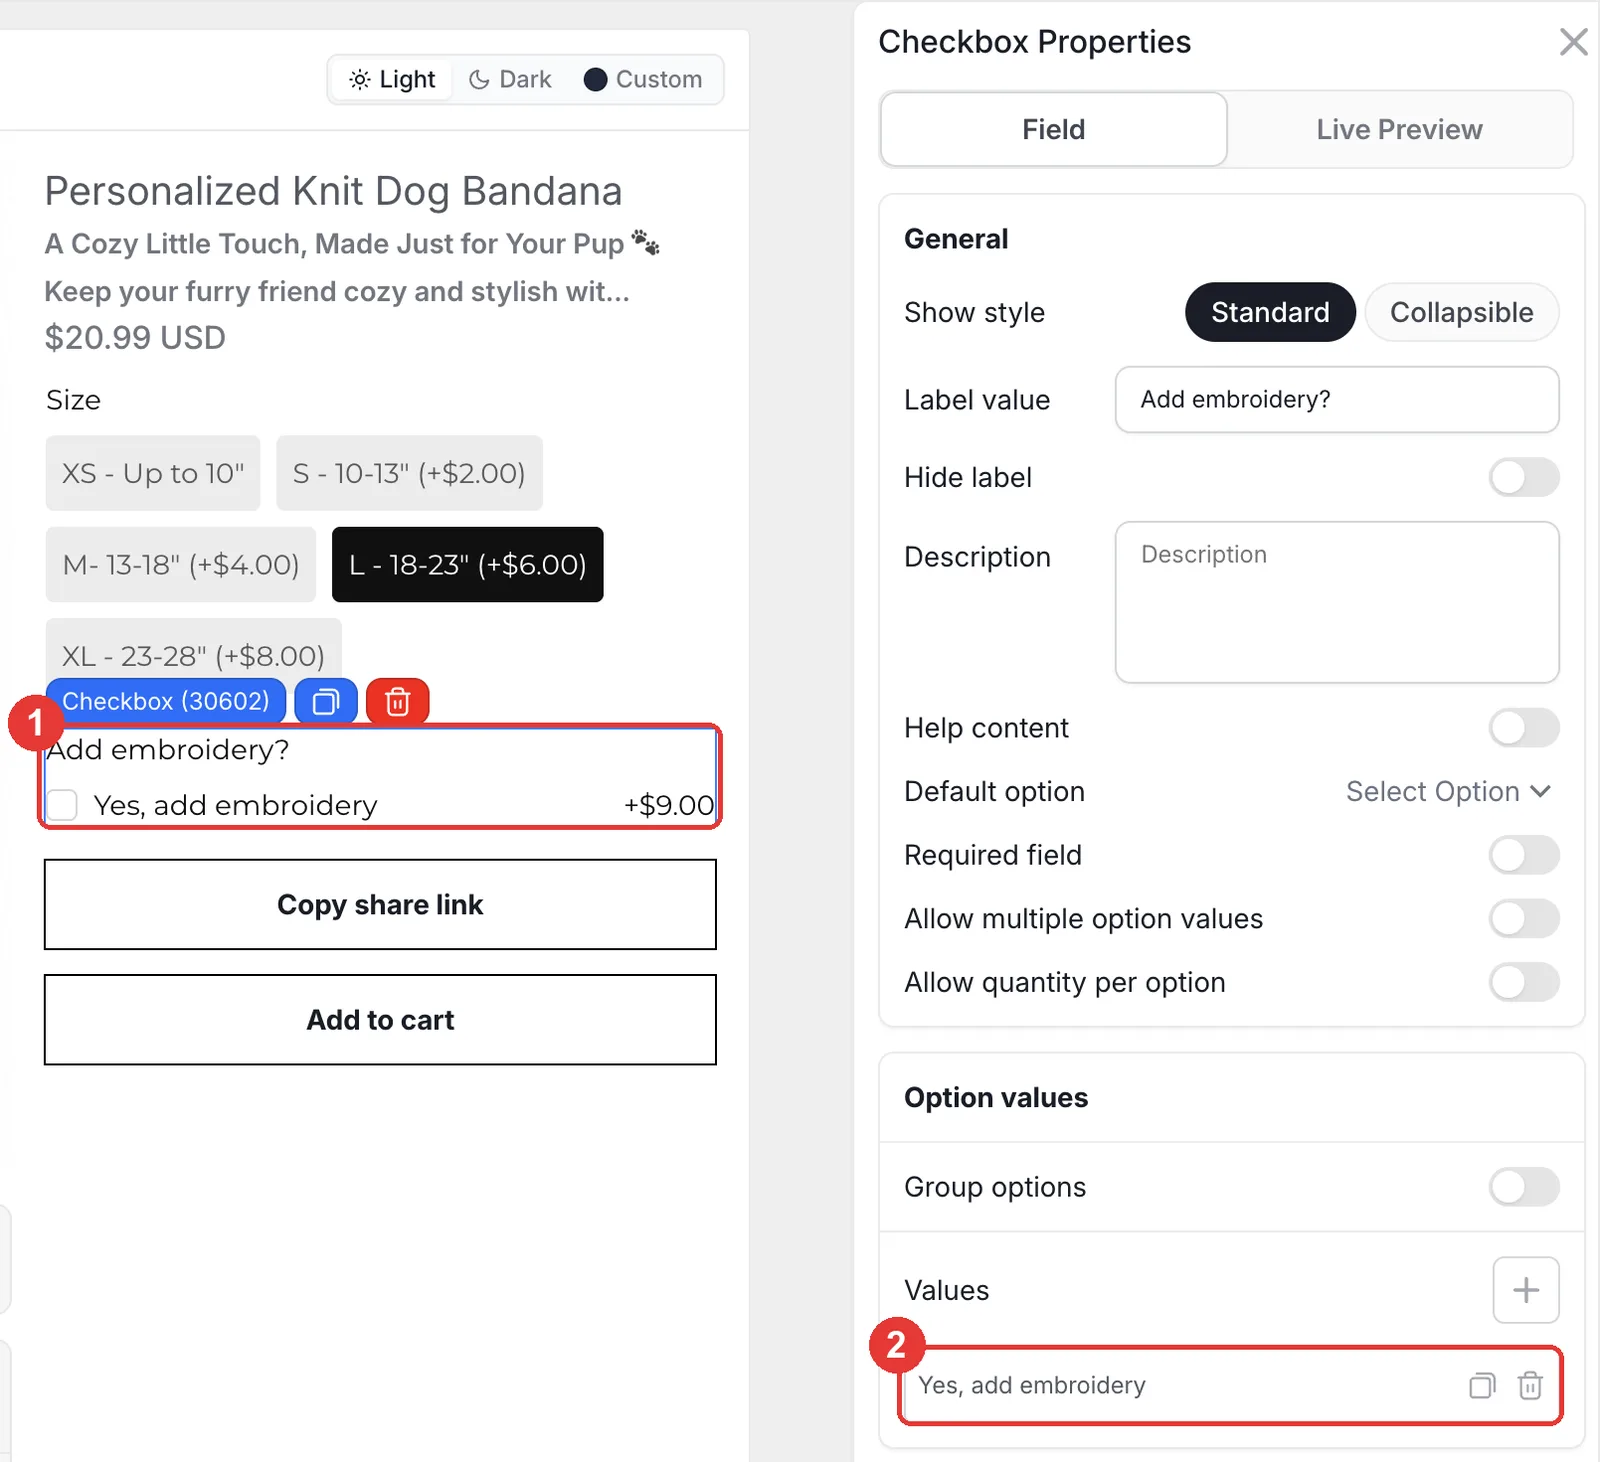
Add a Checkbox labelled "Add embroidery?" with a single value, "Yes, add embroidery", and give that value a fixed price (+$9.00 in the demo). Leave Required field off so shoppers can still buy the plain bandana.
Step 5: Add thread colors
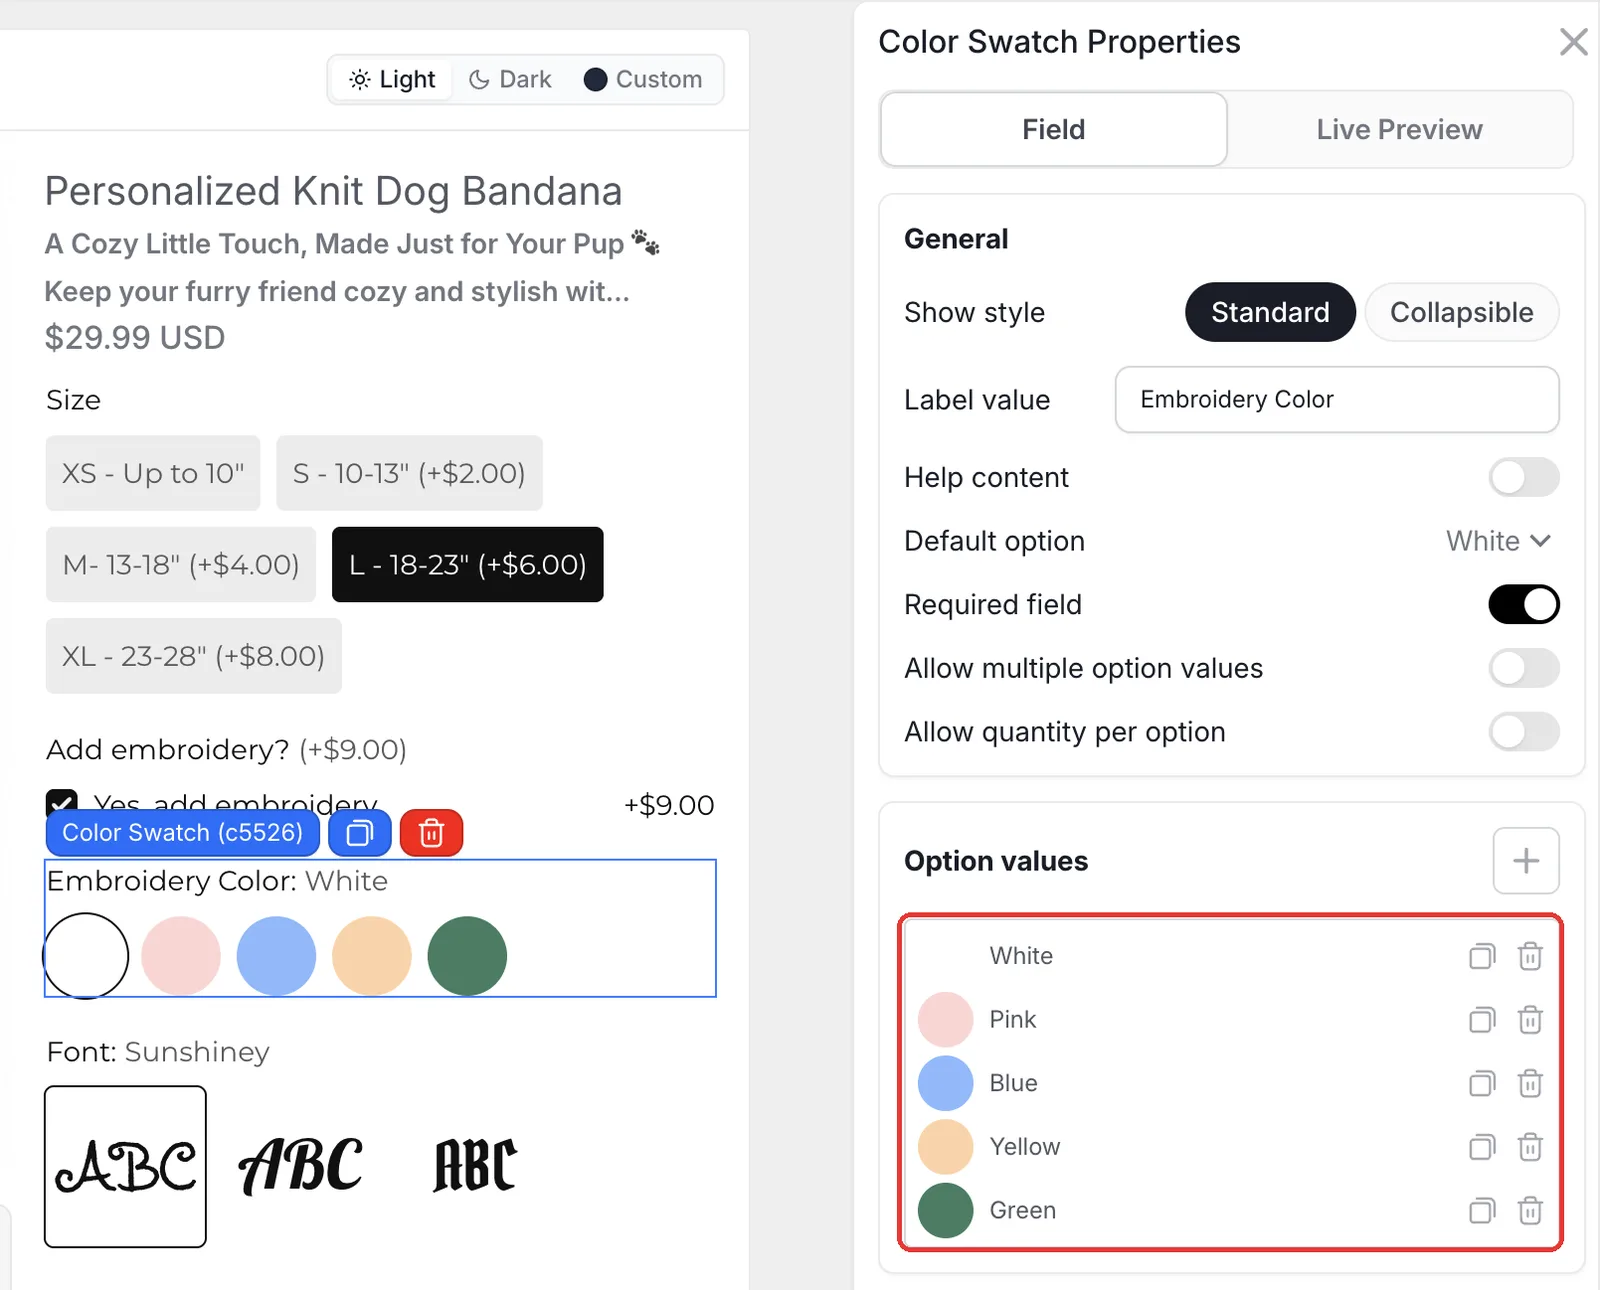
In the Color Swatch, add one value per thread color and set its color code to match your real thread. Set a Default option (White in the demo) so the preview never starts empty, and turn on Required field.
Step 6: Show embroidery options only when needed
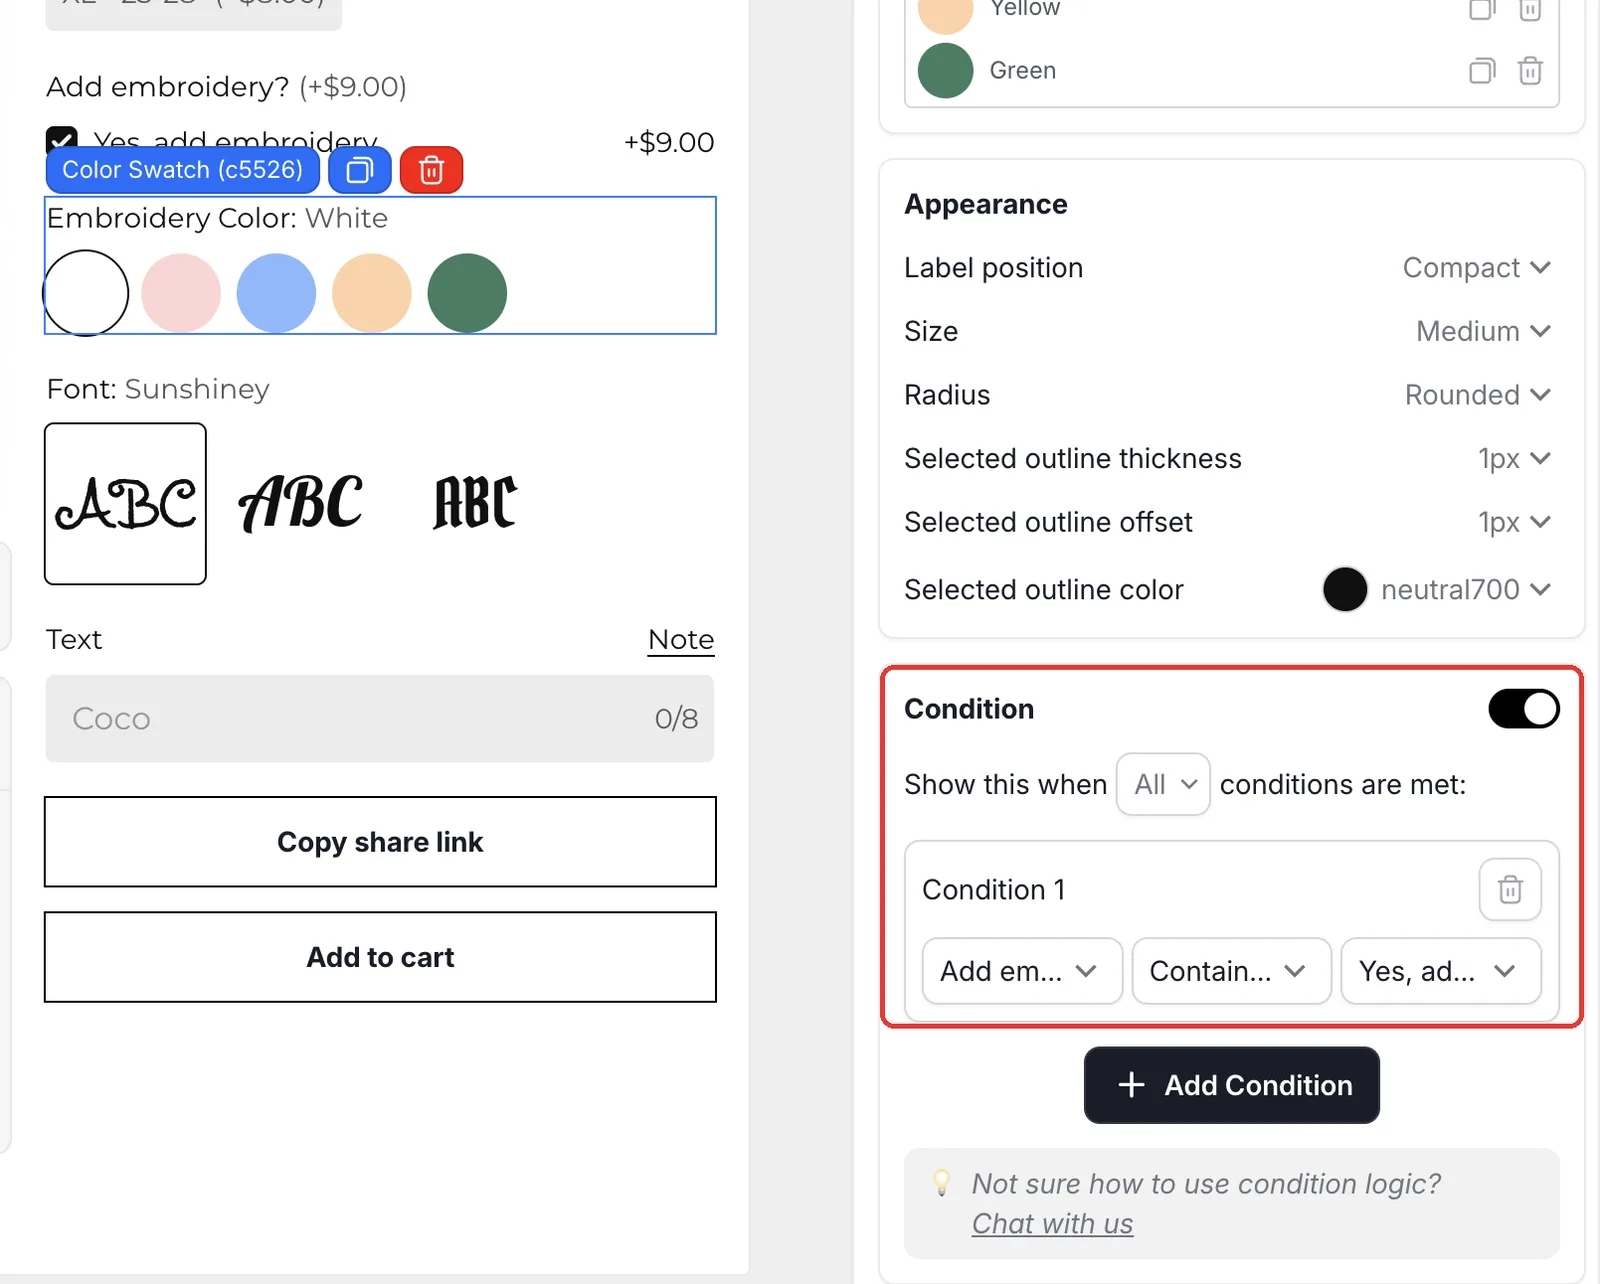
Scroll to Condition on the Color Swatch, turn it on and add one rule: Add embroidery? contains Yes, add embroidery. Repeat on the Font Swatch and the Text Input. Shoppers who skip embroidery see a two-question form, and nobody is asked for a name they will not pay for.
Step 7: Set up the name field and icon picker
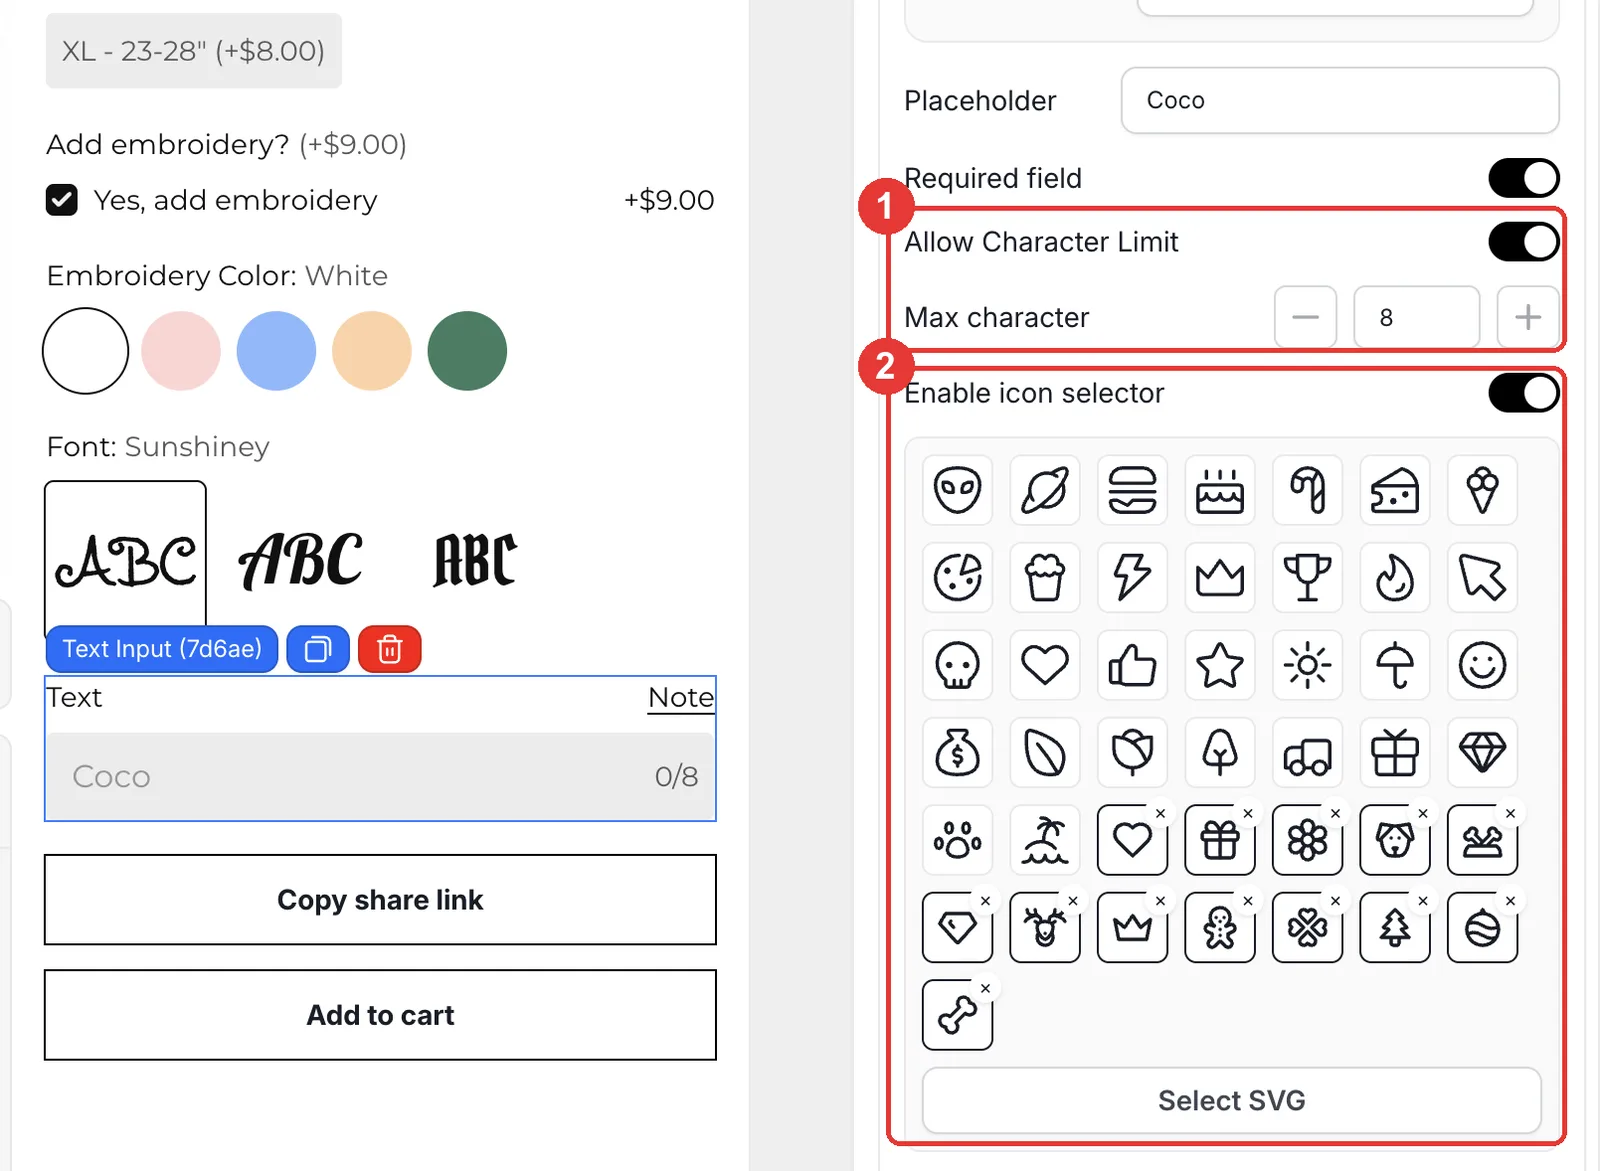
Select the Text Input. Turn on Allow Character Limit and set Max character to 8 so names fit the stitch area. Turn on Enable icon selector, keep the icons that suit pets and remove the rest, or add your own with Select SVG. Each icon counts as one character, so add a short help note such as "Icons count as 1 character".
Step 8: Link the preview to color and font
Open the Live Preview tab of the Text Input and turn on Live customizer. Set Color to Link color swatch and pick Embroidery Color, then set Font to Link font swatch and pick Font. Place the text with the X-Axis, Y-Axis and Size sliders. Finally, turn on On-canvas image controls with Allow move and Allow resize so shoppers can adjust the placement themselves.
Step 9: Test the flow and save
Tick the embroidery checkbox in the editor preview. The color, font and name fields should appear and the name should show on the bandana. Check the total price, click Save, then open the product page on your store and run through it once on desktop and once on your phone.
What happens in the cart and after the order?
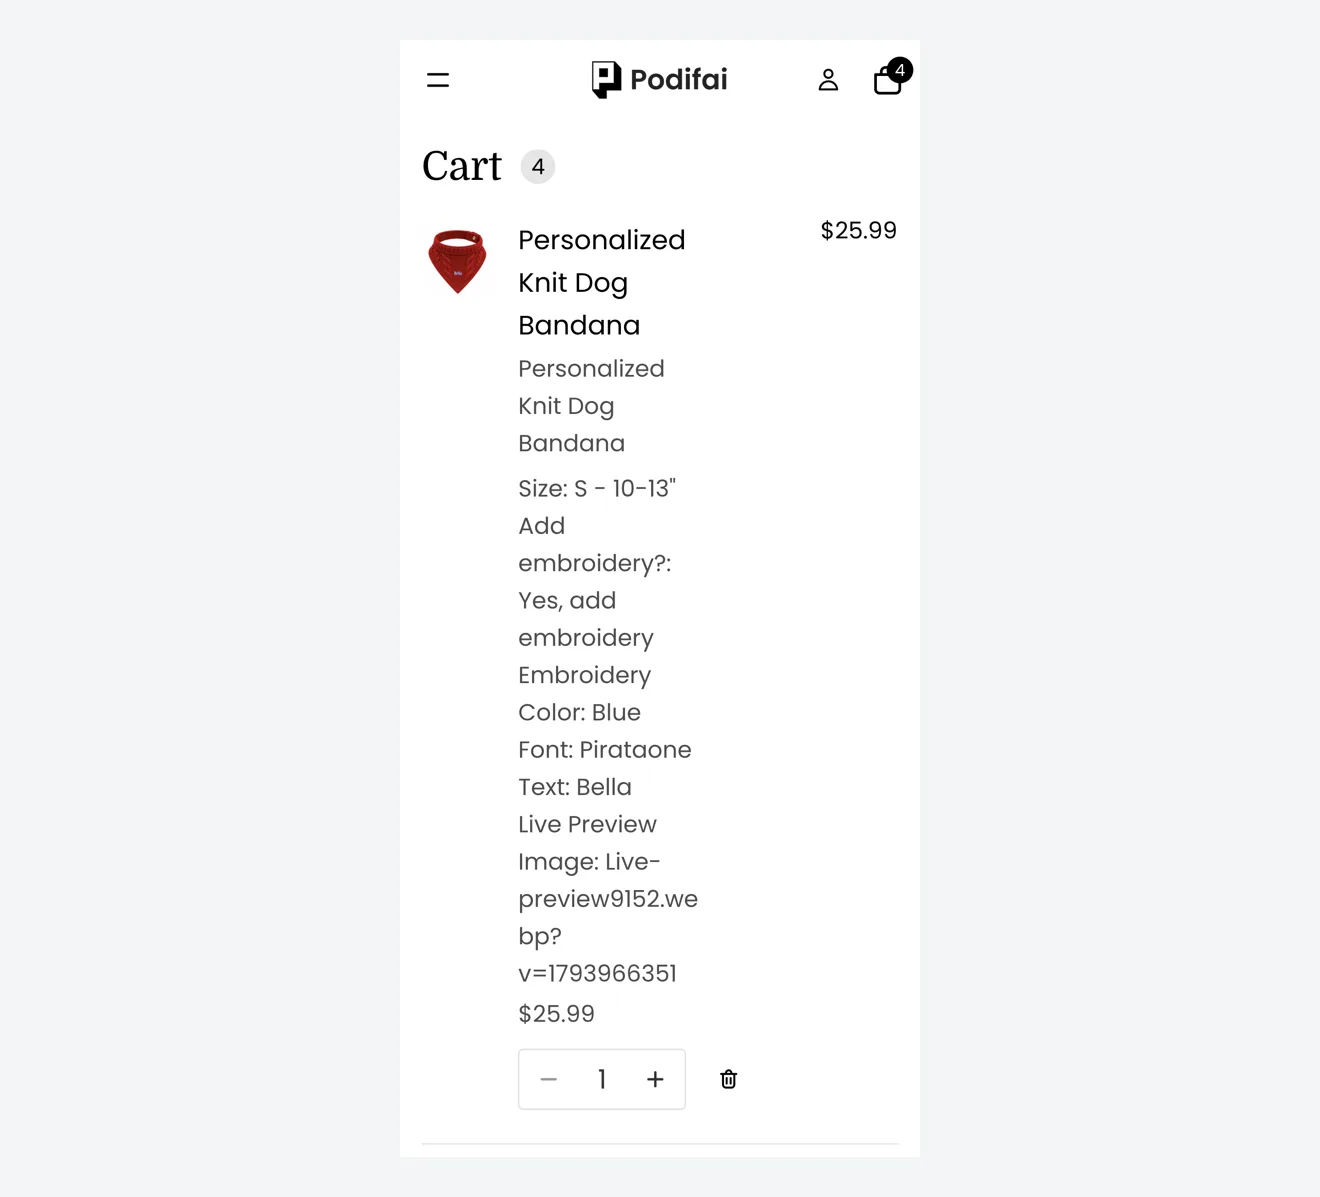
- Every selection (size, embroidery, thread color, font and name) is saved on the Shopify order line as a readable line item property, so it also appears in Shopify Admin > Orders.
- Add-on prices are applied at checkout on the same line, so you do not need extra variants just to charge for embroidery.
- A link to the final preview image is saved with the order, so your team sees exactly what the shopper approved.
- The order also appears in the Podifai Orders tab with the shopper's choices.
- With Generate print-ready files turned on, Podifai creates a transparent PNG of the name and icons for each order. For machine embroidery, your digitizer turns that artwork into a stitch file.
Troubleshooting
The customizer does not show on the product page
Check that the Podifai app embed is on in the theme you are previewing. Embeds are saved per theme, so a duplicated or newly published theme needs it switched on again. If you placed Podifai with an App Block instead, check that the block is on this product's template. See Enable App Embed.
The name preview only appears after the shopper changes something
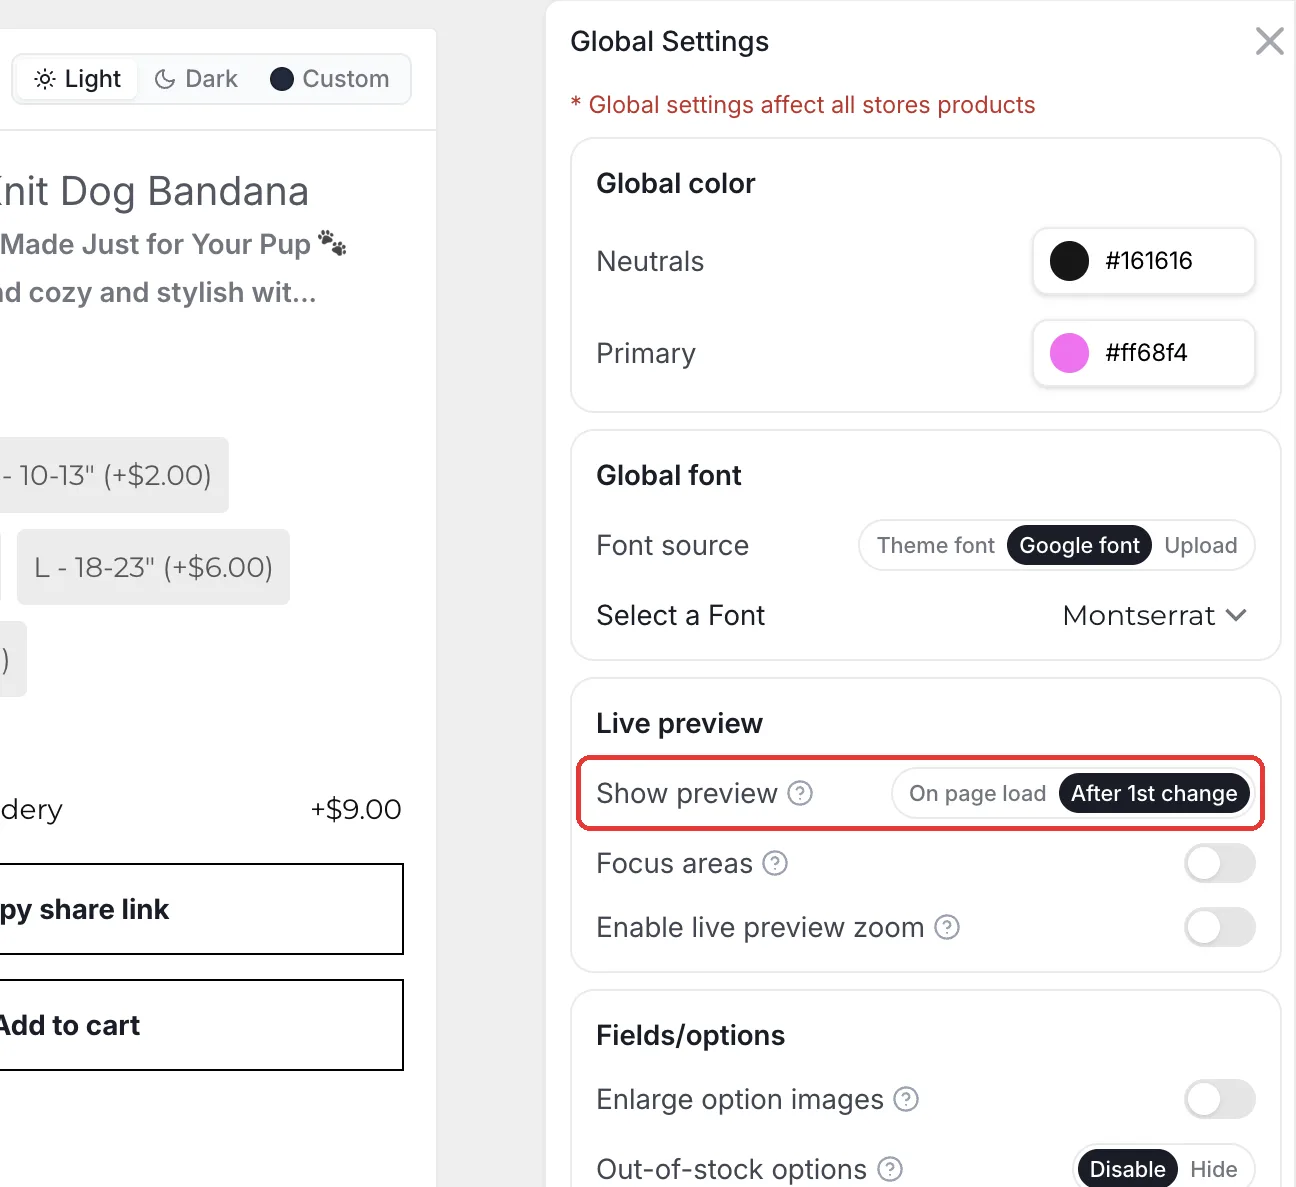
That is the shop-wide Show preview setting in Global Settings. After 1st change keeps your product photo on screen until the shopper interacts; On page load shows the live preview immediately. It applies to every product in the store.
The color, font and name fields are missing
They are hidden on purpose until "Yes, add embroidery" is ticked. If they still do not appear after ticking, open each field's Condition and check that the rule points to the embroidery checkbox and its value.
Out-of-stock sizes still show
If a size is tracked and runs out, Global Settings > Out-of-stock options decides whether it is shown as disabled or hidden. This applies to all products.
Selling tips
- Price embroidery as one flat fee. A single fee is easier to understand than charging per letter, and the character limit keeps stitch time predictable. If you run a custom embroidery business, build your digitizing and thread costs into that one price.
- Ask shoppers to check spelling. Personalized items are usually final sale. Add a short help note under the name field, and state your return policy for personalized items on the product page.
- Match swatches to the thread you stock. Every color value is a promise. Use your supplier's thread names or codes internally so production picks the right spool.
What else can you sell with this setup?
The same options work for any product with a small embroidered or printed name:
- Embroidered hats and caps
- Pet collars, harnesses and leashes
- Towels, robes and blankets
- Baby bibs and burp cloths
- Tote bags and pouches
Frequently asked questions
Yes. In Podifai, open Templates > Podifai Templates, find Personalized Dog Bandana, click Copy to Product, then Apply on your product. Then replace the preview photo with your own and check prices and colors. On a product that already has options the button reads Override and replaces them.
Yes. Add a Podifai Checkbox with one value, such as "Yes, add embroidery", and give that value a fixed price. The fee is added at checkout only when the shopper ticks the box.
Turn on Condition for each embroidery field and add the rule: Add embroidery? contains Yes, add embroidery. The fields stay hidden until the checkbox is ticked.
Yes. In the Text Input's Live Preview tab, set Color to Link color swatch and Font to Link font swatch. The name on the bandana then updates as the shopper changes either choice.
Yes. Turn on Enable icon selector in the Text Input. Shoppers tap an icon to insert it into the name, and each icon counts as one character toward the limit.
Use Shopify variants if each size has its own SKU or stock. Use a Podifai Badge Group if sizes share one SKU and you only charge more for bigger sizes. A Badge Group value can still track stock with a Custom count or by linking it to a Shopify variant.
Each choice is saved as a line item property on the Shopify order, together with a link to the final preview image. With Generate print-ready files on, you also get a transparent PNG of the name and icons.
Every feature used here is available on the Free plan, which covers up to 3 custom products. Starter ($7.9/month) covers 30 products and Growth ($15.9/month) is unlimited.
More Podifai use cases
- How to Sell Custom Photo Phone Cases on Shopify
- How to Sell Monogrammed Leather Keychains on Shopify
- How to Sell Custom Neon Signs on Shopify
- How to Build a Charm Bracelet Builder on Shopify
- How to Sell Custom Hoodies with Front, Back and Sleeve Prints on Shopify
- How to Sell Custom Pickleball Paddles on Shopify
- How to Sell Custom Wedding Invitations on Shopify
- How to Sell Personalized Pens with a Paid Engraving Add-on on Shopify
- How to Sell Custom Trucker Hats on Shopify
Related help docs
Build this customizer on your store
Free for 3 custom products. Start from the ready-made template and change what you need.
 Install Podifai free