How to Sell Custom Trucker Hats on Shopify
Set up a custom trucker hat on Shopify: cap colors, front, back or side placement with the photo turning to match, and priced embroidery, patch or print.
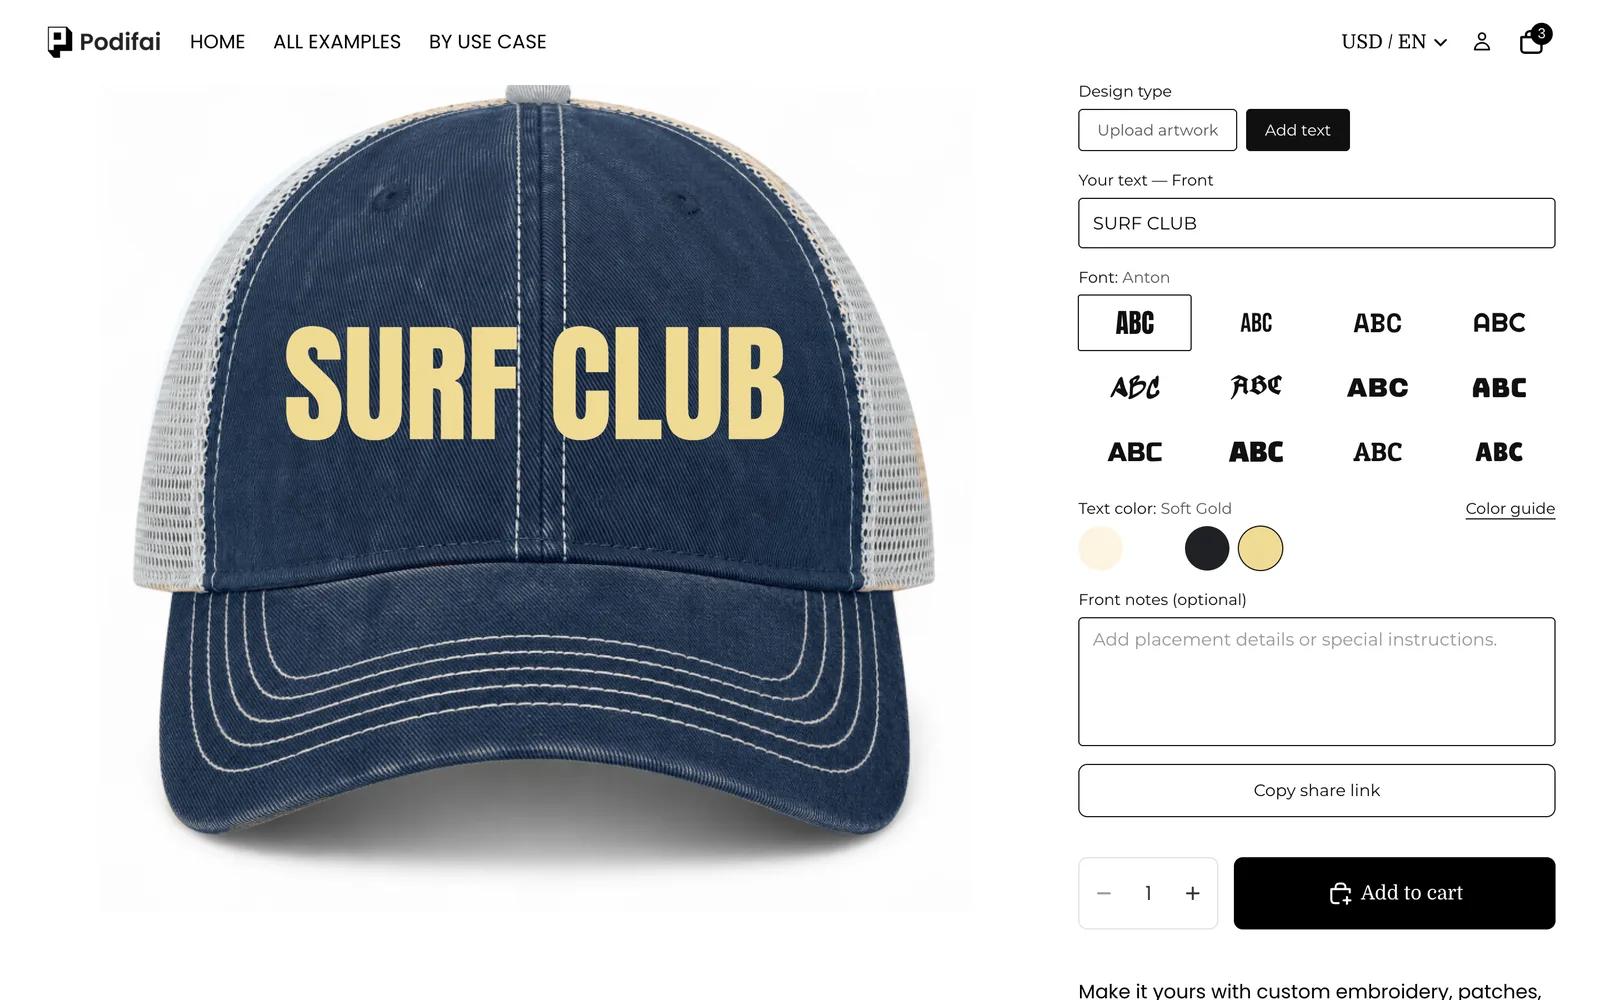
TL;DR: To sell custom trucker hats with Podifai, use image swatches whose pictures are the cap itself. The cap color swatch shows the whole hat; the design area swatch shows the cap from the front, back, left or right, so picking a side turns the preview to that angle. A paid checkbox adds a design, the placement choice sets the exact spot, and every upload is clipped to that spot's shape. Decoration methods (embroidery, 3D puff, patches, print) each carry their own price. Start from the Custom Two-Tone Trucker Hat template; every feature used here is on the Free plan.
What does the shopper see?
- Pick a cap color: Rusty & Charcoal, Navy & Silver or Forest & Tan.
- Tick Yes, add my design (+$8.00).
- Choose a design area (front, back, left or right side) and, for the front, a placement: center, left or right crown.
- Choose a decoration method, from flat embroidery to 3D puff (+$6.00), patches or print.
- Upload artwork or type text with one of 12 fonts and 4 thread colors, add notes for the production team, then add to cart.
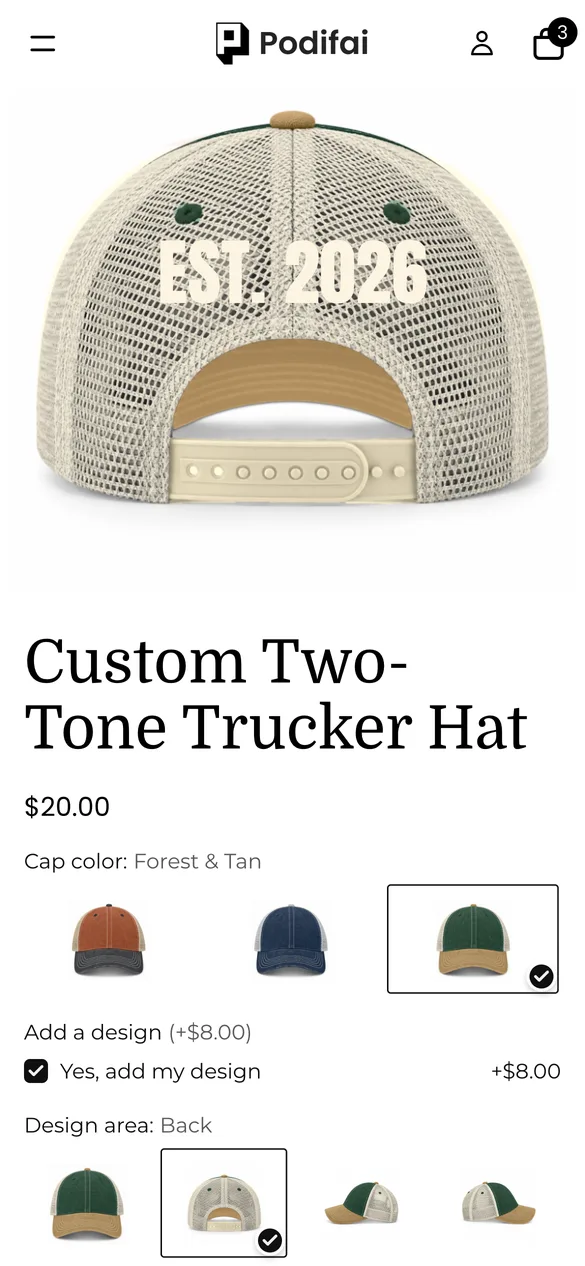
Try it yourself on the live demo product.
What do you need before you start?
1. Install Podifai and turn on the app embed
Install Podifai from the Shopify App Store, then open Online Store > Themes > Edit theme > App embeds and switch on Podifai Customizer. See Enable App Embed.
2. Photograph each cap from four sides
For every cap color you need front, back, left and right photos at the same size: 12 images for three colors. These are the design area swatch images and the preview at the same time. See Image & Asset Requirements.
3. Draw a shape for each print area
Export a transparent PNG for each placement (front crown, left and right crown, sides, back) in the shape and position of what you can embroider or print. These become the masks that keep uploads inside the area.
Should cap colors be Shopify variants or Podifai options?
The demo product has a single Shopify variant and does everything in Podifai, which lets each color have its own set of angle photos:
| Your situation | Use | What it gives you |
|---|---|---|
| Blank caps are bought in as needed | Podifai Image Swatch (as in the demo) | One product; each color brings its own angle photos |
| You stock caps per color | Shopify variants plus Podifai for the design | Stock per color; the front view follows the variant image |
| Decoration methods with different costs | Podifai Checkbox with a price per method | Embroidery, puff, patches and print priced separately |
If colors are Shopify variants, you can still link each Podifai color value to its variant with Track inventory.
What is the fastest way to set this up?
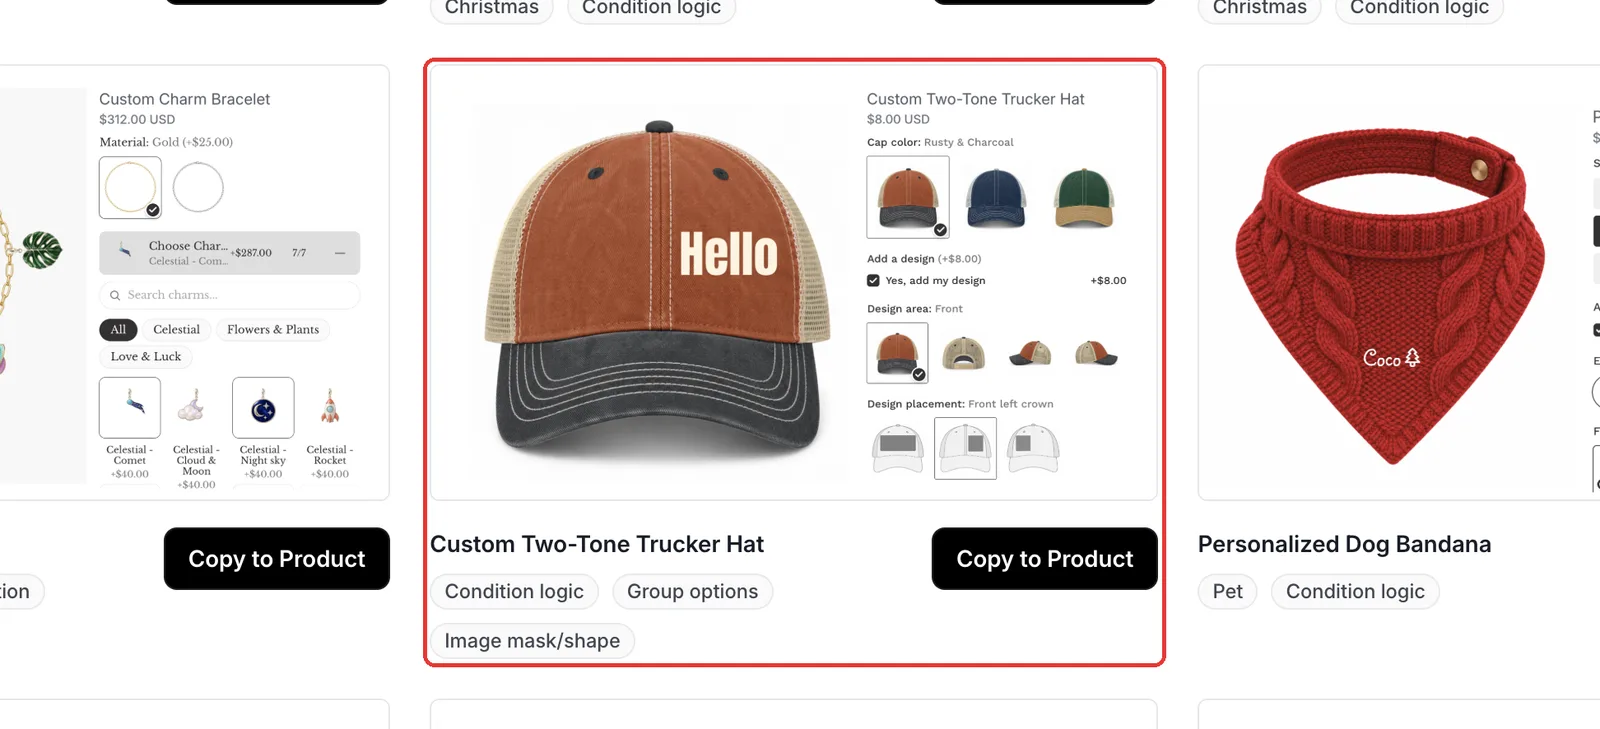
Podifai ships a ready-made Custom Two-Tone Trucker Hat template with the same 34 options, including every placement, mask and decoration method. Open Templates > Podifai Templates, find it, click Copy to Product, choose your cap and click Apply (or Override, which replaces existing Podifai options). Then replace the cap photos and masks with yours, adjust the decoration prices and save.
Which options do you need?
The whole customizer is 7 Podifai options on one Shopify product:
| Option | Podifai type | Key settings | Price |
|---|---|---|---|
| Cap color | Image Swatch | 3 colors, full-size cap photo | No charge |
| Add a design | Checkbox | One value, optional | +$8.00 |
| Design area (one per color) | Image Swatch | Front, Back, Left, Right; each image is that side of the cap | No charge |
| Design placement (one per area) | Image Swatch | Front crown, front left or right crown, back, left, right | No charge |
| Decoration method | Checkbox | Grouped: Embroidery, Patch, Print; card style | +$0 to +$8.00 |
| Upload artwork / Your text (one per placement) | Image Upload, Text Input | Masked to the placement; linked font and color | Included |
| Notes (one per area) | Text Area | Optional instructions for production | No charge |
How to set it up in Podifai, step by step
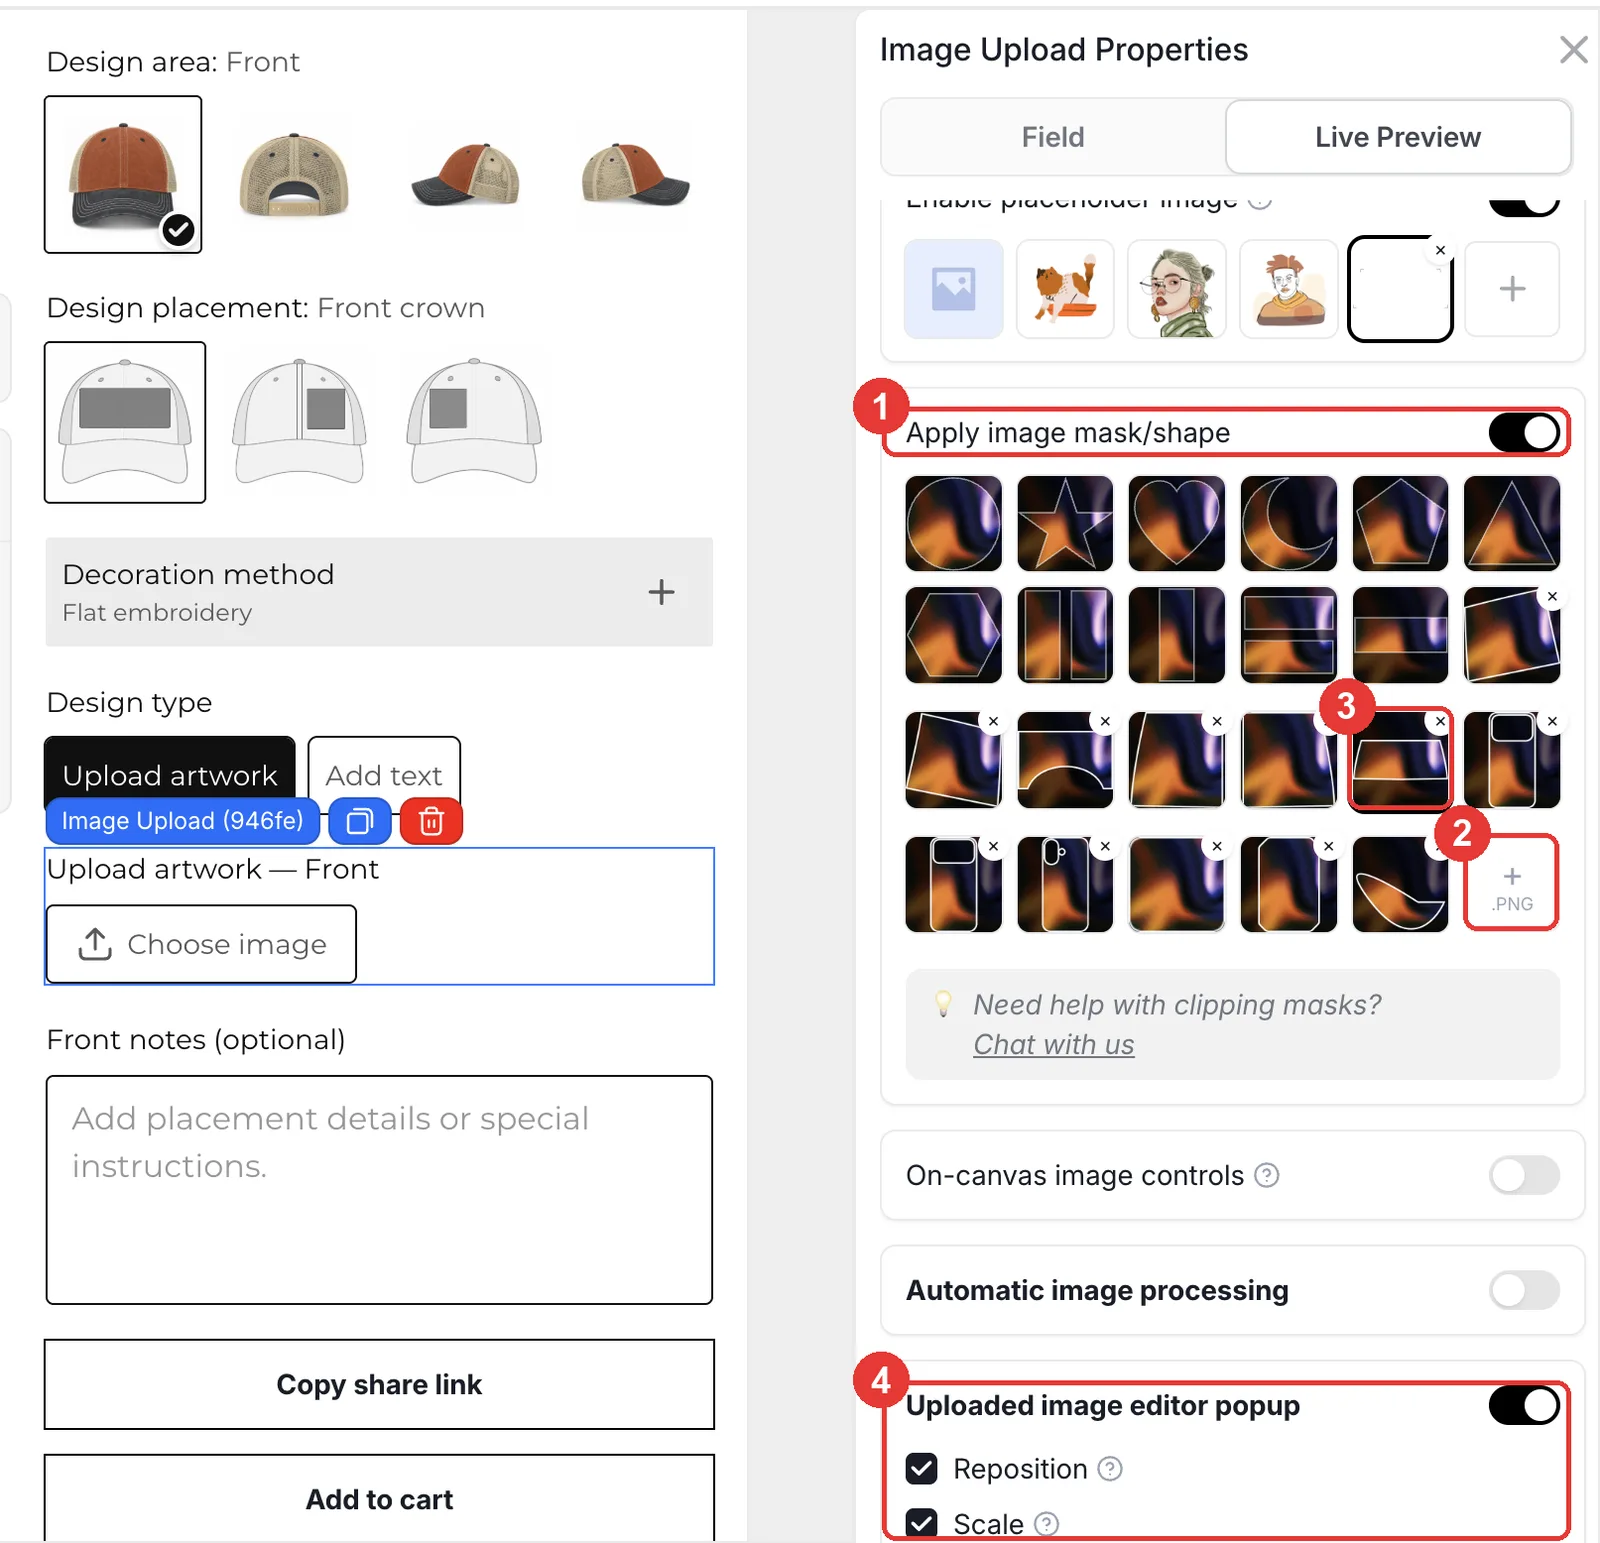
These steps match the live demo product. Red boxes mark what to change; numbers follow the order in the step text.
Step 1: Add the option types
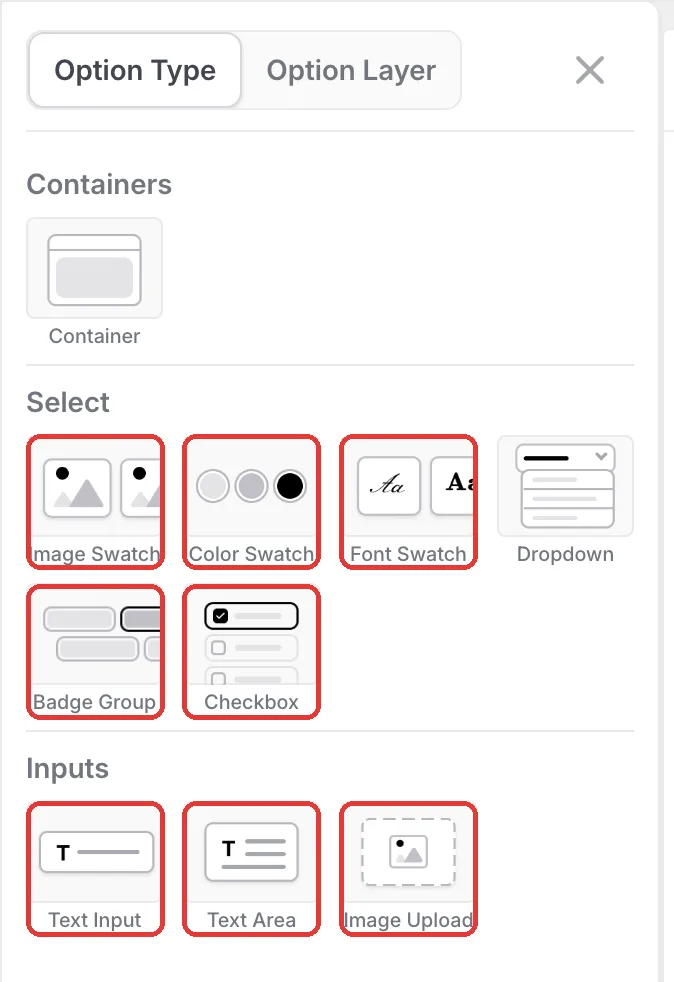
Open the cap in the Podifai editor and click the menu icon on the left. You will use Image Swatches (color, area, placement), Checkboxes (add a design, decoration method), Badge Groups (design type and patch details), Image Uploads and Text Inputs per placement, a Font Swatch, a Color Swatch and optional Text Areas for notes.
Step 2: Build the choices in shopping order
Add Cap color first, with one photo per color and Live customizer on at 100%. Then a Checkbox Add a design with one value at +$8.00. Then Design area and Design placement, each shown only when the step before it is chosen. Shoppers who skip the design see only the color.
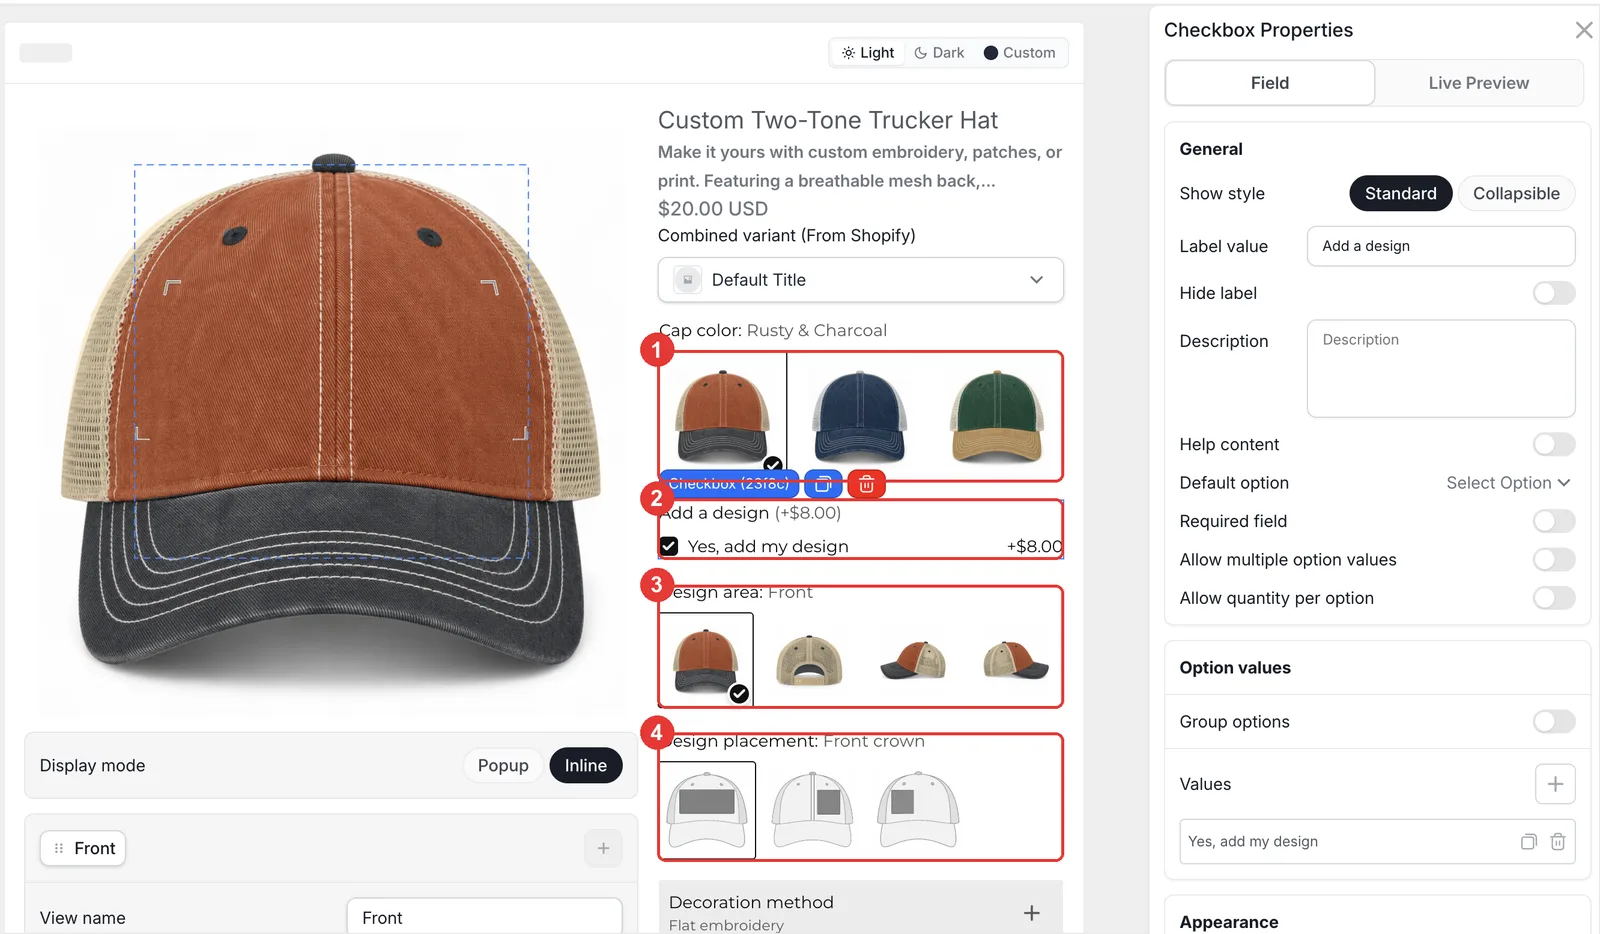
Step 3: Turn the cap when a side is picked
In Design area, give each value a photo of the cap from that side as its Option image and leave Preview image on Same as thumbnail, with Live customizer at 100%. Picking Back now swaps the preview to the back of the cap. Create one Design area swatch per cap color, each with the condition Cap color contains that color and Add a design contains Yes.
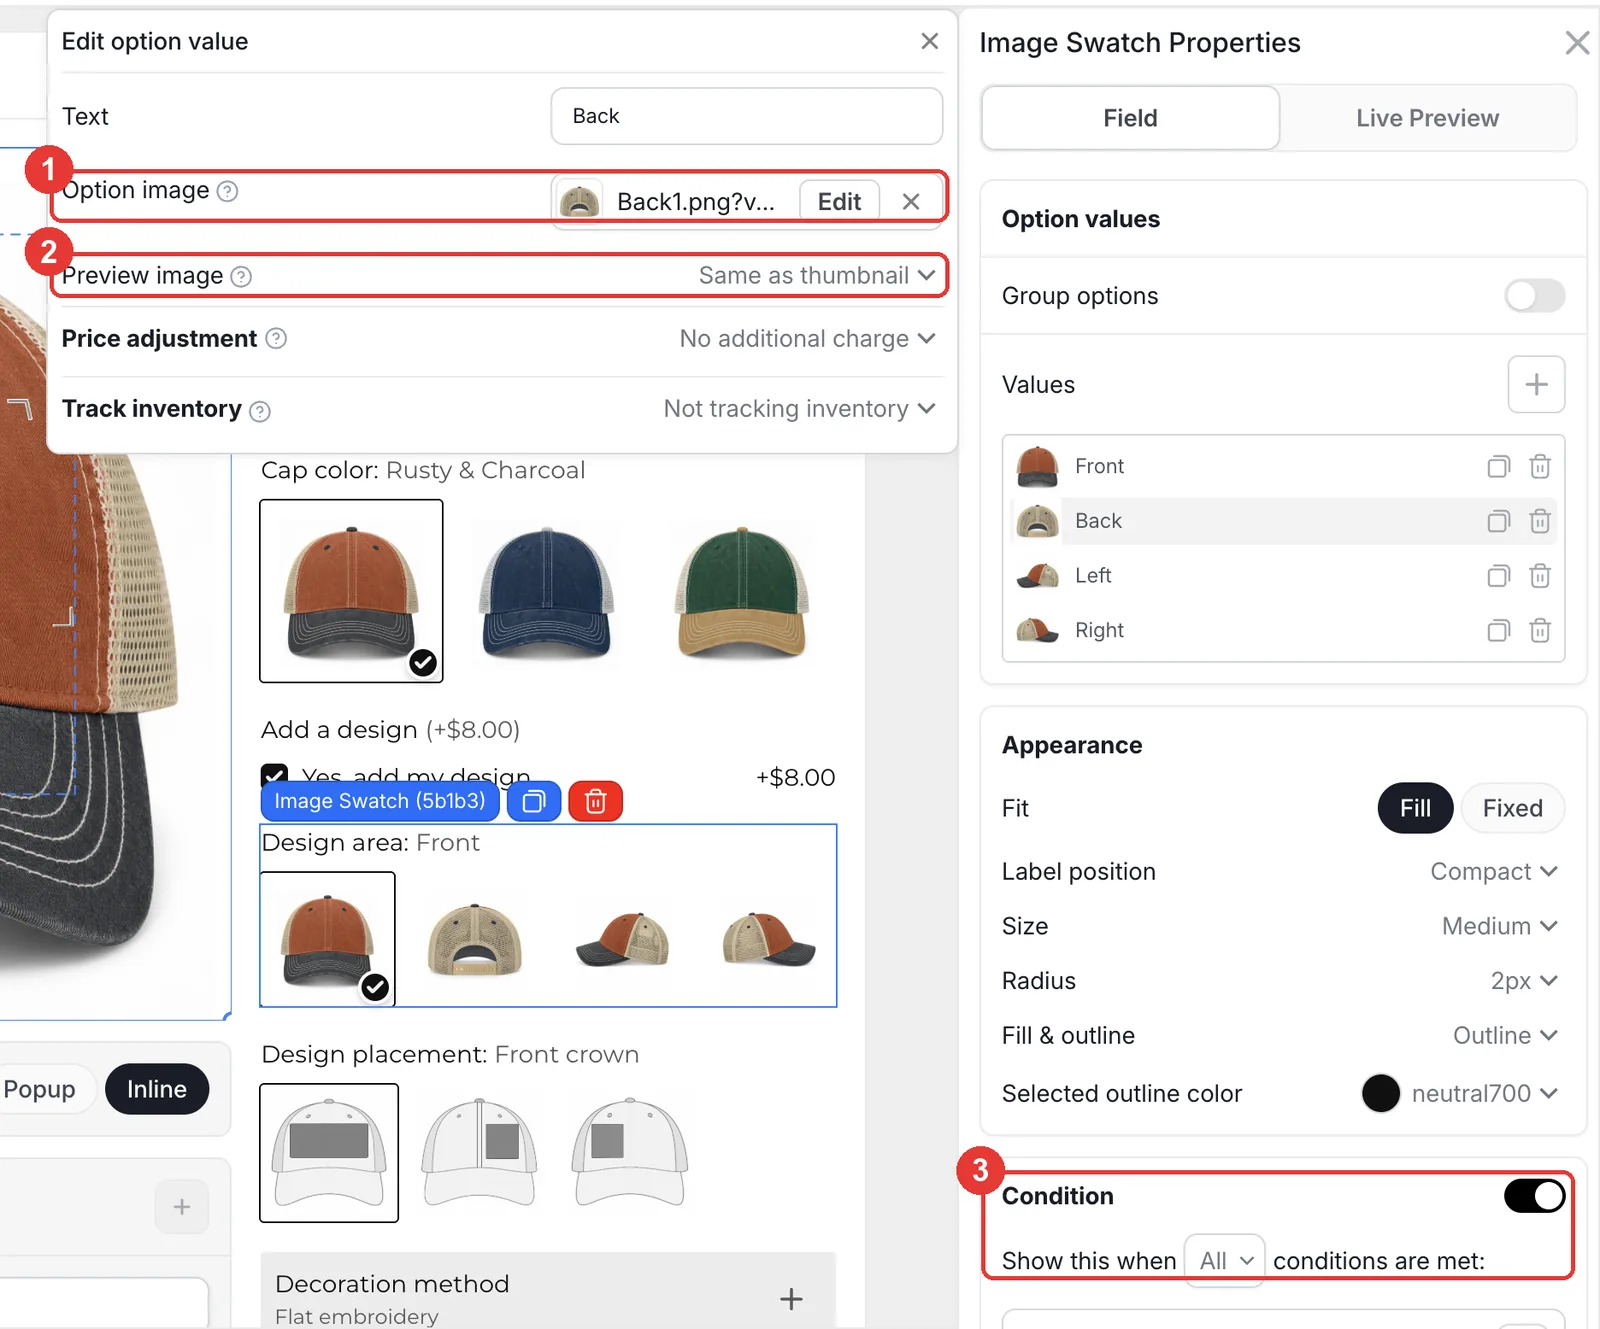
Step 4: Price each decoration method
Add a Checkbox called Decoration method. Turn on Group options with Embroidery, Patch and Print, and give each method a fixed price (3D puff +$6.00, 3D puff chain stitch +$8.00, PVC patch +$4.00 and so on). Set Appearance > Style to Card. Follow-up questions, such as genuine or faux leather, are Badge Groups with a condition on the method.
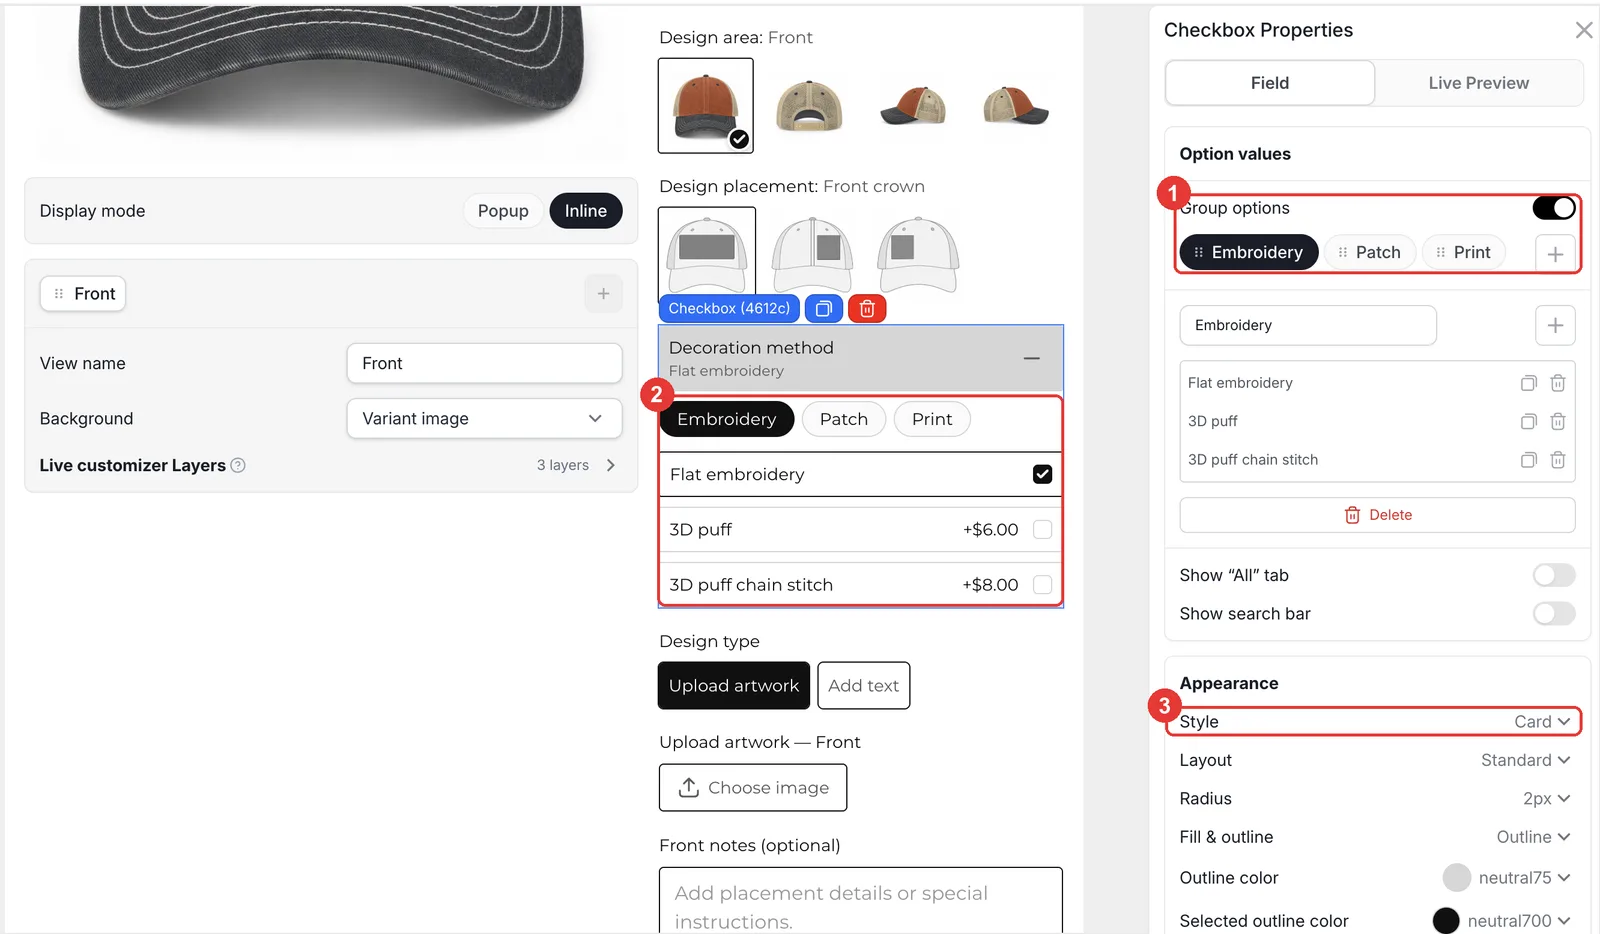
Step 5: Keep uploads inside each area
Create one Image Upload per placement, each shown for its placement. In its Live Preview tab, turn on Apply image mask/shape, click + PNG to upload that placement's shape, and select it. Keep Uploaded image editor popup on with Reposition and Scale, so shoppers can fit their logo. Add a matching Text Input per placement for text designs. Click Save and test each side.
- A Color guide help link under the thread color helps shoppers pick a readable color on dark caps.
What happens in the cart and after the order?
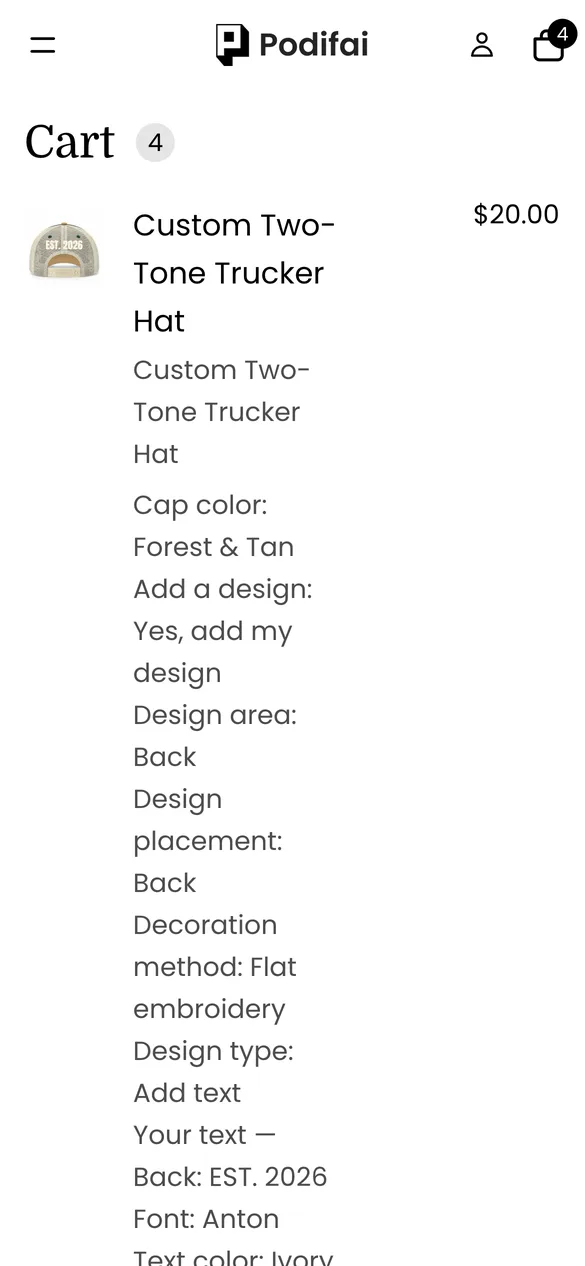
- Every choice, from cap color to decoration method and notes, is saved on the order line, which reads like a work order.
- Design and decoration prices are added to the same line at checkout.
- Uploaded logos are saved at their original resolution, and a preview link shows the placement.
- With Generate print-ready files on, Podifai creates a transparent PNG of the design for your digitizer or printer.
Troubleshooting
The preview does not turn when a side is picked
Check that the Design area swatch has Live customizer on at 100% width and height, and that its values use full cap photos. See Image Swatch.
The wrong cap color shows after choosing a side
Each cap color needs its own Design area swatch with a condition on Cap color. Check that each one points to the right color. See Conditional Logic.
Uploads spill outside the print area
Turn on Apply image mask/shape on that placement's upload and select its PNG shape. See Image masks.
Selling tips
- Explain decoration methods with pictures. Most shoppers do not know 3D puff from flat embroidery. Card-style values with a small photo per method sell the upgrade.
- Ask for vector logos. Embroidery digitizing works best from vector or high-resolution files. Say so in the upload's help text.
- Offer team minimums. Custom caps sell well to teams and businesses. Mention quantity pricing in the description.
What else can you sell with this setup?
The same angle-swapping swatches, masks and method pricing work for other multi-side products:
- Baseball caps, dad hats and beanies
- Sneakers with left and right designs
- Backpacks and duffel bags
- Polo shirts with chest and sleeve logos
- Helmets and sports gear
Frequently asked questions
Yes. A Design area swatch lets them pick a side, the preview turns to that side, and a placement choice sets the exact spot. Each placement has its own upload clipped to its shape.
Put the methods in a Checkbox, group them, and give each value its own fixed price. Follow-up choices like leather type are Badge Groups shown with a condition.
Yes. Open Templates > Podifai Templates, find Custom Two-Tone Trucker Hat, click Copy to Product and Apply it, then replace the cap photos and masks.
Yes. Turn on Apply image mask/shape on each upload and upload a PNG of that area's shape with + PNG.
Yes. Add an optional Text Area per design area, such as Front notes, shown only when that area is chosen.
Image swatches, masks, grouped values, conditions and pricing are on the Free plan, which covers up to 3 custom products. Starter ($7.9/month) covers 30 products and Growth ($15.9/month) is unlimited.
More Podifai use cases
- How to Sell Personalized Embroidered Dog Bandanas on Shopify
- How to Sell Custom Photo Phone Cases on Shopify
- How to Sell Monogrammed Leather Keychains on Shopify
- How to Sell Custom Neon Signs on Shopify
- How to Build a Charm Bracelet Builder on Shopify
- How to Sell Custom Hoodies with Front, Back and Sleeve Prints on Shopify
- How to Sell Custom Pickleball Paddles on Shopify
- How to Sell Custom Wedding Invitations on Shopify
- How to Sell Personalized Pens with a Paid Engraving Add-on on Shopify
Related help docs
Build this customizer on your store
Free for 3 custom products. Start from the ready-made template and change what you need.
 Install Podifai free