
Image Masks
Apply a built-in mask or custom PNG mask to supported preview images. Position the upload inside the shape and check the storefront result.
Last updated: 2026-11-06
Image Masks let merchants display image-based Live Preview content inside a specific shape. Use one of Podifai's built-in masks or upload a custom PNG mask for Image Swatch, image-enabled Dropdown, image-enabled Badge Group, image-enabled Checkbox, or Image Upload preview content.
Supported Option Types
Masks are available for options whose Live Preview result contains an image:
- Image Swatch
- Image-enabled Dropdown
- Image-enabled Badge Group
- Image-enabled Checkbox
- Image Upload
Choose a Mask
- Enable Live Preview for the image-based option.
- Select its image preview layer in the editor.
- Turn on Apply image mask/shape in the option's Live Preview settings.
- Choose one of Podifai's built-in masks or upload a custom PNG mask.
- Position and scale the preview content so it fits the visible masked area.
- Save and test every affected option value on desktop and mobile.
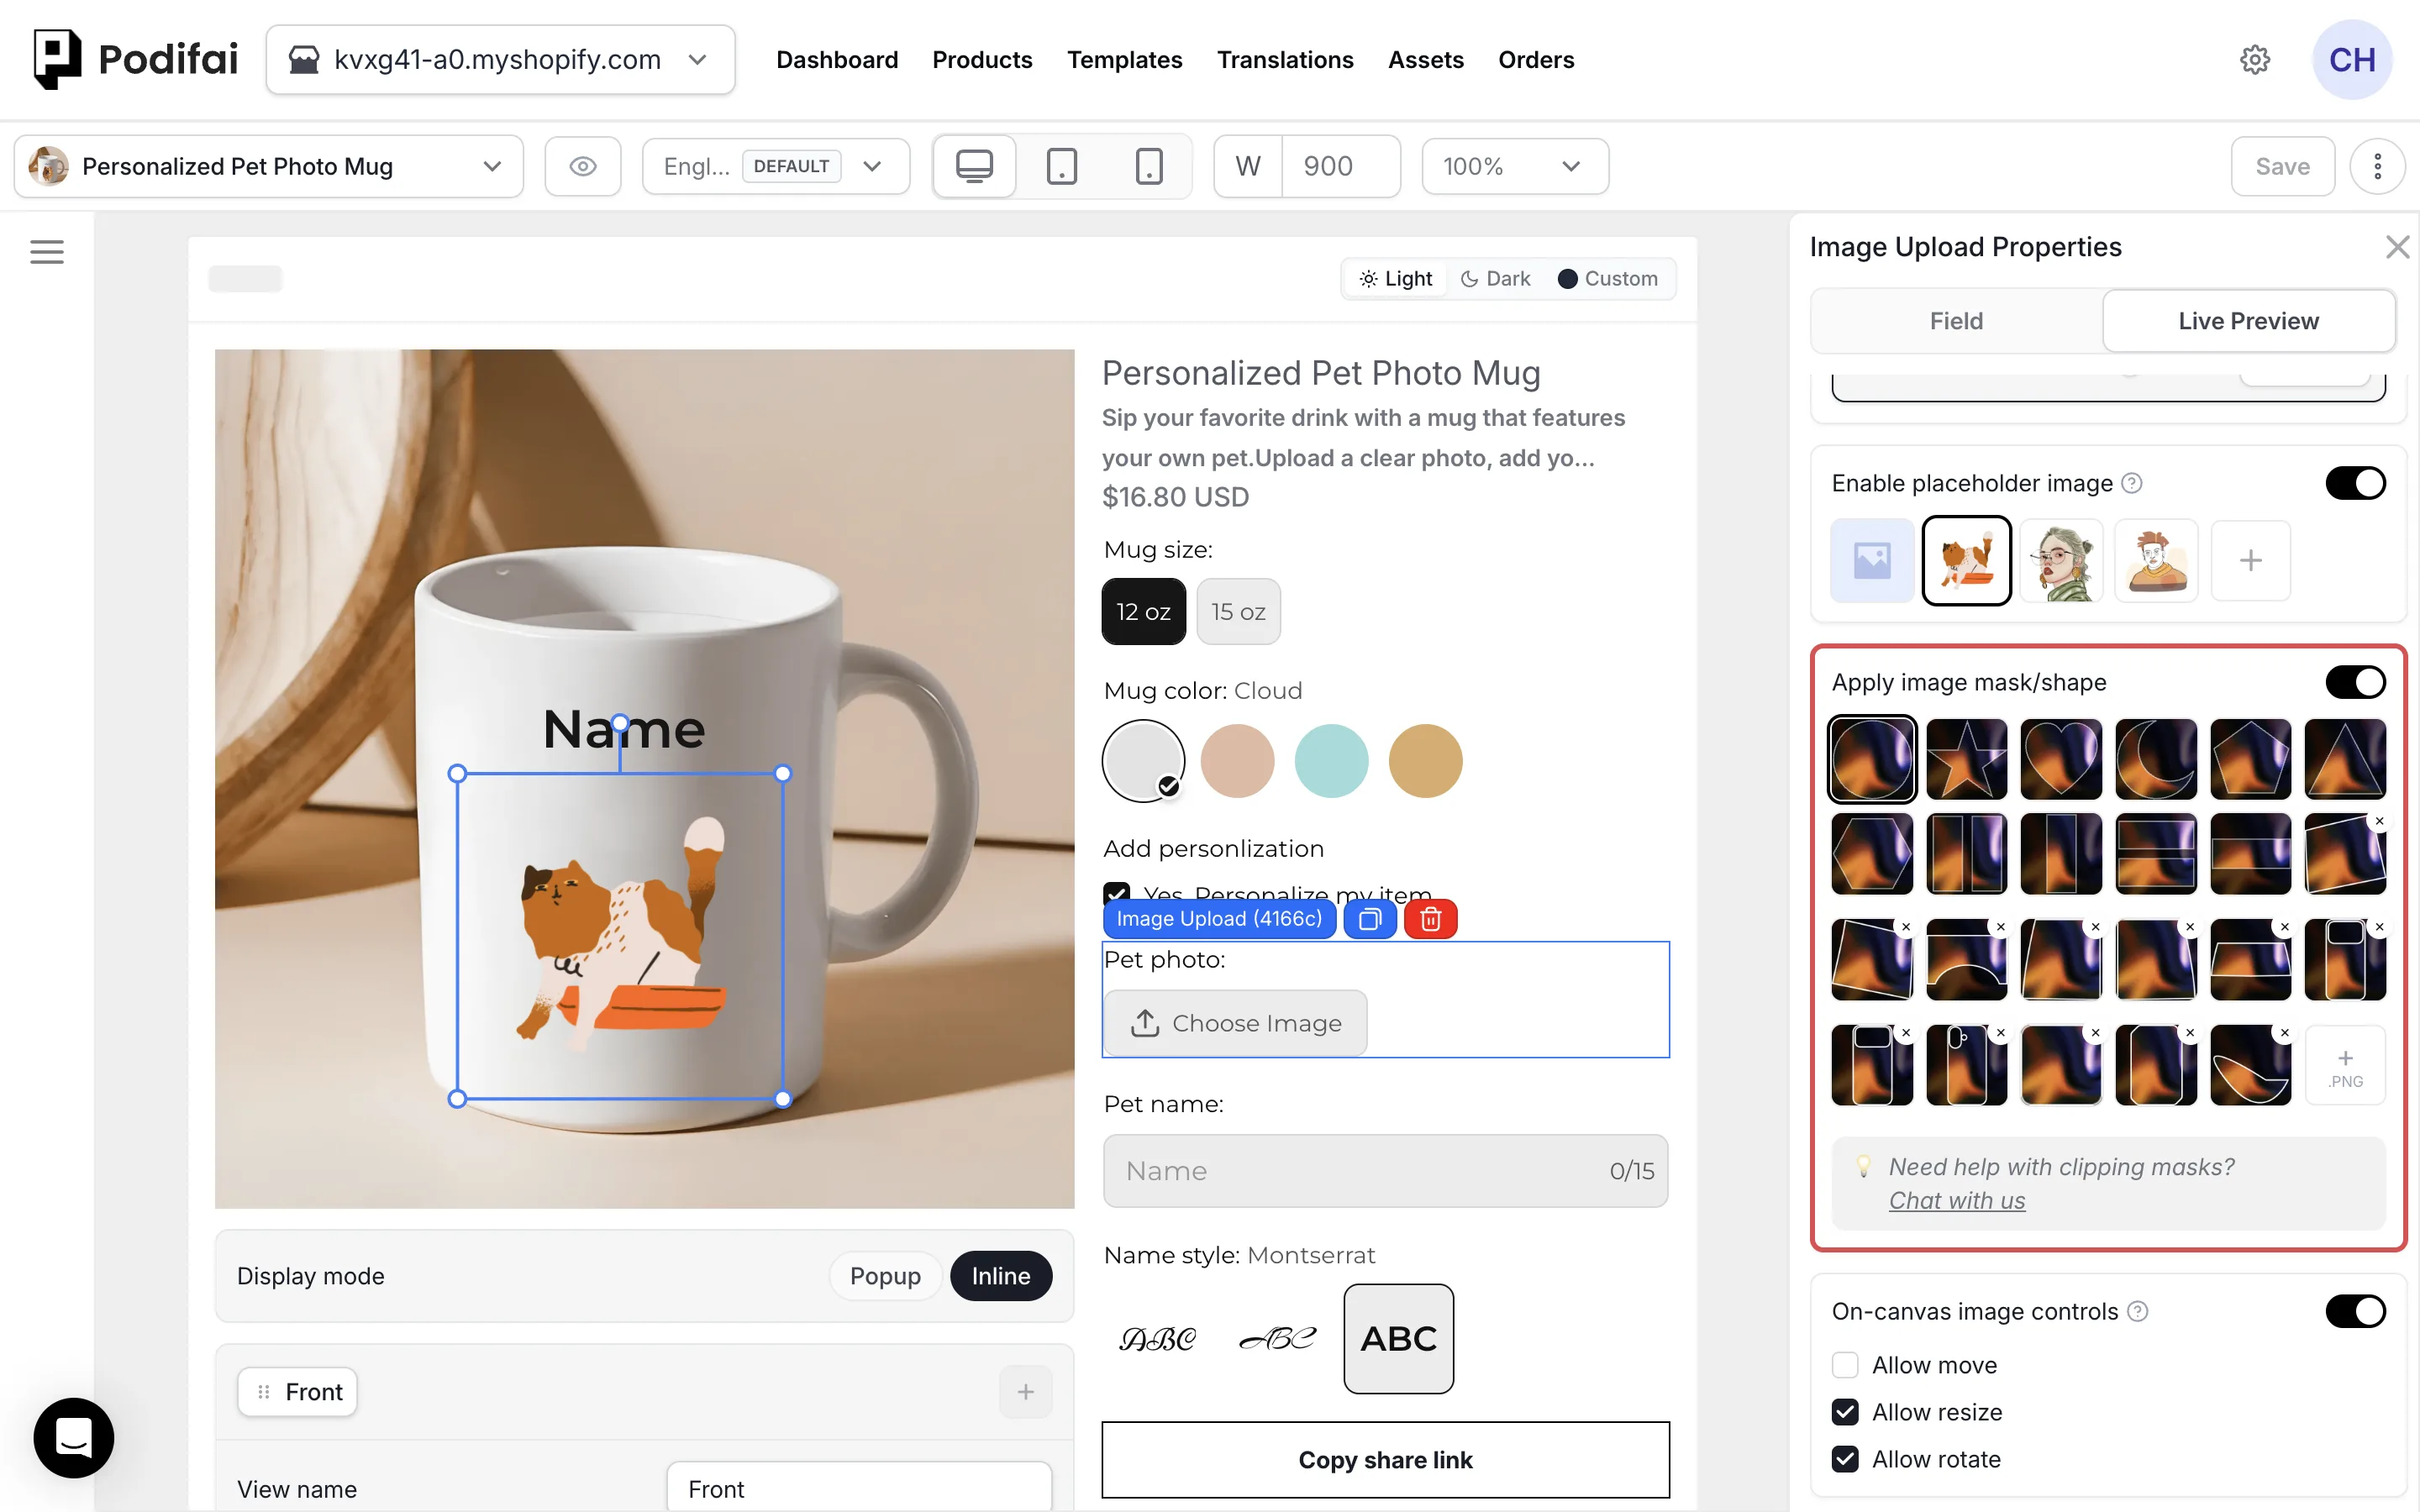
The screenshot selects Image Upload. Image Swatch and image-enabled Badge Group and Dropdown also support image masks for their preview images. Choose the shape for the image layer; a shopper-uploaded photo is collected through Image Upload.
Upload a Custom PNG Mask
Use a custom PNG mask when the visible area needs to match a product-specific outline. Prepare the PNG at the same aspect ratio as the intended preview area, and test it with both portrait and landscape uploads.
- Turn on Apply image mask/shape in the option's Live Preview settings.
- Click the + PNG tile and choose your PNG file.
- Select the new mask and check the result in the preview.
Masks with Image Upload
Image Upload can use a mask together with the Storefront Image Editor. The merchant chooses the mask and enables the shopper tools that are appropriate for the product. Shoppers can then reposition, scale, rotate, adjust opacity, apply grayscale, or zoom the preview according to those settings while the uploaded image remains presented inside the masked area.
Example: A Photo Inside a Pendant Outline
For a photo pendant, use the product image as the background and an Image Upload layer for the shopper's photo. Apply a mask to the upload layer so the photo appears inside the intended pendant shape. The product background and the masked photo serve different roles in the preview.
- Add an Image Upload option with a clear label, such as Pendant photo, and enable Live Preview for it.
- Position and size the upload layer over the pendant's photo area.
- Choose a built-in mask that matches the intended shape, or upload a custom PNG mask for the outline.
- Enable Uploaded image editor popup and allow Reposition and Scale if shoppers should adjust how their photo fits.
- Save, then upload portrait and landscape photos on the storefront. Move and scale each photo to check the fit.
Add help text asking shoppers to keep the subject inside the visible area. Check a face close to the edge as well as one centered in the photo, so the starting layout and shopper controls work for both.
Testing Checklist
- Test portrait, landscape, square, and transparent images.
- Check that important artwork stays inside the visible mask area.
- Verify the mask on every product view where the layer appears.
- Test the result in both Inline and Popup modes on desktop and mobile.
Check an Unexpected Mask Result
- The whole photo is visible: Confirm that the mask is assigned to the intended image layer and that Live Preview is enabled for that option.
- The subject is cut off: Check the image position and scale within the masked area. If shoppers need to adjust the fit, review the enabled Storefront Image Editor tools.
- The shape is wrong: Review the selected mask or custom PNG and its aspect ratio, then test it with a simple image before trying detailed artwork.
- One product side looks wrong: Check the affected view's background and layer placement separately.
For asset preparation, see Image Mask Assets. For separate product sides, see Multiple Views.
FAQ
Does a mask limit where shoppers can move an image or text?
No. A mask only crops what is visible; it does not restrict movement, and it does not control where text can be placed. Masks and layer positions are independent. To keep an uploaded image inside a fixed print area, set the Image Upload area to the print area's ratio with a rectangle mask, enable Reposition and Scale in the Uploaded image editor popup, and turn off Allow move and Allow resize in On-canvas image controls. Shoppers then adjust the photo inside the fixed area instead of moving the layer. For text, Fixed text width with automatic resizing keeps longer text within a set width.
Which Podifai options support image masks?
Masks can be applied to image-based Live Preview content from Image Swatch, image-enabled Dropdown, image-enabled Badge Group, image-enabled Checkbox, and Image Upload.
Can I upload my own mask?
Yes. Choose a built-in mask or upload a custom PNG mask when the preview needs a product-specific shape.
Is an image mask the same as shopper-controlled cropping?
No. The merchant configures the mask that defines the visible preview shape. For Image Upload, shoppers can use the enabled Storefront Image Editor tools to reposition or scale their image within that presentation.