
Image Upload
Accept customer images up to 8 MB. Configure required uploads, optional Live Preview, image editing, charges, and order file access.
Last updated: 2026-11-06
Image Upload lets shoppers attach their own artwork, logo, photo, or design file to a custom product order, with optional Live Preview, image masks, and merchant-configured Storefront Image Editor tools.
Overview
Image Upload lets customers upload their own images for printing, engraving, or other customization. Uploaded files are saved as links with the order. See Customer Uploads and Final Preview Images.
Local Images, Links, Audio, and Video
Customers upload local PNG, JPG, JPEG, WebP, or SVG image files up to 8 MB. Pasting an image URL to upload it is not supported. Audio and video uploads are not supported, including as attachments without Live Preview. Other file types such as PDF, AI, EPS, PSD, HEIC, GIF, and TIFF are not accepted either. For print, ask shoppers for high-resolution images.
Live Preview
One Image Upload field drives one preview layer. To let shoppers add a photo to several areas or views (for example front and back), create a separate Image Upload field for each.
Image Upload supports Live Preview. When enabled, the uploaded image appears on the product image in real time. Configure the preview layer position, size, and rotation in the editor.
Turn Live Preview on or off for Image Upload
What this shows
- Add an Image Upload option.
- Enable Live Preview when the uploaded file should appear on the product image.
- Place the upload preview layer in the correct product area.
Move the uploaded image layer
What this shows
- Select the uploaded image layer.
- Drag it into the correct position.
- Check placement on desktop and mobile.
Resize the uploaded image layer
What this shows
- Select the uploaded image layer.
- Resize it to fit the printable or preview area.
- Keep enough margin for real production tolerances.
Rotate the uploaded image layer
Example: Upload a Logo to a Tumbler
Try the tumbler demo: choose Image & Text, then Upload Image. Upload a logo, apply any enabled image edits, and enter a short brand name in the text field.
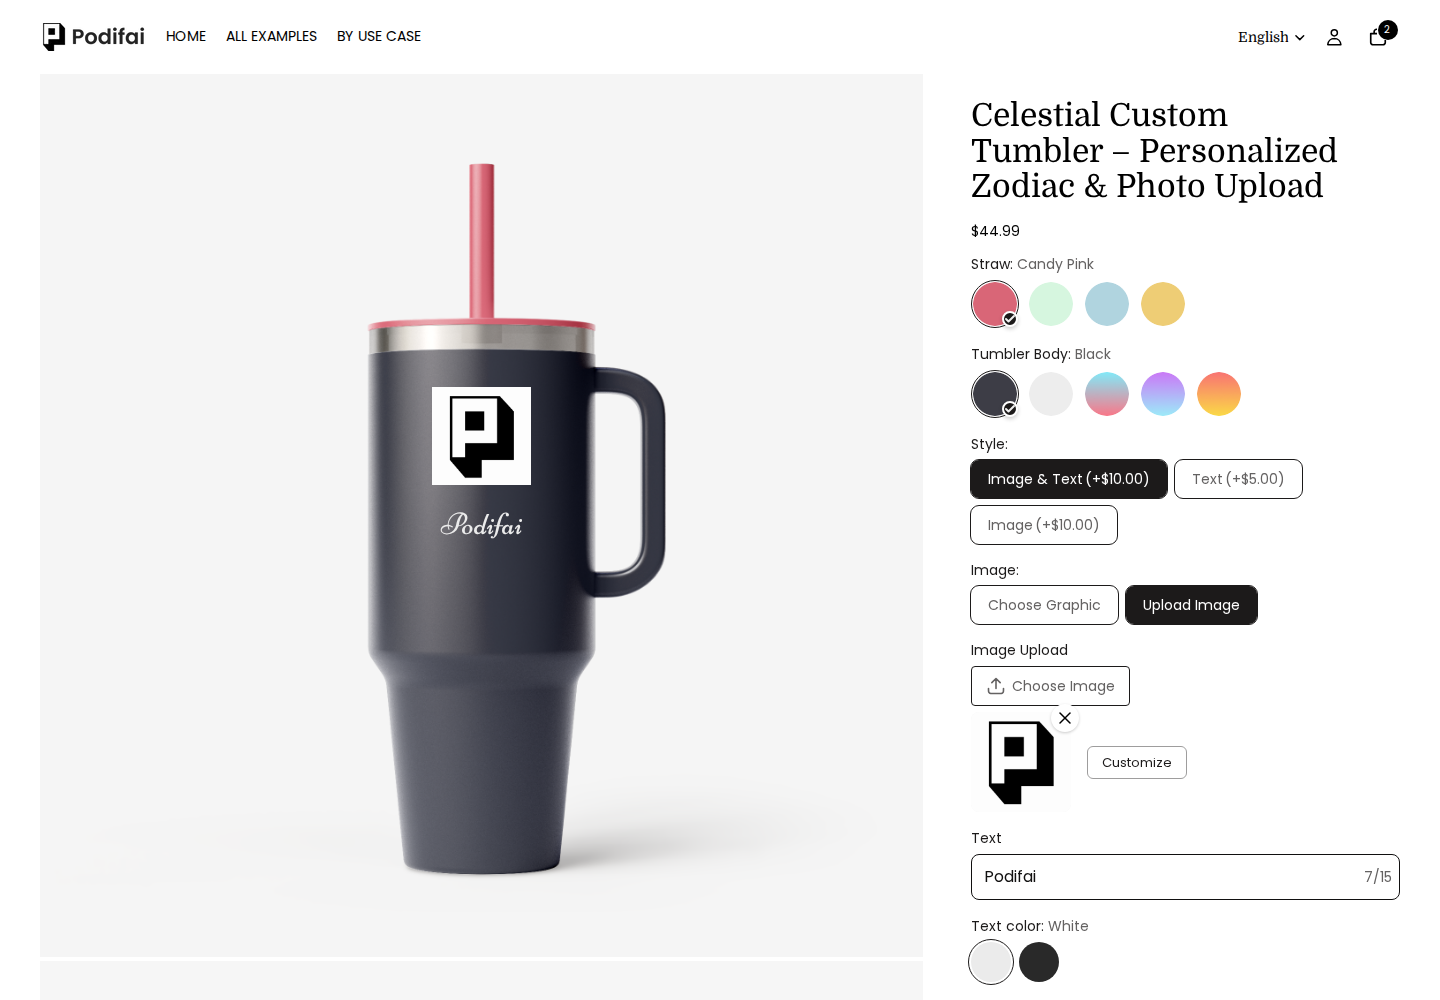
Check that the preview shows the intended file, the logo fits the product area, and the uploaded thumbnail matches it. A JPG can retain a visible background; use a transparent PNG when your design needs transparency. Background removal is a separate processing setting.
This Demo text field is configured for 15 characters, and the displayed price reflects this product's selected options. These are example settings, not a shared limit or price for every customizer.
Storefront Image Editor
Select the Image Upload option and open Image Upload Properties → Live Preview. Enable Live customizer, turn on Uploaded image editor popup, and choose which controls shoppers can use after uploading an image:
- Reposition
- Scale
- Rotate
- Adjust opacity
- Grayscale
- Remove background
- Zoom preview
Zoom preview helps the shopper inspect the product preview and does not change the final design. See the Storefront Image Editor guide for setup and testing recommendations.
To let shoppers move, resize, or rotate the image layer directly on the product preview, configure On-canvas image controlsin the same Live Preview tab. Its Allow move, Allow resize, and Allow rotate permissions are separate from the tools inside the uploaded image editor popup.
Image Masks
Apply one of Podifai's built-in masks or upload a custom PNG mask when the uploaded image should appear inside a specific shape. The merchant sets the mask, while the shopper uses any enabled Storefront Image Editor controls to adjust their image within the masked presentation. See Image Masks.
Automatic Image Processing
Enable Automatic image processing when an effect should apply as soon as the shopper uploads a file. Choose Convert to grayscale on upload, Remove background on upload, or both. The processed result is used in Live Preview and in the production file attached to the customization.
Configure automatic processing separately from Uploaded image editor popup. Automatic processing applies the chosen upload effects; the storefront editor supplies the adjustment tools you enable for the shopper. Test both together if you use both.
Background removal quality (Standard or Premium) is a store-wide choice under Global Settings → Other → AI background removal. See Background removal.
General Settings
- Label value — The field label (e.g. "Upload your logo")
- Required field — Whether an image must be uploaded
- Help content — Hover or popup upload guidance.
Option Values
Image Upload does not have predefined option values — the customer uploads their own file. The storefront accepts PNG, JPG, JPEG, WebP, and SVG images up to 8 MB.
- Price adjustment — Fixed or percentage increase or decrease. Add variant price (Bundle variant) is not currently supported
The price adjustment applies once per upload option when the customer uses that upload field.
Add a fixed surcharge to Image Upload
Appearance
- Layout — Choose the upload control layout.
- Size — Set the control size.
- Radius — Set corner rounding.
- Fill & outline — Choose the fill and outline style.
- Focused outline color — Set the outline color when the control is focused.
Choose the Image Upload layout (button vs box)
Conditional Logic
Use Conditional Logic to show or hide this option based on another selection. For example, show the image upload only when a "Custom print" option is selected.
See Image & Asset Requirements for the difference between customer upload limits and merchant-created Image Swatch assets.
To let shoppers adjust the uploaded preview layer, see the Storefront Image Editor.
Set a Placeholder Image
Open this option's Live Preview tab and turn on Enable placeholder image. Choose a provided placeholder or add your own image. This setting is available for Image Upload, Image Swatch, Badge Group, Dropdown, and image-enabled Checkbox.
The placeholder appears on the storefront before the shopper uploads a photo. It does not appear in the editor Live Preview.
Review the Uploaded File with the Order
After a test purchase, open the upload link for the relevant item in Shopify Admin or Podifai Orders and check that it is the file you submitted. If you enabled processing, a mask, or shopper adjustments, also review the resulting preview and any generated production file your workflow uses. See Customer Uploads and Final Preview Images for where to find the links, and Generate Print-Ready Files for the separate file-generation setup and output boundaries.
FAQ
When should I use Image Upload?
Use Image Upload when shoppers need to provide their own logo, artwork, photo, or design file for a customized product.
Can uploaded images appear in Live Preview?
Yes. When Live Preview is enabled, the uploaded image can appear on the product image in real time.
Which image formats does Image Upload accept?
The storefront accepts PNG, JPG, JPEG, WebP, and SVG images up to 8 MB.
Can I collect an uploaded image without showing it in Live Preview?
Yes. Turn off Live Preview for the Image Upload option. The customer can still upload a file, and the file will appear in the Shopify admin order information and the Podifai Orders tab.
Can I apply a shape mask to Image Upload?
Merchants can apply a built-in mask or upload a custom PNG mask for Image Upload. Shoppers can then adjust their image with the Storefront Image Editor tools enabled by the merchant; the mask itself is merchant-configured rather than shopper-selected.
What can shoppers change in the Storefront Image Editor?
Merchants can enable Reposition, Scale, Rotate, Adjust opacity, Grayscale, Remove background, and Zoom preview for an Image Upload option. Shoppers see only the enabled tools.
Can Podifai process an uploaded image automatically?
Yes. Enable Automatic image processing to apply Convert to grayscale on upload, Remove background on upload, or both. The processed result is used in Live Preview and in the production file attached to the customization. Uploaded image editor popup remains a separate, optional set of shopper controls.
How does pricing work for Image Upload?
Image Upload supports fixed or percentage increases and decreases. Add variant price (Bundle variant) is not currently supported for this field. The adjustment applies once per upload field when the customer uses it.