How to Sell Custom Pickleball Paddles on Shopify
Build a custom pickleball paddle on Shopify: pick face, edge guard and handle colors as stacked image layers, then add angled text to each paddle.
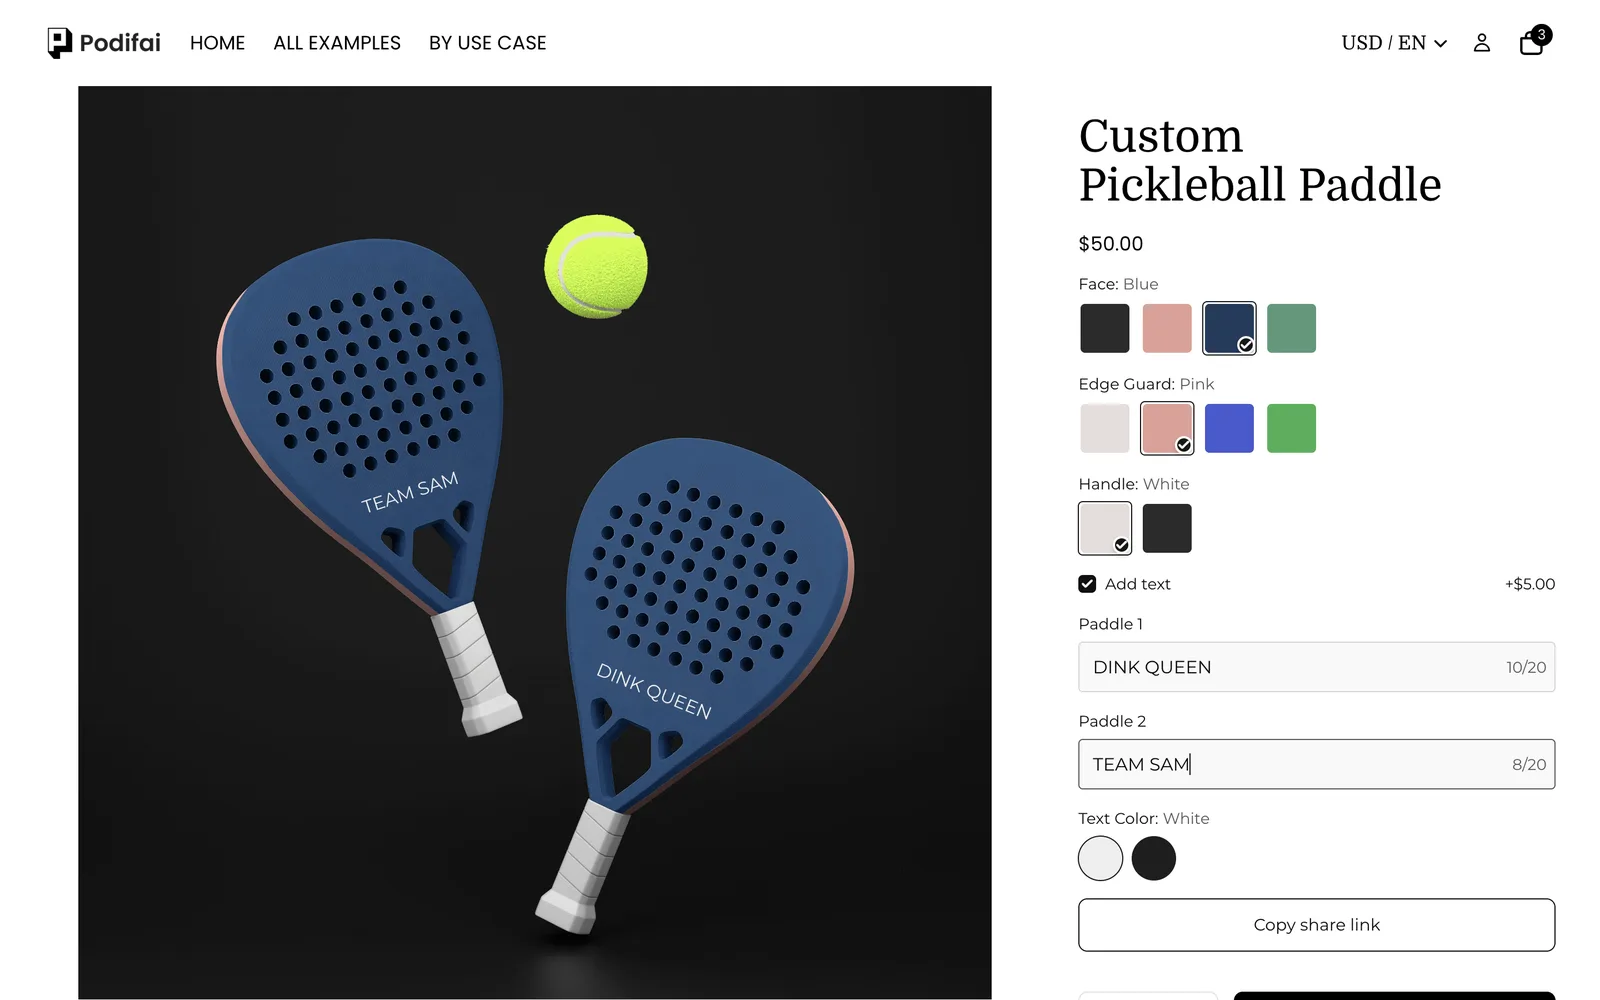
TL;DR: To sell custom pickleball paddles with Podifai, split the paddle into parts. Each part (face, edge guard, handle) is an Image Swatch whose values have two images: a small color tile for the button and a transparent PNG of that part for the preview. The PNGs stack in layer order on one product photo, so every color combination looks real without photographing each one. A paid checkbox adds text that is rotated to follow each paddle. Every feature used here is on the Free plan.
What does the shopper see?
- Choose the face color: Black, Pink, Blue or Green.
- Choose the edge guard: White, Pink, Blue or Green.
- Choose the handle: White or Black. The paddles on the photo update with each tap.
- Tick Add text (+$5.00) and type up to 20 characters for each paddle, then pick white or black text.
- Drag or resize the text on the paddle if they want, then add to cart.
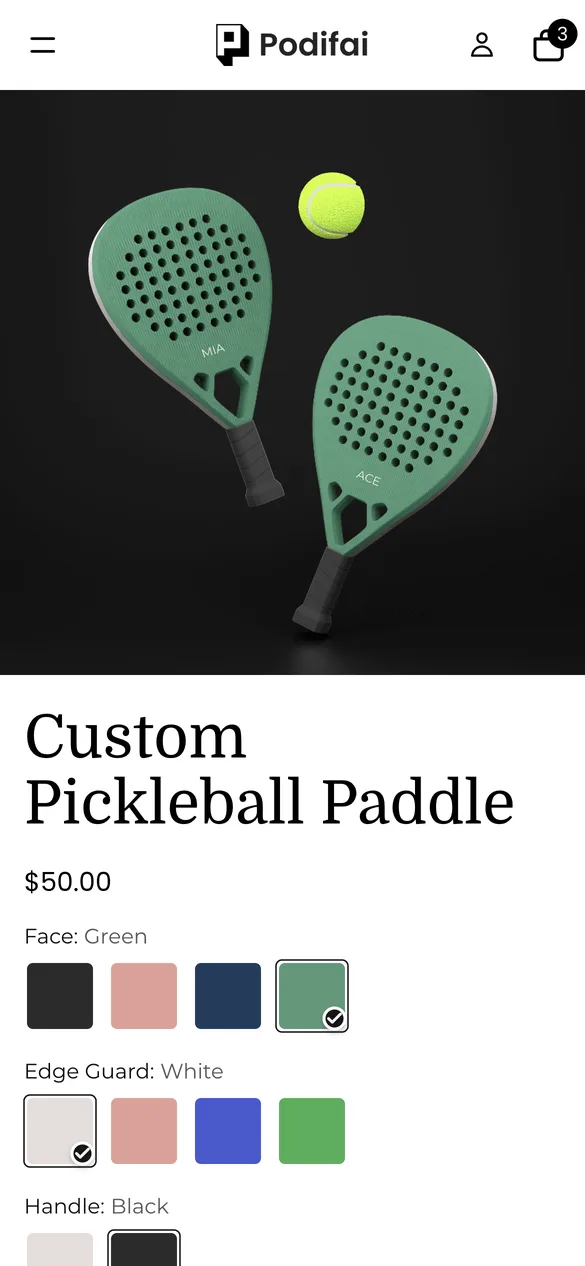
Try it yourself on the live demo product.
What do you need before you start?
1. Install Podifai and turn on the app embed
Install Podifai from the Shopify App Store, then open Online Store > Themes > Edit theme > App embeds and switch on Podifai Customizer. See Enable App Embed.
2. Render the paddle as separate layers
From your 3D model or photo, export one transparent PNG per part per color (face in 4 colors, edge guard in 4, handle in 2), all at exactly the same canvas size and position. Also export a base photo with the background and anything that never changes, like the ball. See Image & Asset Requirements.
3. Use the base photo as the first product image
Upload the base photo as the first image of the Shopify product ($45.00 in the demo). Podifai uses it as the preview background.
Should part colors be Shopify variants or Podifai options?
Three parts with 4, 4 and 2 colors make 32 combinations. As Shopify variants that is 32 photos and 32 SKUs; as Podifai layers it is 10 PNGs:
| Your situation | Use | What it gives you |
|---|---|---|
| Paddles are assembled or printed to order | Podifai Image Swatches with layers (as in the demo) | 10 images cover 32 combinations; one product, one SKU |
| Each finished combination is separate stock | Shopify variants | Stock per combination, but a photo per variant |
| Only one part is stocked separately, like handle grips | Podifai swatch with Track inventory | Link that part's values to Shopify variants |
Layers work for any product made of parts that change color independently, from sneakers to furniture.
What is the fastest way to set this up?
There is no ready-made pickleball template yet, so build it once with the steps below. When it is done, click Save, open the three dots menu at the top right of the editor and choose Save as Template, then copy it to other paddle shapes or sports products and swap only the images.
Which options do you need?
The whole customizer is 6 Podifai options on one Shopify product:
| Option | Podifai type | Key settings | Price |
|---|---|---|---|
| Face | Image Swatch | 4 colors; color tile + transparent face PNG; full-size layer | No charge |
| Edge Guard | Image Swatch | 4 colors; color tile + edge PNG; full-size layer | No charge |
| Handle | Image Swatch | 2 colors; color tile + handle PNG; full-size layer | No charge |
| Add text | Checkbox | One value, not required | +$5.00 |
| Paddle 1, Paddle 2 | Text Input (x2) | 20 characters each, rotated to the paddle, on-canvas move and resize | Included above |
| Text Color | Color Swatch | White or Black | No charge |
How to set it up in Podifai, step by step
These steps match the live demo product. Red boxes mark what to change; numbers follow the order in the step text.
Step 1: Add the option types
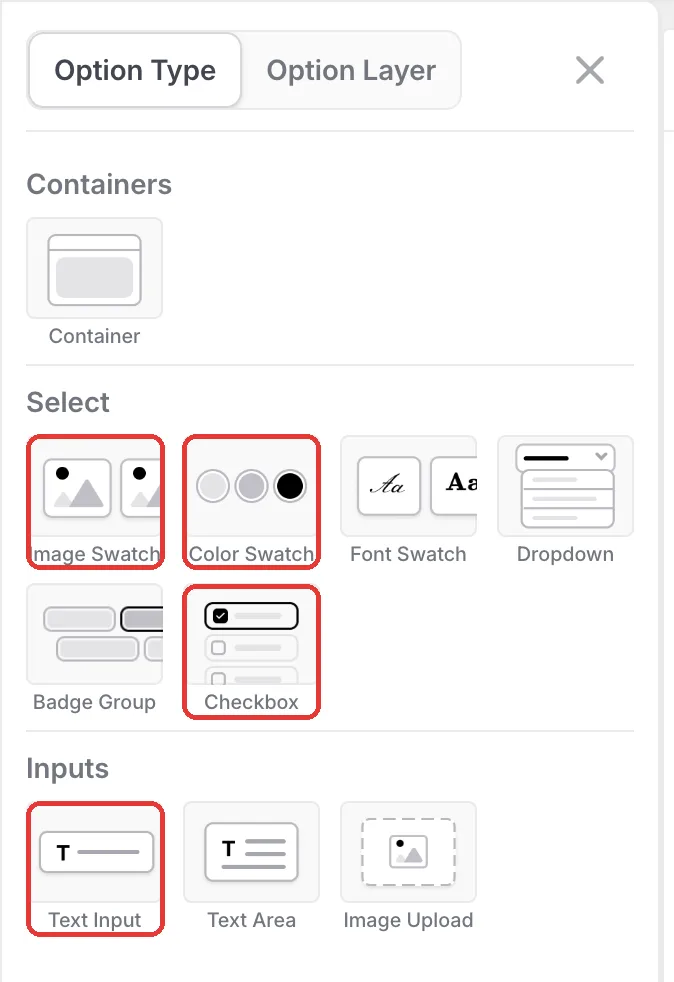
Open the paddle in the Podifai editor, click the menu icon on the left and add three Image Swatches (Face, Edge Guard, Handle), a Checkbox for the text add-on, two Text Inputs (one per paddle in the photo) and a Color Swatch for the text color.
Step 2: Give every color two images
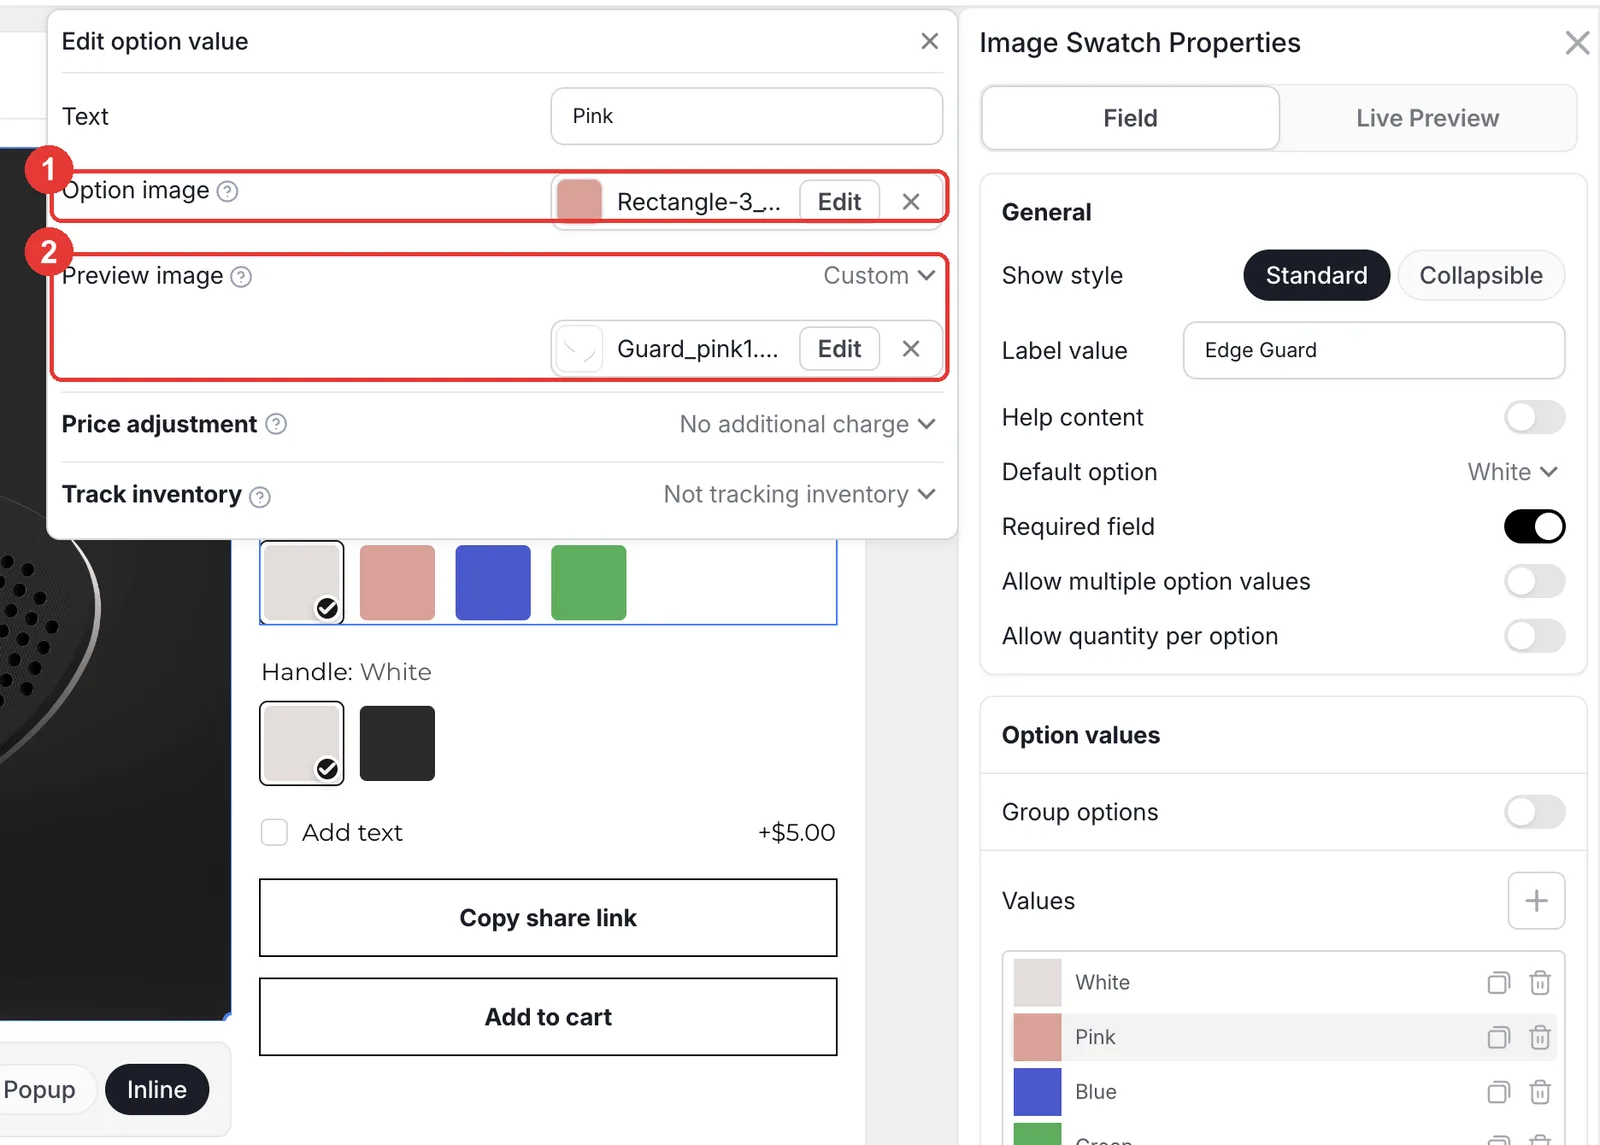
Click a value, for example Edge Guard Pink, to open Edit option value. Option image is the small tile shoppers tap: upload a flat pink square. Set Preview image to Custom and upload the transparent PNG of the pink edge guard. Repeat for every color of every part, and turn on Live customizer at 100% width and height on each swatch so its layer covers the whole photo.
- Preview image "Same as thumbnail" would put the small tile on the paddle, so always choose Custom here.
- In the swatch's Appearance, set Fit to Fixed so the tiles stay square.
Step 3: Stack the parts on the product photo
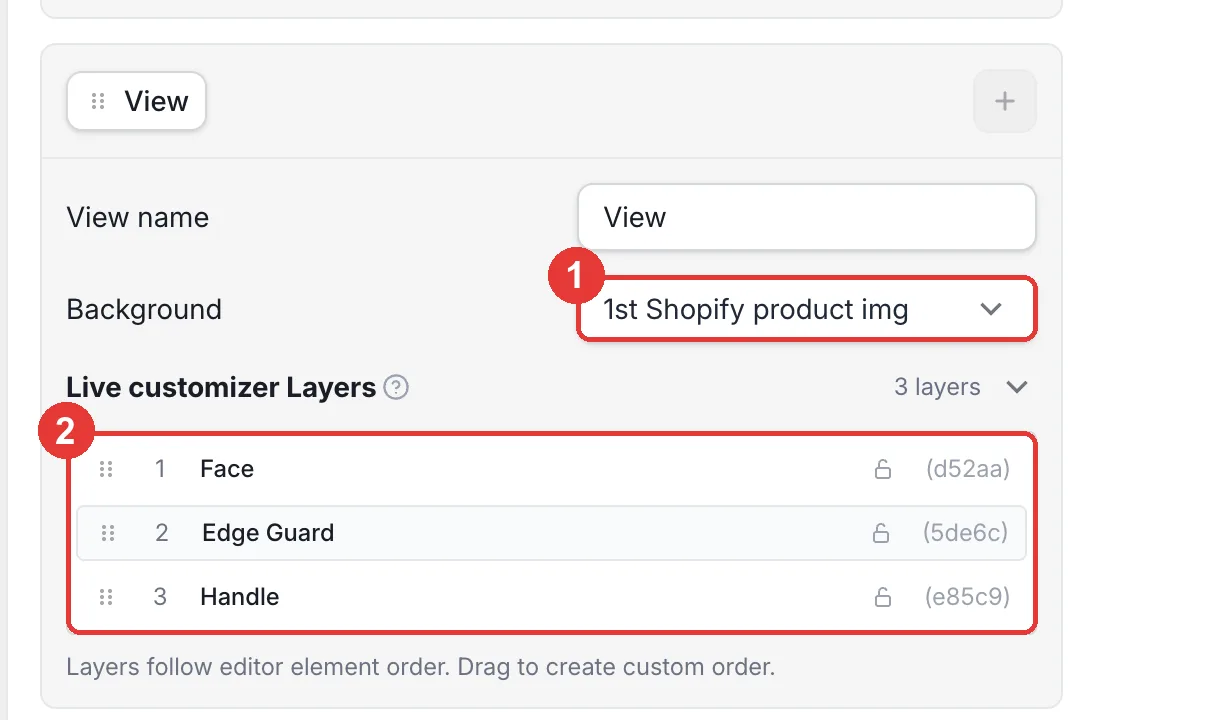
Below the preview, set the view's Background to 1st Shopify product image, the base photo. Open Live customizer Layers to check the order: Face, Edge Guard, Handle. Layers follow the option order, and you can drag them to change which part sits on top.
Step 4: Add paid text that follows the paddle
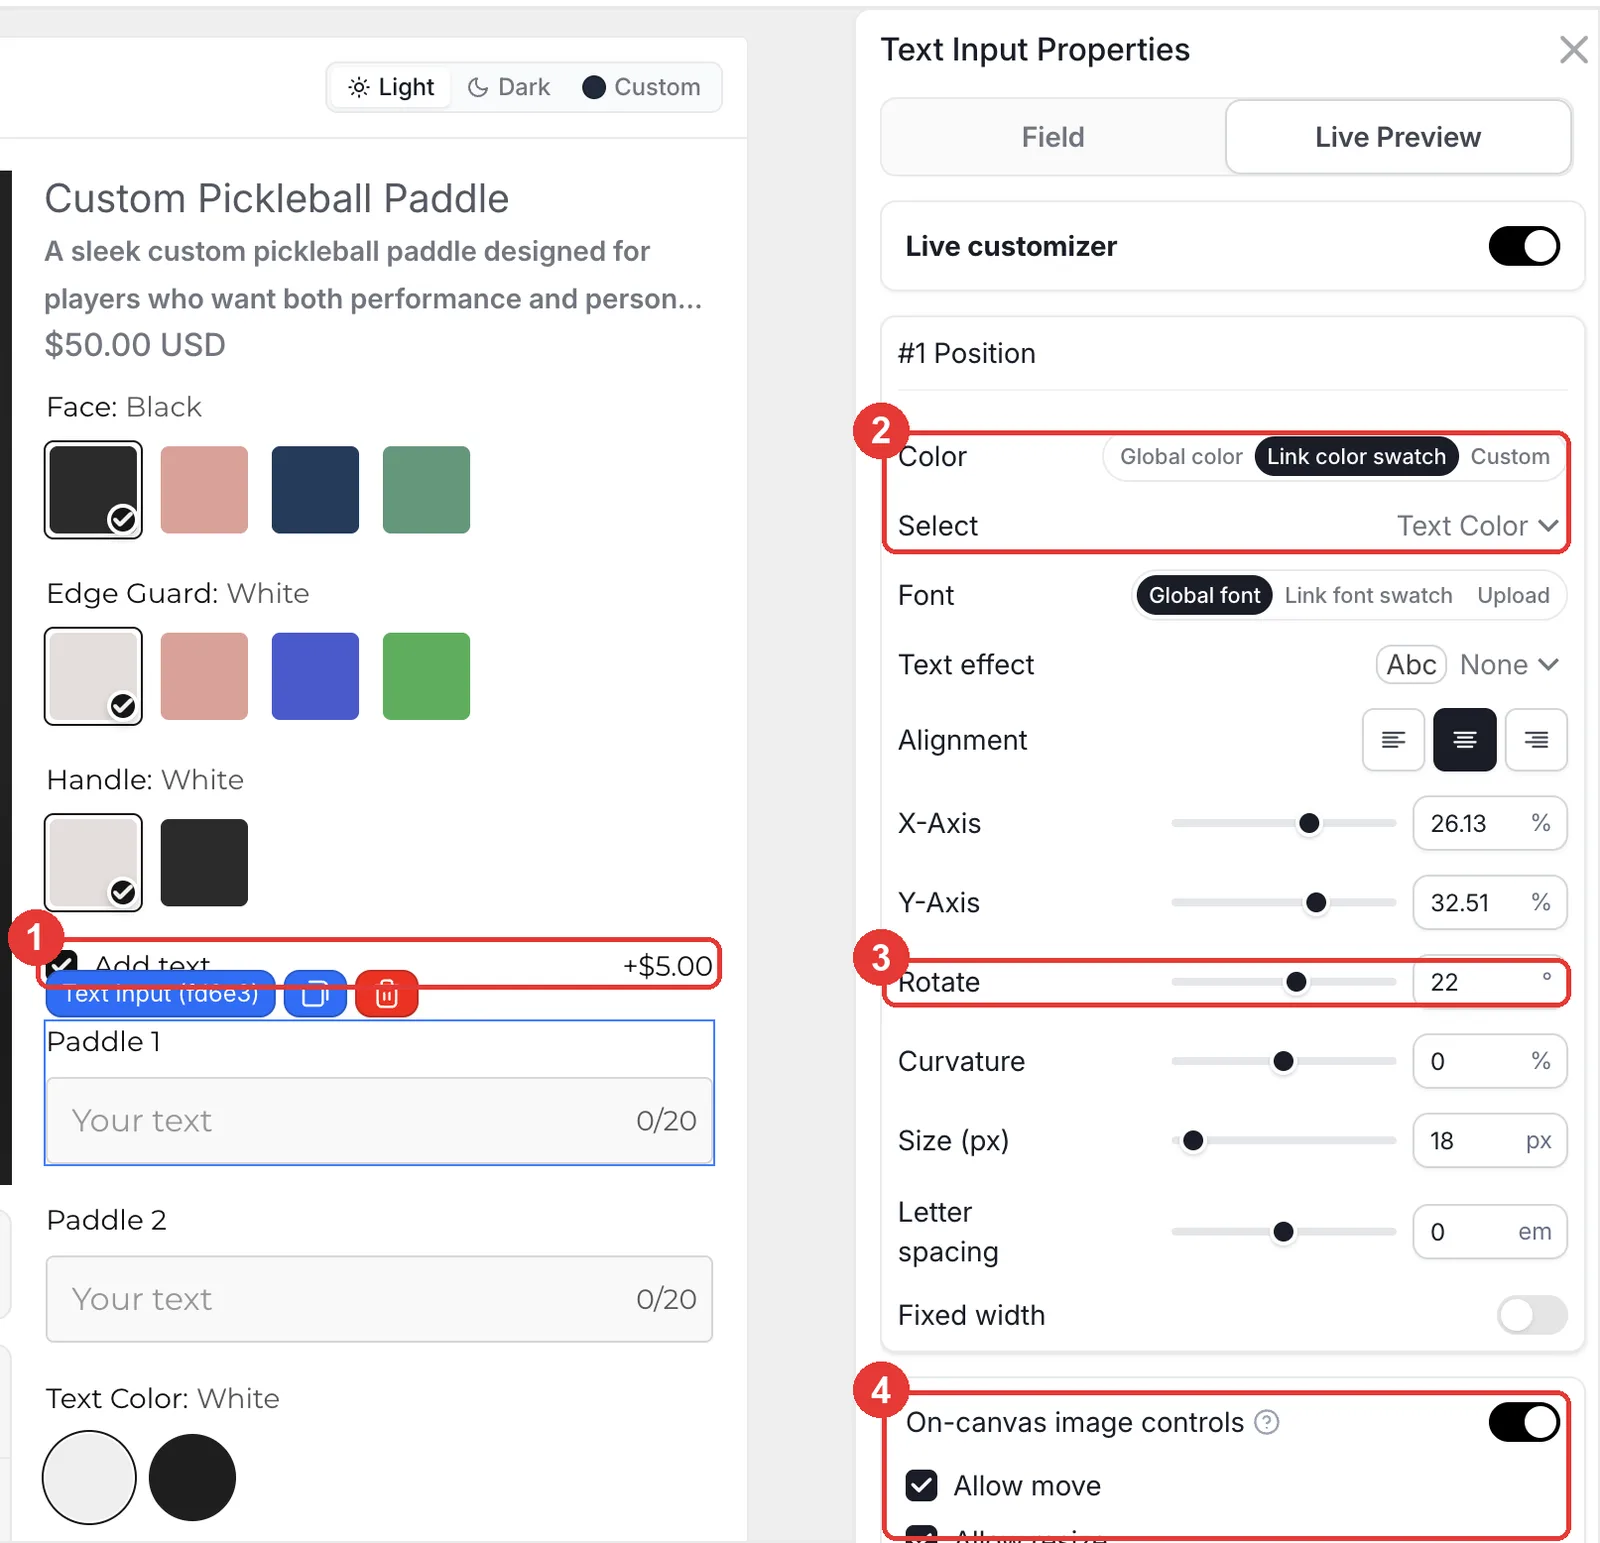
Add a Checkbox called Add text with one value and a fixed price of $5.00, and leave Required field off. Give both text inputs the condition Add text contains Add text. In each text input's Live Preview tab, set Color to Link color swatch (Text Color), then use X-Axis, Y-Axis and Rotate to place the text on the paddle face (22° in the demo). Turn on On-canvas image controls with Allow move so shoppers can adjust it. Click Save and test a few color combinations on the storefront.
What happens in the cart and after the order?
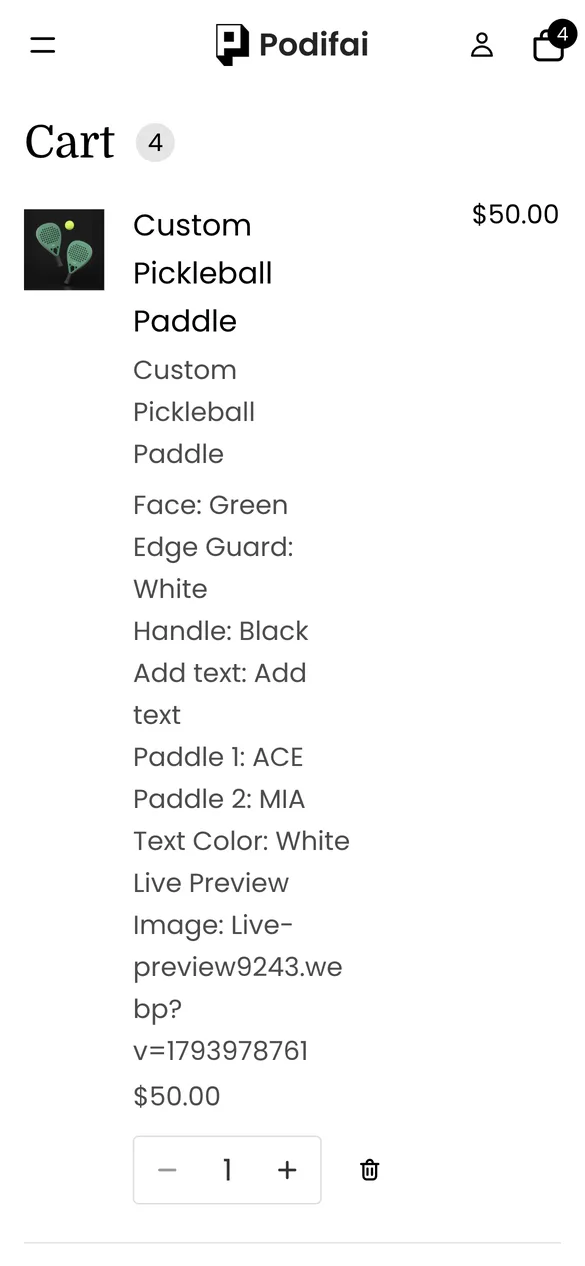
- Face, edge guard and handle colors are saved on the order line, which reads like a build sheet for assembly.
- The text add-on is charged on the same line.
- A link to the final preview shows the exact combination the shopper approved.
- With Generate print-ready files on, Podifai creates a transparent PNG of the text for printing or engraving.
Troubleshooting
The color tile appears on the paddle
That value's Preview image is set to Same as thumbnail. Change it to Custom and upload the part's transparent PNG. See Image Swatch.
A part sits behind another part
Open Live customizer Layers below the preview and drag the layers into the right order.
Parts do not line up
Every PNG must share the same canvas size and position. Re-export them from the same file and keep each layer at 100% width and height.
Selling tips
- Render once, sell every combination. A 3D render or a careful Photoshop file per part is a one-time job, and it replaces dozens of product photos.
- Offer team orders. Clubs often buy paddles in sets. Mention bulk pricing on the page, and keep the names short so they fit the face.
- Show the default as your best seller. Set each part's Default option to your most popular color, so the first thing shoppers see is a combination that sells.
What else can you sell with this setup?
Layered image swatches work for any product where parts change color independently:
- Tennis and padel rackets
- Sneakers and custom shoes
- Bikes, skateboards and helmets
- Watches with straps and faces
- Furniture with frame and fabric choices
Frequently asked questions
Use one Podifai Image Swatch per part. Give each value a transparent PNG of that part as its Preview image, and the PNGs stack on the product photo as layers.
Option image is the small tile shoppers tap. Preview image is what appears in the live preview. Set Preview image to Custom to show a different, full-size image.
Not yet. Build it once with the steps above, then use Save as Template from the editor's three dots menu to reuse it for other paddles and sports products.
Yes. In the Text Input's Live Preview tab, set Rotate (22° in the demo) and position it with X and Y. On-canvas controls let shoppers fine-tune it.
Yes. Put a priced value on a Checkbox and show the text fields only when it is ticked. The demo charges $5.00.
Image Swatch layers, conditions, rotation and add-on pricing are on the Free plan, which covers up to 3 custom products. Starter ($7.9/month) covers 30 products and Growth ($15.9/month) is unlimited.
More Podifai use cases
- How to Sell Personalized Embroidered Dog Bandanas on Shopify
- How to Sell Custom Photo Phone Cases on Shopify
- How to Sell Monogrammed Leather Keychains on Shopify
- How to Sell Custom Neon Signs on Shopify
- How to Build a Charm Bracelet Builder on Shopify
- How to Sell Custom Hoodies with Front, Back and Sleeve Prints on Shopify
- How to Sell Custom Wedding Invitations on Shopify
- How to Sell Personalized Pens with a Paid Engraving Add-on on Shopify
- How to Sell Custom Trucker Hats on Shopify
Related help docs
Build this customizer on your store
Free for 3 custom products. Start from the ready-made template and change what you need.
 Install Podifai free