How to Sell Custom Hoodies with Front, Back and Sleeve Prints on Shopify
Set up a custom hoodie on Shopify with four print areas, front, back and both sleeves, each with its own view, price and a graphic, upload or text.
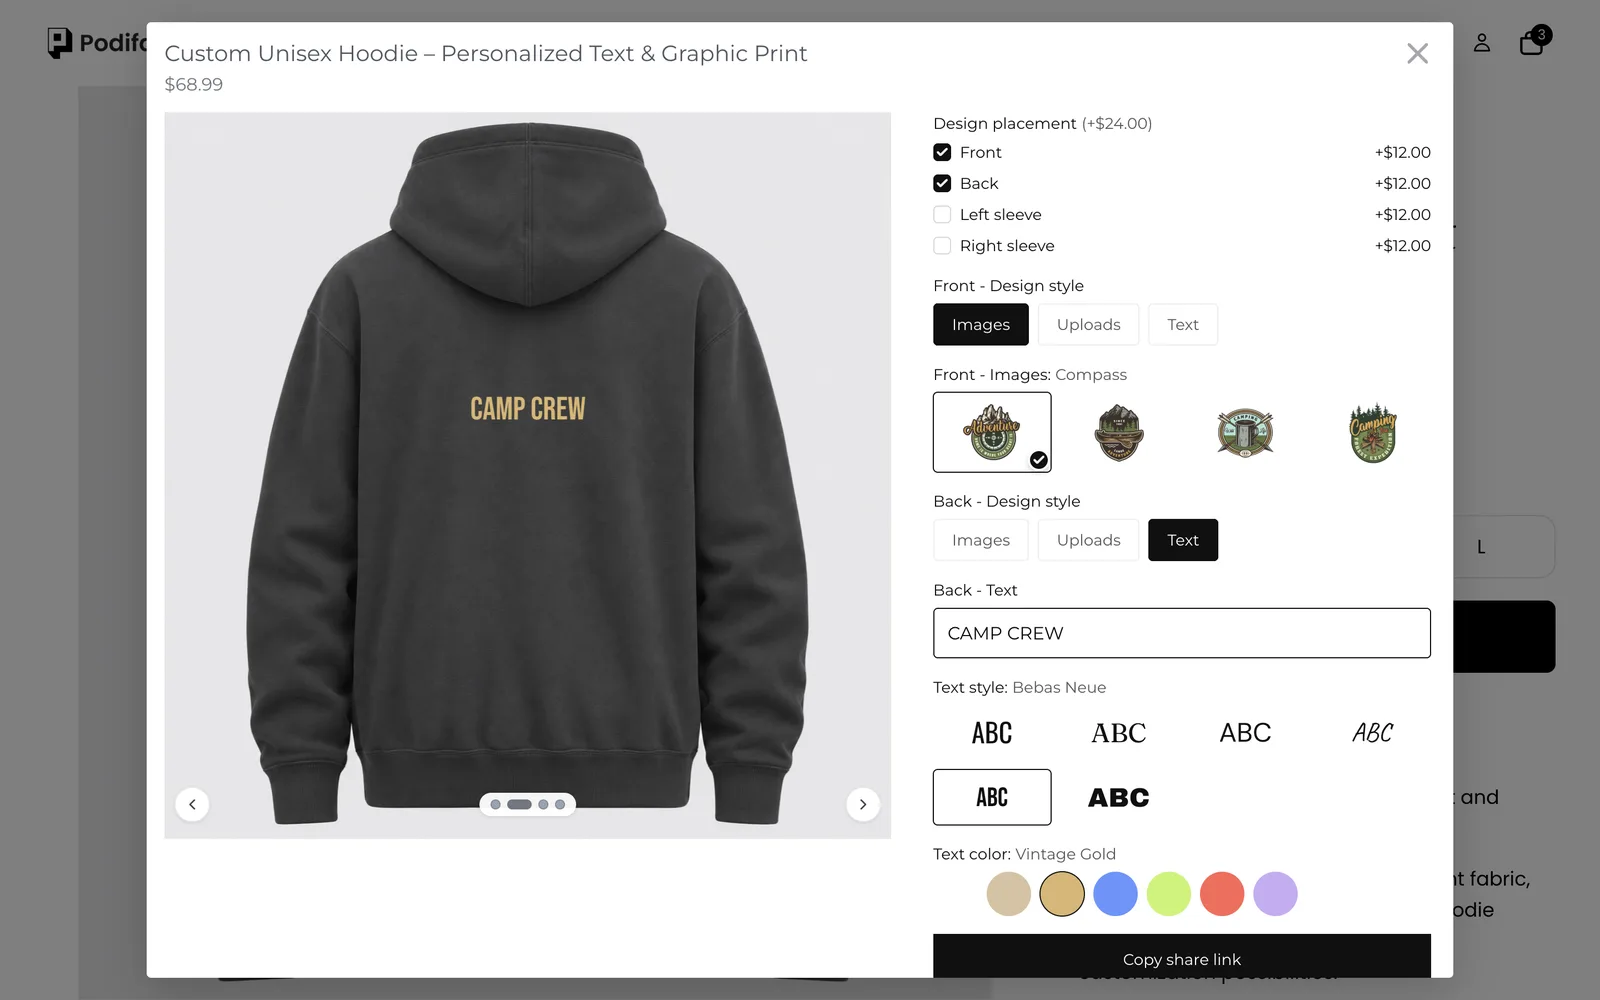
TL;DR: To sell custom hoodies with Podifai, add one preview view per print area (front, back, left sleeve, right sleeve), each with its own hoodie photo. A multi-select checkbox lets shoppers pick the areas they want, at $12 each in the demo, and conditions reveal a design style choice (graphic, upload or text) for each ticked area only. Keep color and size as Shopify variants. Start from the ready-made hoodie template; every feature used here is on the Free plan.
What does the shopper see?
- Pick the hoodie color and size on the product page, then click Customize.
- Tick where to print: Front, Back, Left sleeve and/or Right sleeve. Each adds $12.00.
- For each ticked area, choose a design style: one of four graphics, their own upload, or text.
- For text, type the words and choose one of six fonts and seven colors.
- Swipe through the views to check every side, then add to cart.
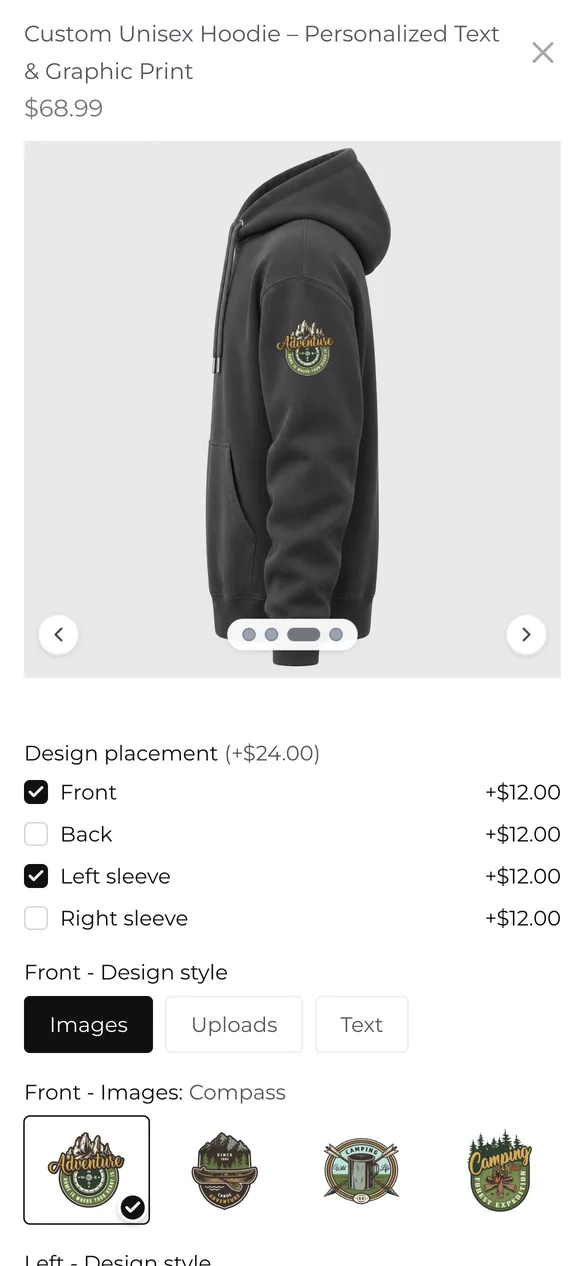
Try it yourself on the live demo product.
What do you need before you start?
1. Install Podifai and turn on the app embed
Install Podifai from the Shopify App Store, then open Online Store > Themes > Edit theme > App embeds and switch on Podifai Customizer. See Enable App Embed.
2. Keep color and size as Shopify variants
Create the hoodie with Color and Size variants so Shopify tracks stock per size. Give each color variant its front photo.
3. Shoot four photos per color
You need front, back, left and right photos of the hoodie, flat and at the same scale. The front uses the variant image; the back and sleeves use the extra photos. See Image & Asset Requirements.
What belongs in Shopify variants and what in Podifai?
Blank garments are stock; designs are not. Split them like this:
| Your situation | Use | What it gives you |
|---|---|---|
| Hoodie color and size | Shopify variants (as in the demo) | Stock per size and color, standard size charts and filters |
| Which areas to print | Podifai Checkbox with a price per area | One line in the cart, priced by the number of print areas |
| What to print in each area | Podifai Badge Group, Image Swatch, Image Upload and Text Input | Only the fields for ticked areas are shown |
If you sell many colors, set the front view's Background to Variant image so the preview follows the chosen color.
What is the fastest way to set this up?
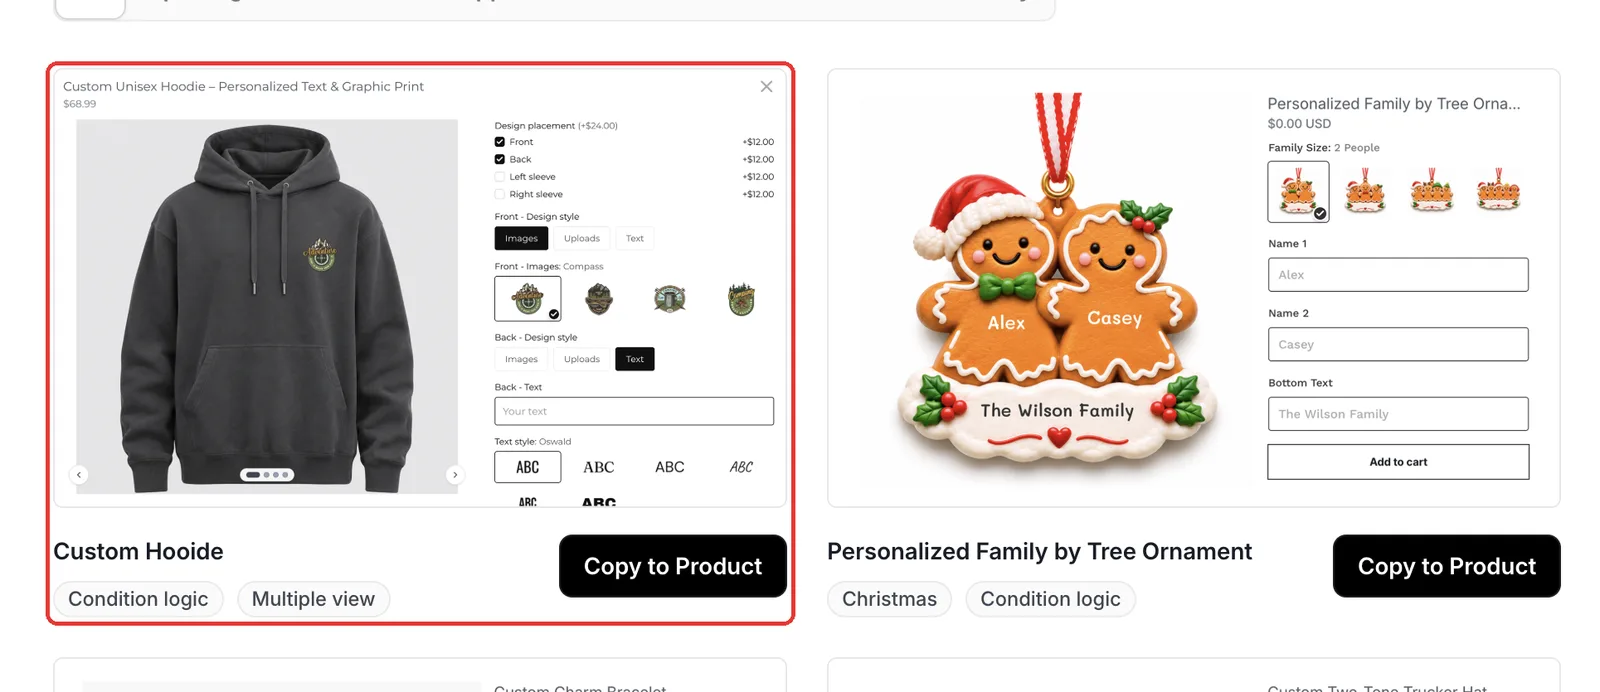
Podifai ships a ready-made hoodie template (listed as "Custom Hooide" in Podifai Templates) with the same 19 options and four views as the demo. Click Copy to Product, choose your hoodie and click Apply (or Override, which replaces existing Podifai options). Then upload your own back and sleeve photos for each view, replace the sample graphics with your own, check the price per area and save.
Which options do you need?
The whole customizer is 6 Podifai options on one Shopify product:
| Option | Podifai type | Key settings | Price |
|---|---|---|---|
| Design placement | Checkbox | Front, Back, Left sleeve, Right sleeve; multiple values, max 4 | +$12 per area |
| [Area] - Design style | Badge Group (x4) | Images, Uploads or Text; shown when that area is ticked | No charge |
| [Area] - Images | Image Swatch (x4) | Four graphics, placed on that area's view | No charge |
| [Area] - Upload image | Image Upload (x4) | Shopper artwork on that area's view | No charge |
| [Area] - Text | Text Input (x4) | Fixed width with shrink, linked color and font | No charge |
| Text style, Text color | Font Swatch, Color Swatch | Shared by all text areas; shown when any area uses Text | No charge |
How to set it up in Podifai, step by step
These steps match the live demo product. Red boxes mark what to change; numbers follow the order in the step text.
Step 1: Add the option types
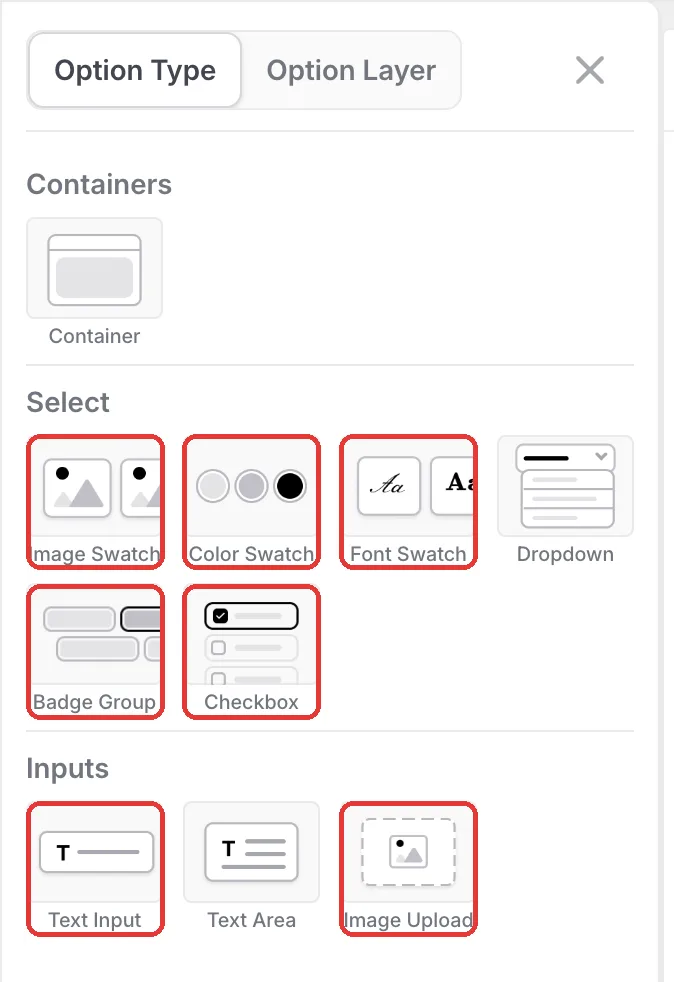
Open the hoodie in the Podifai editor and click the menu icon on the left. From Option Type you need a Checkbox for the print areas, then for each area a Badge Group, an Image Swatch, an Image Upload and a Text Input, plus one shared Font Swatch and Color Swatch. Build the front set first, then use Duplicate on each option to copy it for the back and sleeves.
Step 2: Add a view for each print area
Below the preview, click + next to the view tabs to add Back, Left sleeve and Right sleeve next to Front. Select each new view, set Background to Custom image and upload the matching hoodie photo. Leave Front on Variant image so it follows the chosen color.
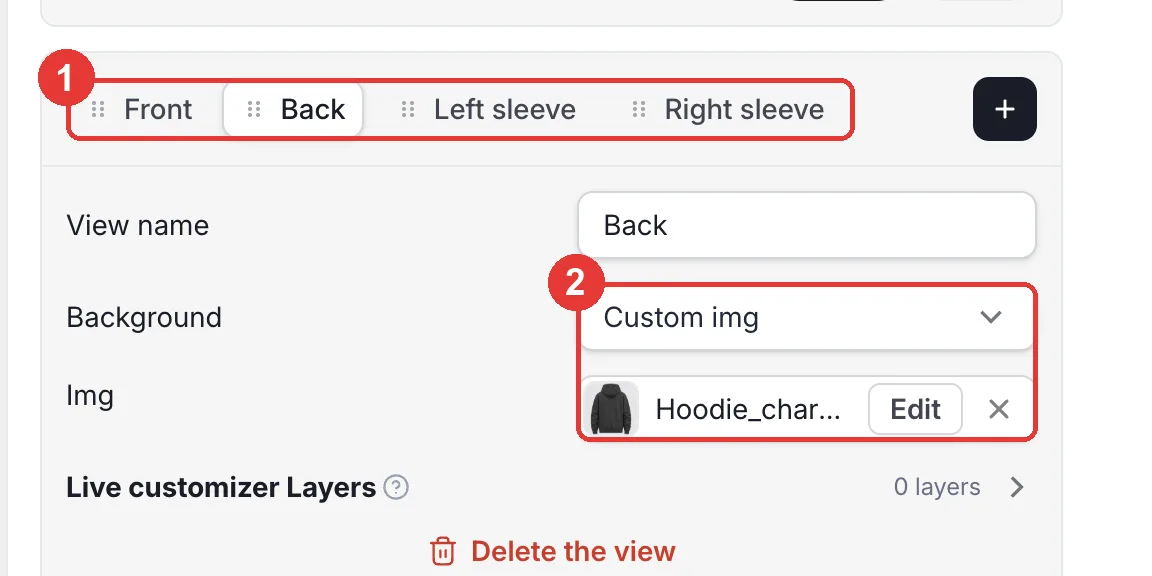
Step 3: Let shoppers pick the print areas
Add a Checkbox called Design placement with four values. Turn on Allow multiple option values and set Max selections to 4. Set Front as the Default option and keep Required field on, so every order has at least one print.
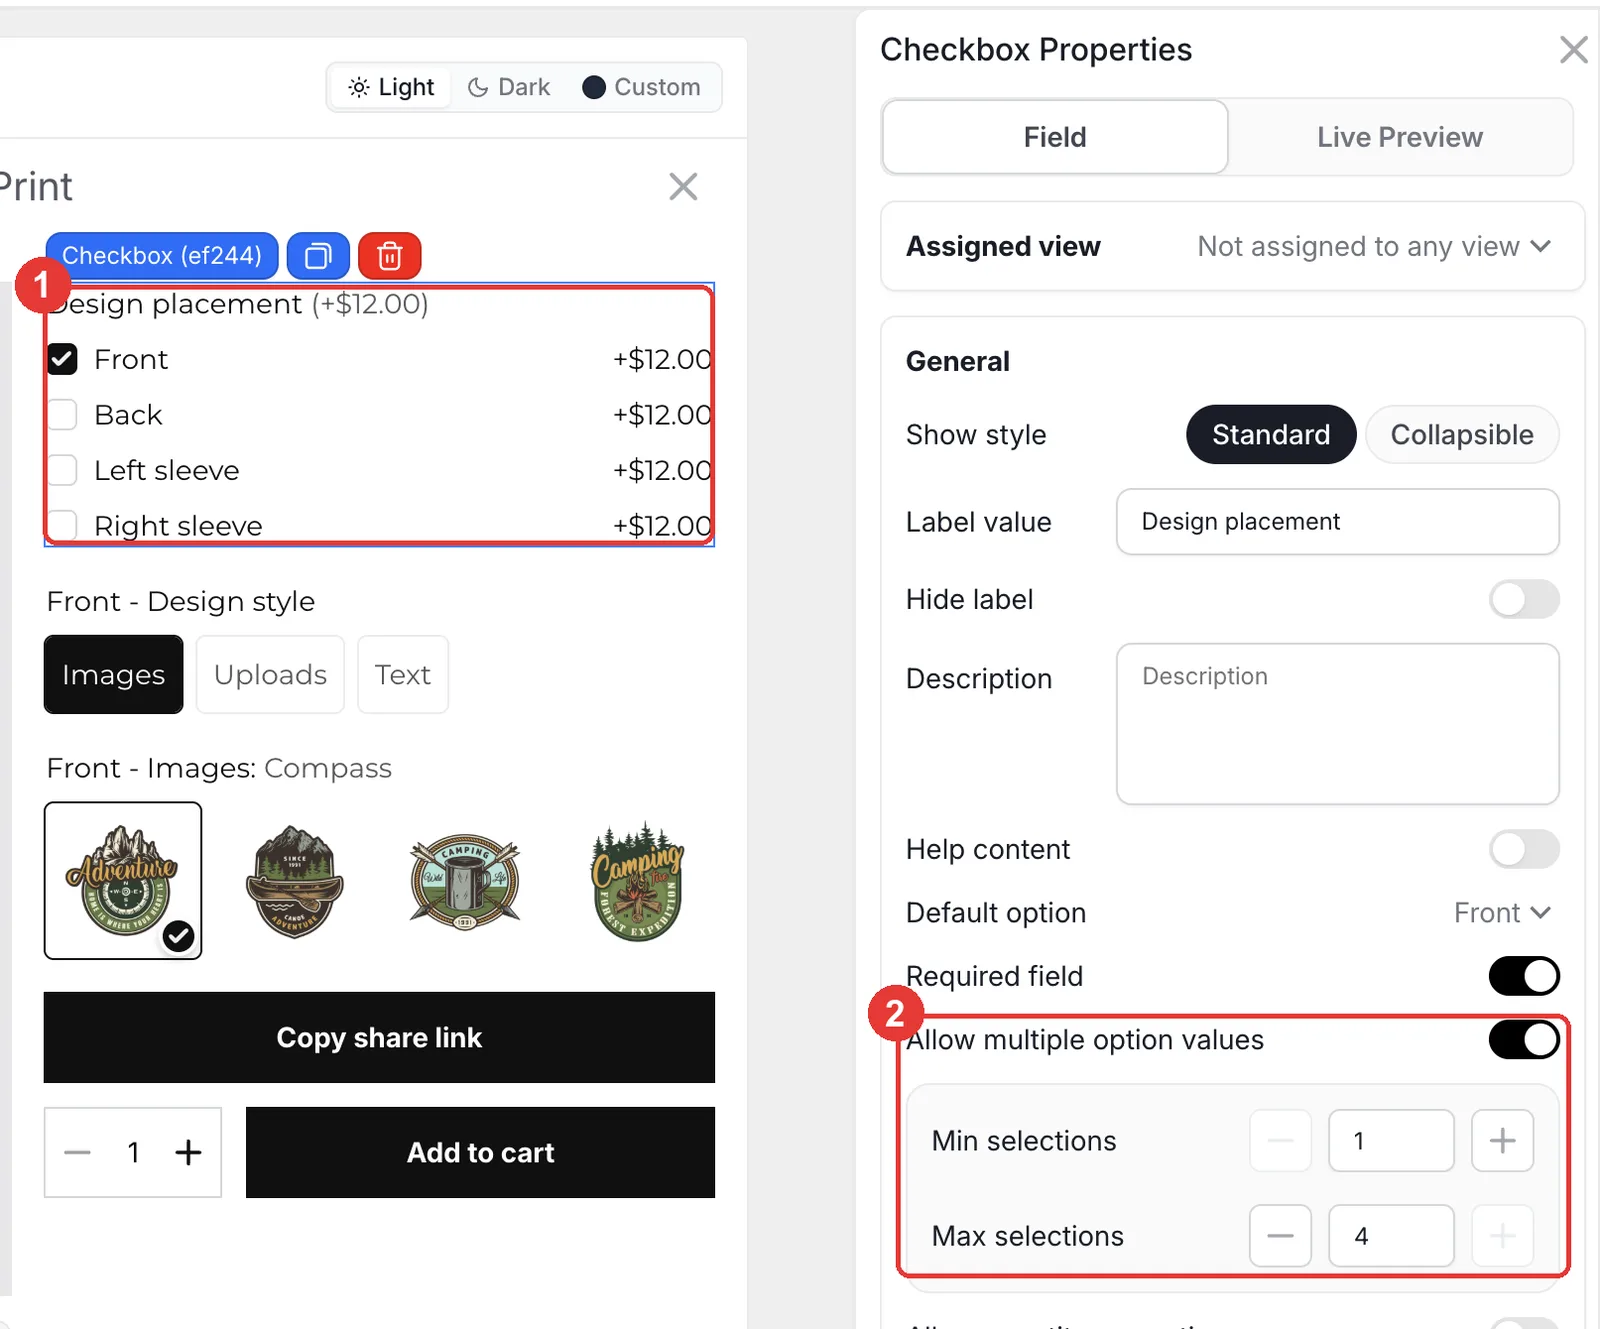
Step 4: Charge per print area
Click each value to open Edit option value and set Price adjustment to Increase by fixed amount, 12.00 in the demo. Optionally set Switch preview to that value's view, so ticking Back turns the preview to the back.
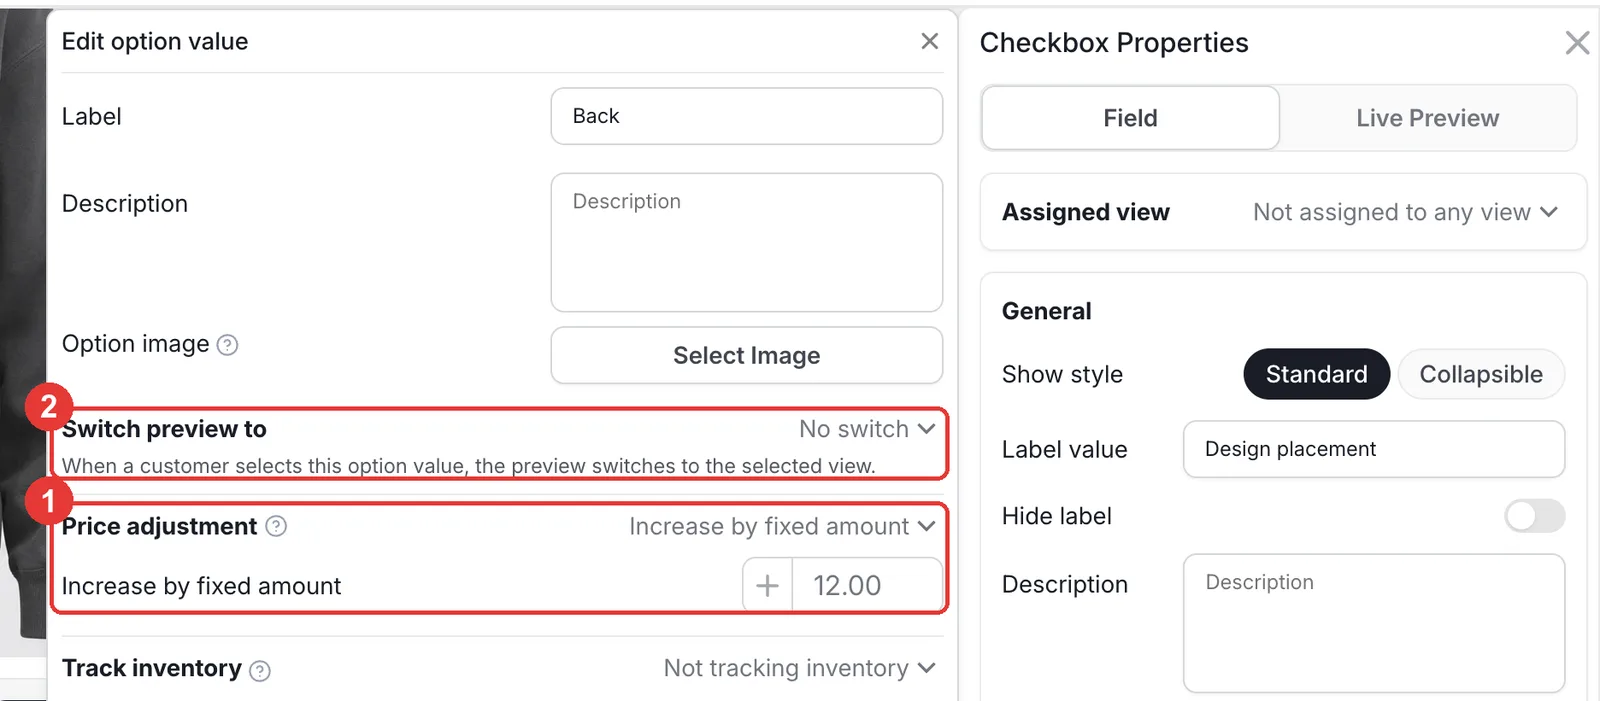
Step 5: Show each area's fields only when it is ticked
Select Back - Design style, turn on Condition and add the rule Design placement contains Back. Then give Back - Images the rule Back - Design style contains Images, and do the same for Uploads and Text. Repeat for the front and sleeves.
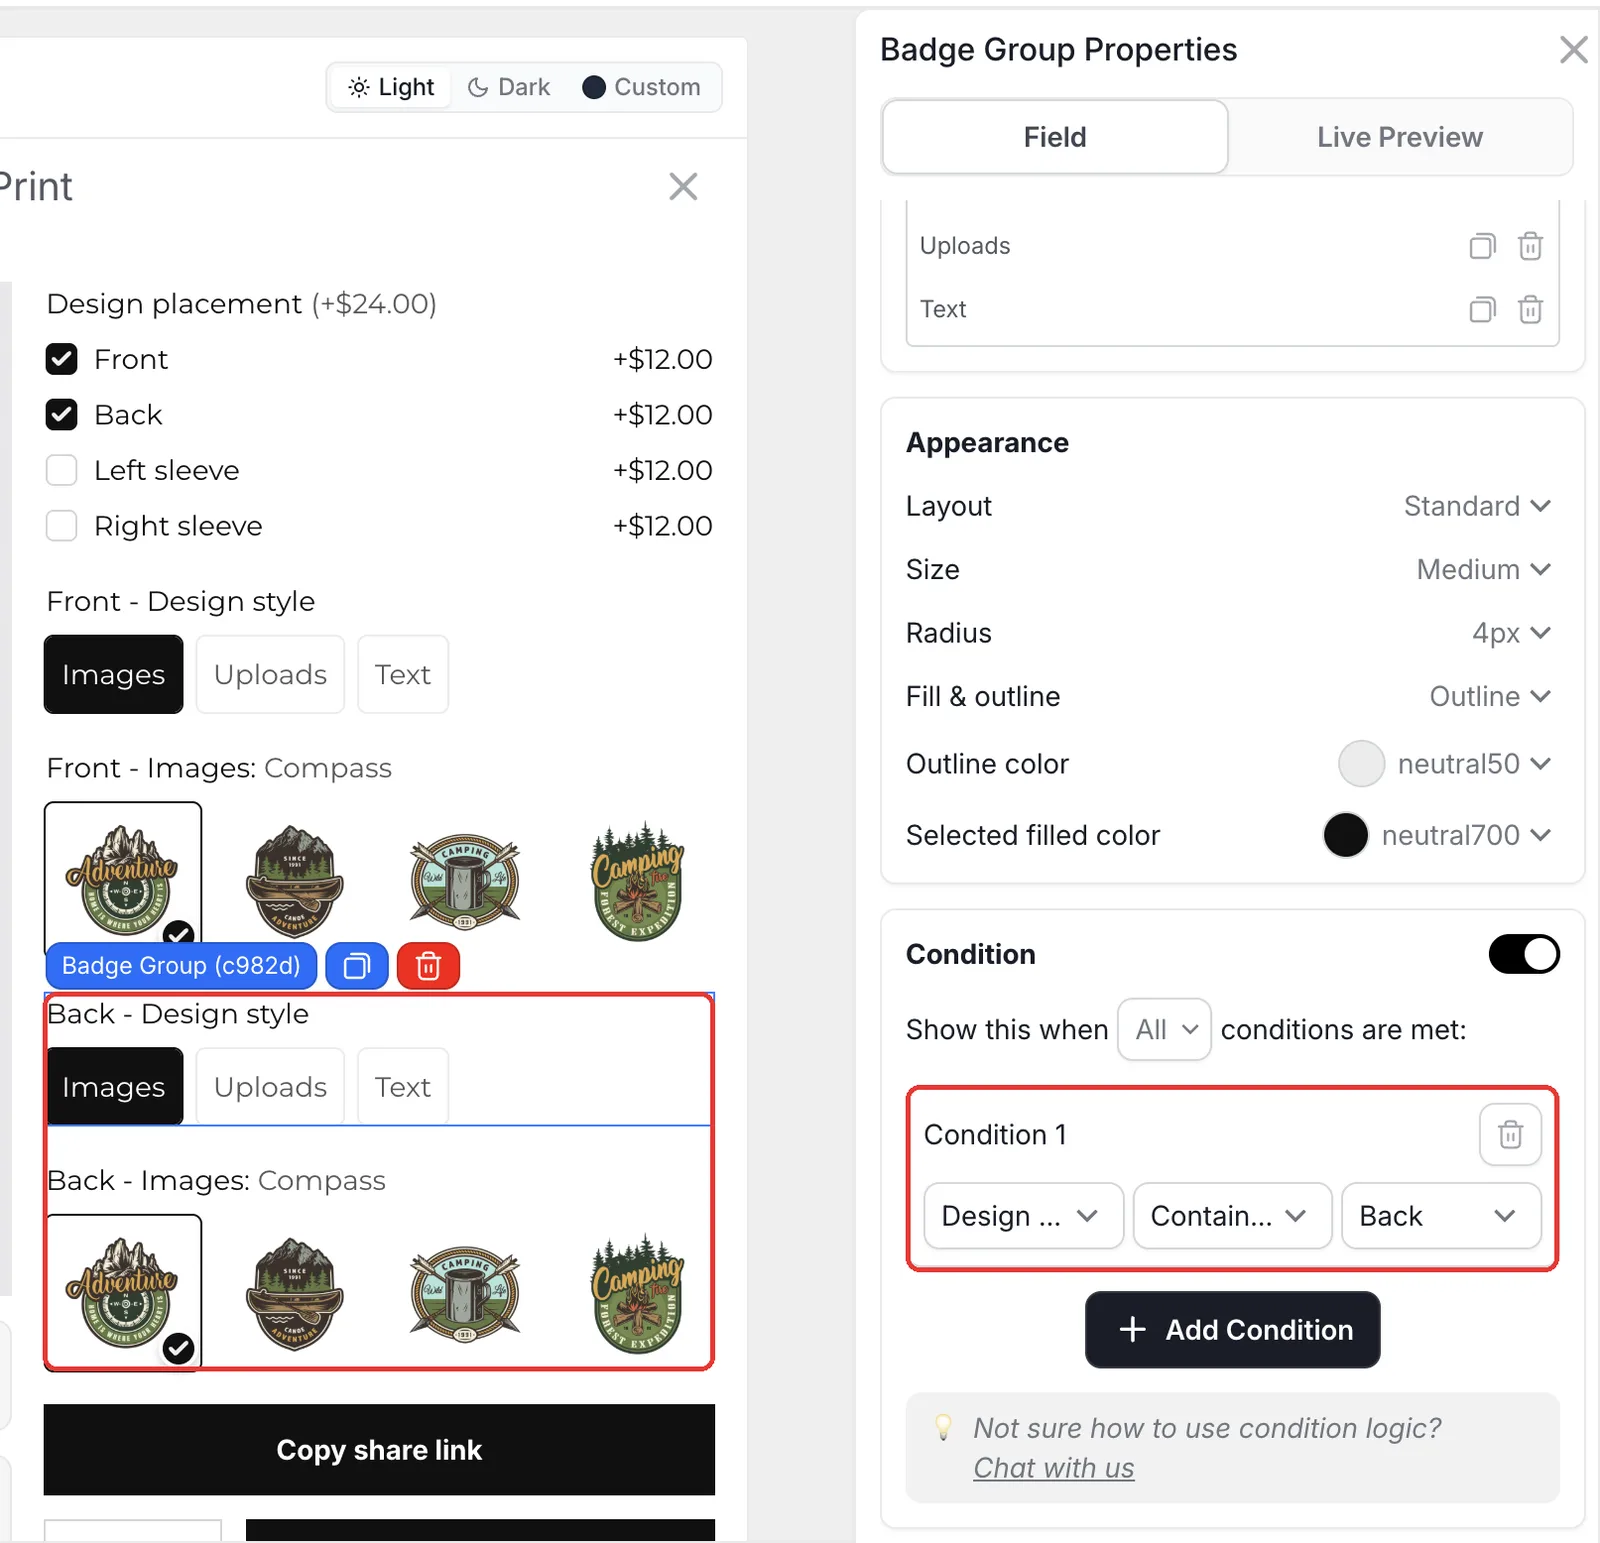
Step 6: Place each design on its view
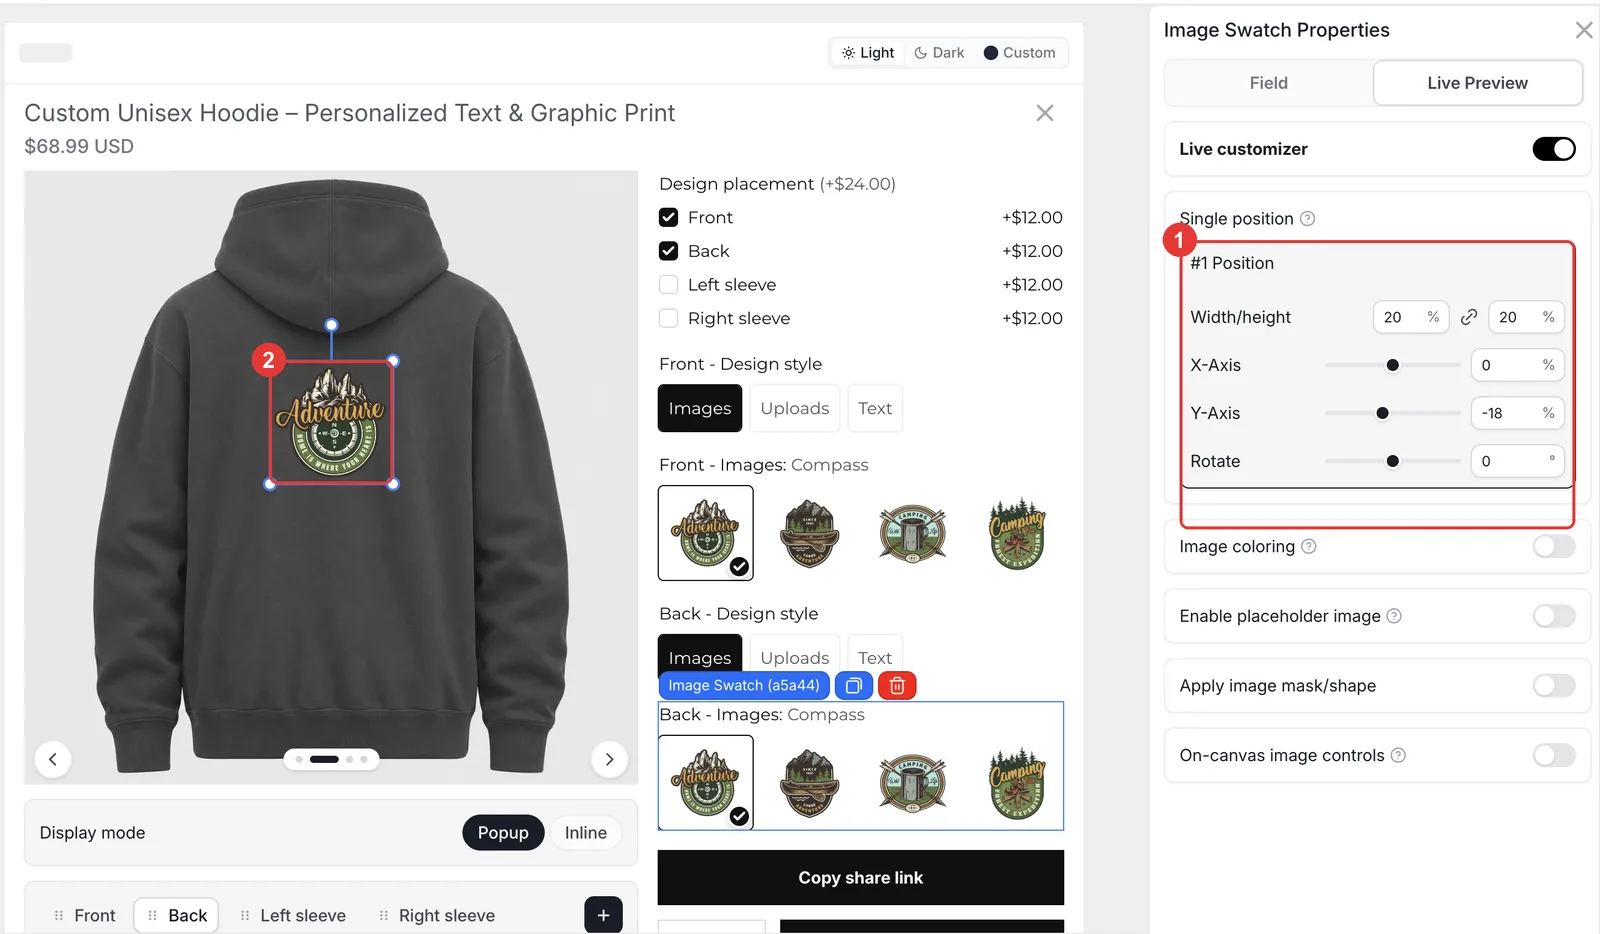
Select Back - Images and open Live Preview. Its layer belongs to the Back view, so set Width/height and X/Y to fill the back print area (20% wide, centred in the demo). Front graphics sit small on the chest (10% wide) and sleeve graphics about 12%. Do the same for the uploads and text in each area. Click Save and tick each area on the storefront to check it.
- Text fields use Fixed width with Shrink text, so long words shrink to fit the sleeve.
- The shared font and color swatches use a condition with Any: Front, Back, Left or Right design style contains Text.
What happens in the cart and after the order?
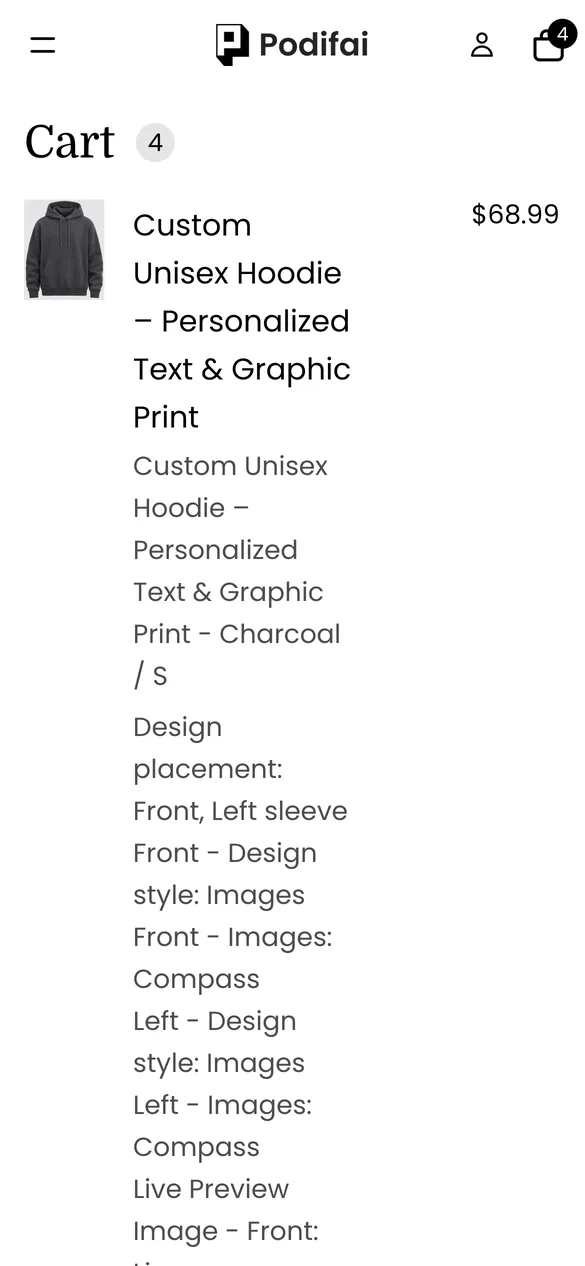
- Color and size come from the Shopify variant; print areas and designs are line item properties.
- Each view gets its own preview image on the order (Live Preview Image - Front, - Back, - Left sleeve, - Right sleeve), so the print team sees every side.
- Uploaded artwork is saved with the order in its original resolution.
- With Generate print-ready files on, Podifai creates a transparent PNG per area for DTG or DTF printing.
Troubleshooting
A design shows on the wrong side
The option's layer is assigned to a different view. Select the option, check its view, and place it again on the right one. See Multiple views.
Sleeve fields appear without ticking the sleeve
The sleeve's design style is missing its condition. Add Design placement contains Left sleeve (or Right sleeve). See Conditional Logic.
The front preview does not change color
Set the Front view's Background to Variant image and make sure each color variant has its own photo.
Selling tips
- Price the most popular area into the base. If almost everyone prints the front, include it in the base price and charge only for extra areas.
- Offer ready-made graphics. A small set of on-brand graphics converts better than an empty upload box, and gives you print-safe files.
- Ask for high-resolution uploads. Add a help note such as "PNG with transparent background, at least 3000 px" on the upload fields.
What else can you sell with this setup?
The same views and per-area pricing work for any product printed on more than one side:
- T-shirts, sweatshirts and jackets
- Team jerseys with name and number on the back
- Tote bags with two printed sides
- Caps with front and side embroidery
- Mugs and tumblers with a front and back design
Frequently asked questions
Yes. Add a Podifai view per print area with its own photo, then place each area's design options on its view. Shoppers switch between views in the preview.
Use a Checkbox with one value per area, allow multiple values and give each value a fixed price adjustment. The demo charges $12 per area.
Yes. In Podifai Templates the hoodie template is listed as Custom Hooide. Copy it to your product, then replace the photos and graphics.
Yes. Keep color and size as Shopify variants so stock is tracked per size, and use Podifai only for the print areas and designs.
Yes. The order includes a preview image for each view, plus the original uploads and, if turned on, a print-ready PNG per area.
Multiple views, conditions and per-value pricing are on the Free plan, which covers up to 3 custom products. Starter ($7.9/month) covers 30 products and Growth ($15.9/month) is unlimited.
More Podifai use cases
- How to Sell Personalized Embroidered Dog Bandanas on Shopify
- How to Sell Custom Photo Phone Cases on Shopify
- How to Sell Monogrammed Leather Keychains on Shopify
- How to Sell Custom Neon Signs on Shopify
- How to Build a Charm Bracelet Builder on Shopify
- How to Sell Custom Pickleball Paddles on Shopify
- How to Sell Custom Wedding Invitations on Shopify
- How to Sell Personalized Pens with a Paid Engraving Add-on on Shopify
- How to Sell Custom Trucker Hats on Shopify
Related help docs
Build this customizer on your store
Free for 3 custom products. Start from the ready-made template and change what you need.
 Install Podifai free