How to Sell Custom Neon Signs on Shopify
Set up a custom LED neon sign on Shopify with a glowing text preview, neon colors and fonts, percentage size pricing, custom sizes and an outdoor upgrade.
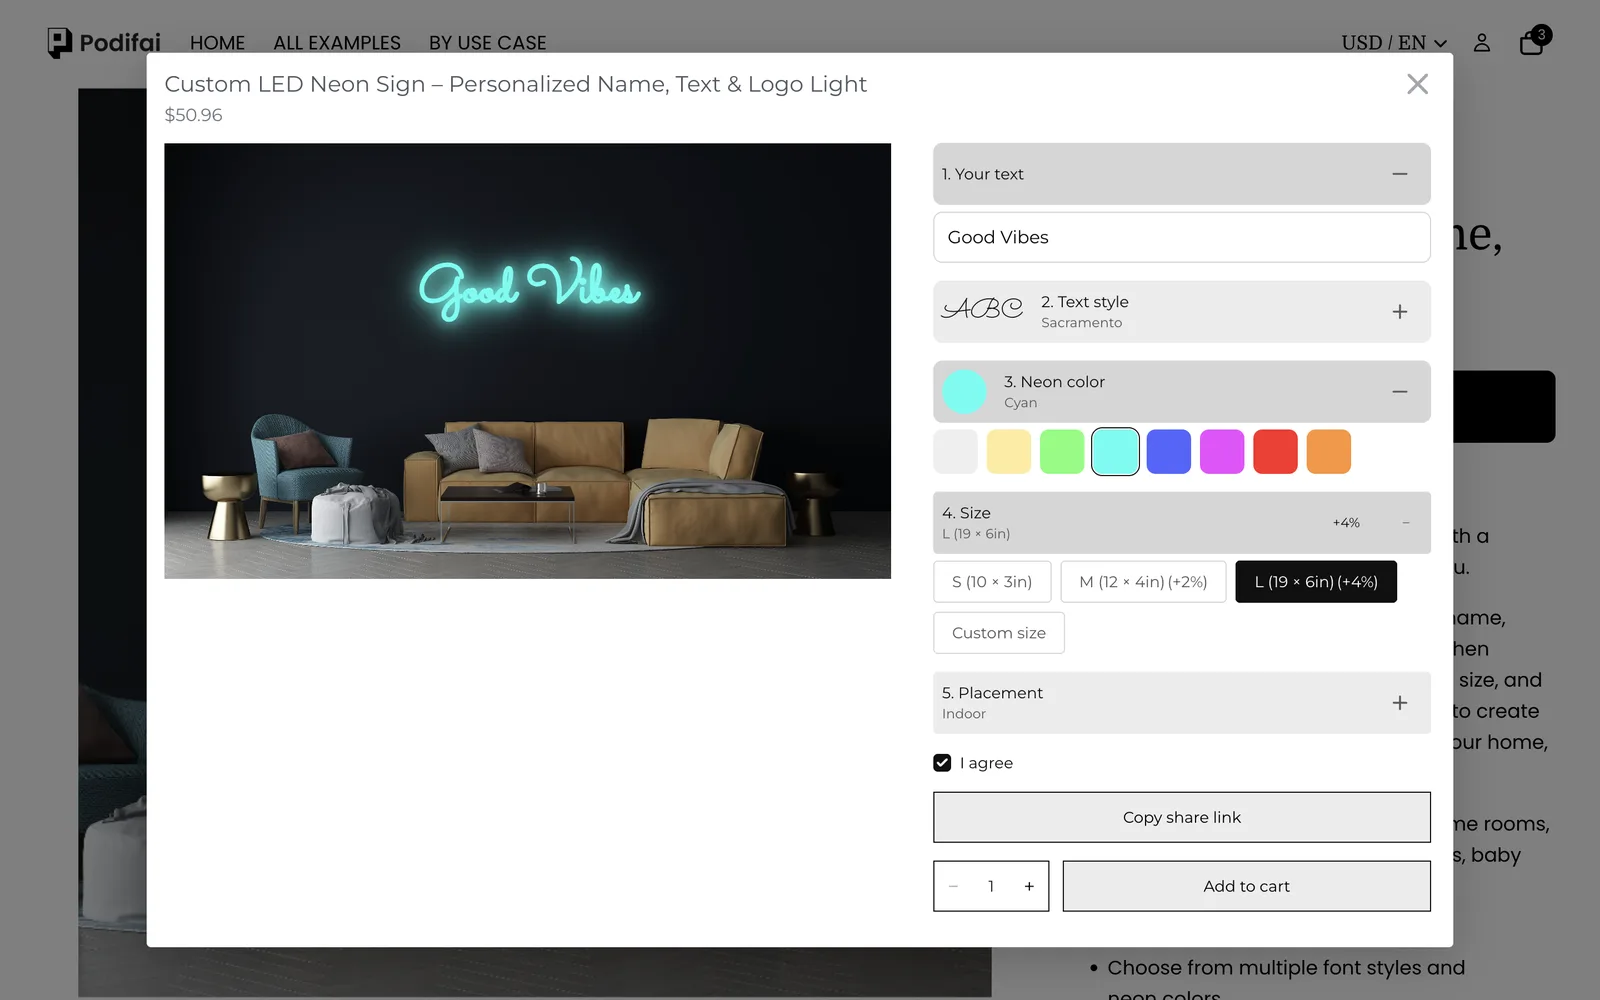
TL;DR: To sell custom neon signs with Podifai, show the shopper's text with the Neon text effect on a room photo, and link its color and font to two swatches. Price sizes and the outdoor version as a percentage of the base price, reveal width and height fields only when Custom size is chosen, and add a required agreement checkbox. Start from the ready-made Custom Neon Signs template; every feature used here is on the Free plan.
What does the shopper see?
- Click Customize to open the popup with the sign on a living room wall.
- Type the text. It glows on the wall as they type.
- Choose a font (7 in the demo) and a neon color (8, from White to Orange).
- Choose a size: S, M (+2%), L (+4%), or Custom size with their own width and height in inches.
- Choose Indoor or Outdoor (Water-resistant, +15%), keep "I agree" ticked and add to cart.
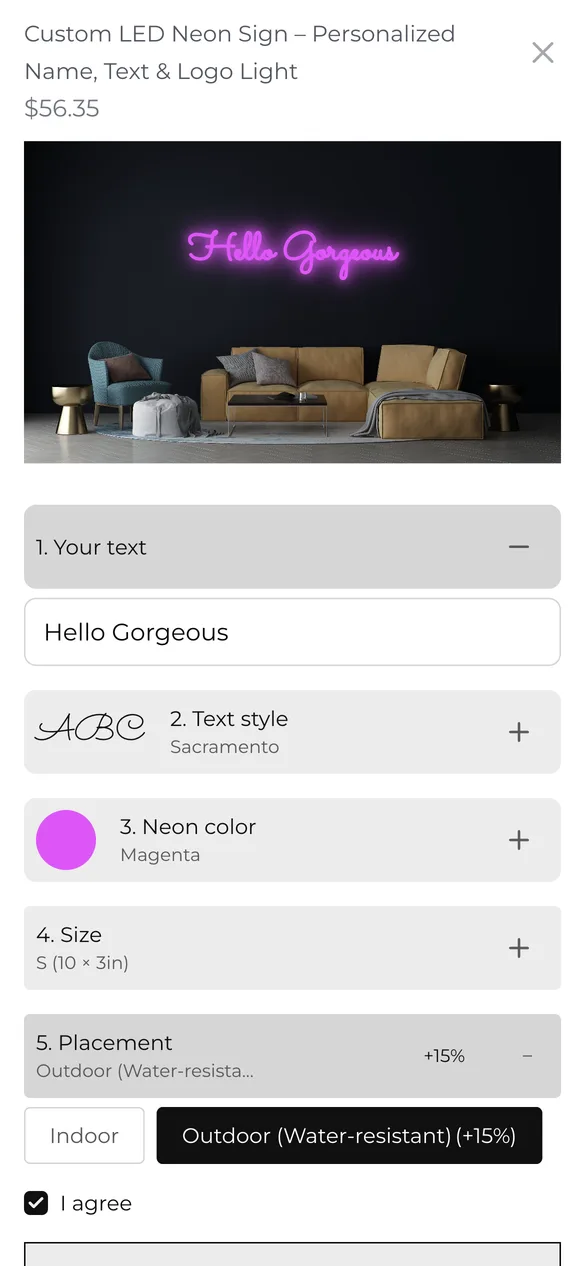
Try it yourself on the live demo product.
What do you need before you start?
1. Install Podifai and turn on the app embed
Install Podifai from the Shopify App Store, then open Online Store > Themes > Edit theme > App embeds and switch on Podifai Customizer. See Enable App Embed.
2. Create the product with your starting price
Add the sign as one Shopify product priced at your smallest size ($49.00 in the demo). Sizes and the outdoor version are priced as a percentage on top, so one base price drives everything.
3. Pick a dark room photo
Neon reads best on a dark wall. Use a landscape room photo with clear empty wall space where the text will sit, at least 1600px wide. See Image & Asset Requirements.
Should sign sizes be Shopify variants or Podifai options?
Neon signs are made to order, so the demo prices sizes in Podifai. Use this to decide:
| Your situation | Use | What it gives you |
|---|---|---|
| Sizes are made to order from the same materials | Podifai Badge Group (as in the demo) | One product, percentage or fixed price per size |
| You sell ready-made signs in fixed sizes with stock | Shopify variants | Shopify tracks stock per size |
| Shoppers need any size | Podifai Custom size value plus width and height inputs | Collect exact dimensions; quote or adjust before production |
Percentage adjustments are calculated on the product's base price, so if you raise the base price every size follows automatically.
What is the fastest way to set this up?
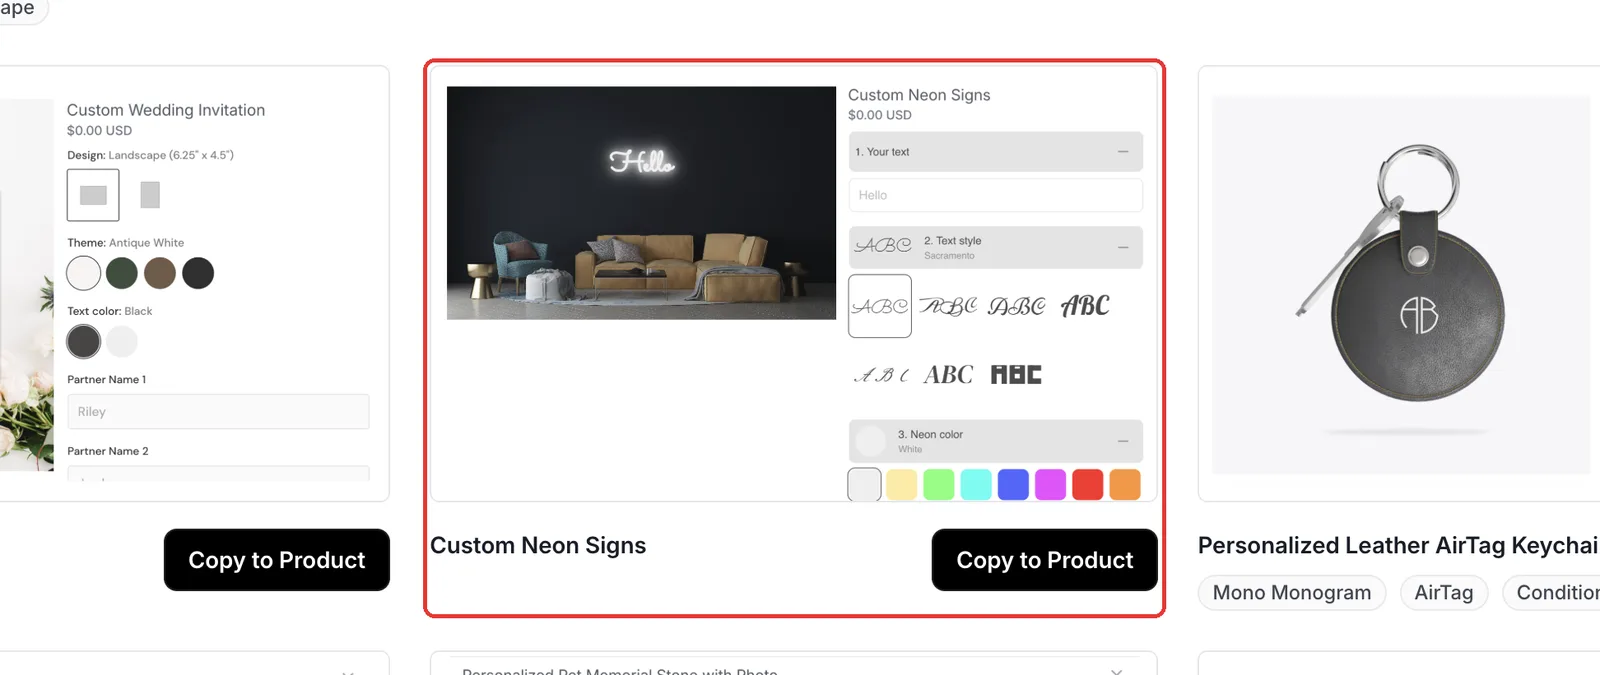
Podifai ships a ready-made Custom Neon Signs template with the same options as the demo. Open Templates > Podifai Templates, find Custom Neon Signs and click Copy to Product, then choose your sign product and click Apply (or Override, which replaces existing Podifai options). Then replace the room photo, adjust fonts, colors and size prices to match what you make, and save.
Which options do you need?
The whole customizer is 7 Podifai options on one Shopify product:
| Option | Podifai type | Key settings | Price |
|---|---|---|---|
| 1. Your text | Text Input | Neon text effect, color and font linked to swatches | No charge |
| 2. Text style | Font Swatch | 7 script and display fonts | No charge |
| 3. Neon color | Color Swatch | 8 neon colors | No charge |
| 4. Size | Badge Group | S, M, L and Custom size | +0%, +2%, +4% |
| Custom size - Width / Height (inch) | Text Input x2 | Shown only for Custom size | No charge |
| 5. Placement | Badge Group | Indoor or Outdoor (Water-resistant) | +15% for outdoor |
| I agree | Checkbox | Required, ticked by default | No charge |
How to set it up in Podifai, step by step
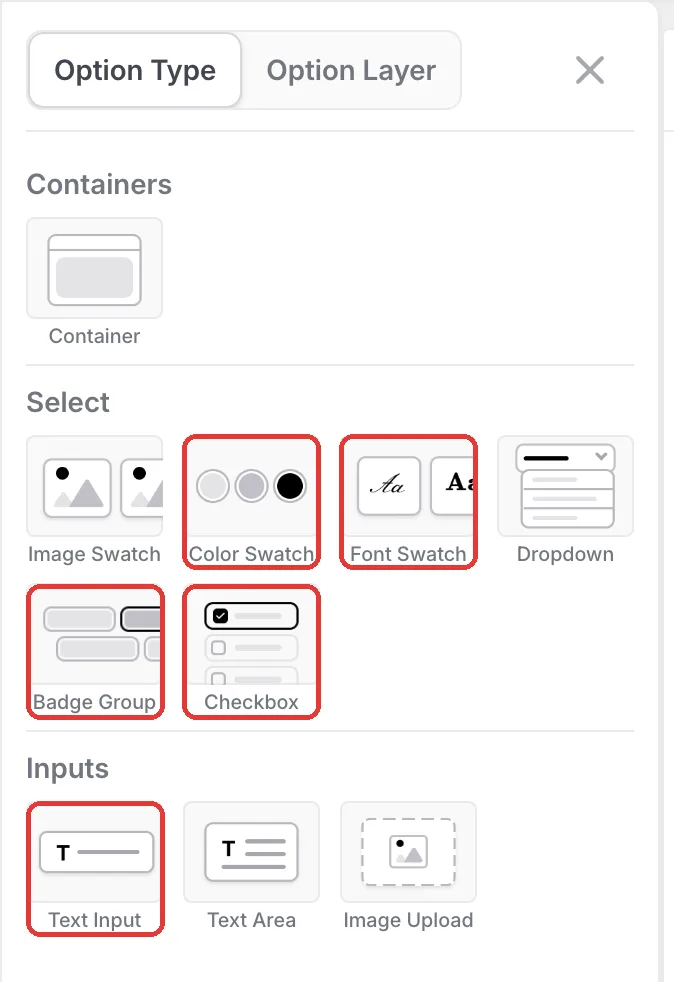
These steps match the live demo product. Red boxes mark what to change; numbers follow the order in the step text.
Step 1: Add the option types
Open the product in the Podifai editor and click the menu icon on the left. From Option Type, add a Text Input for the wording, a Font Swatch, a Color Swatch for the neon color, two Badge Groups for size and placement, two more Text Inputs for custom width and height, and a Checkbox. Number the labels (1. Your text, 2. Text style and so on) so shoppers follow the order.
Step 2: Make the text glow on a room photo
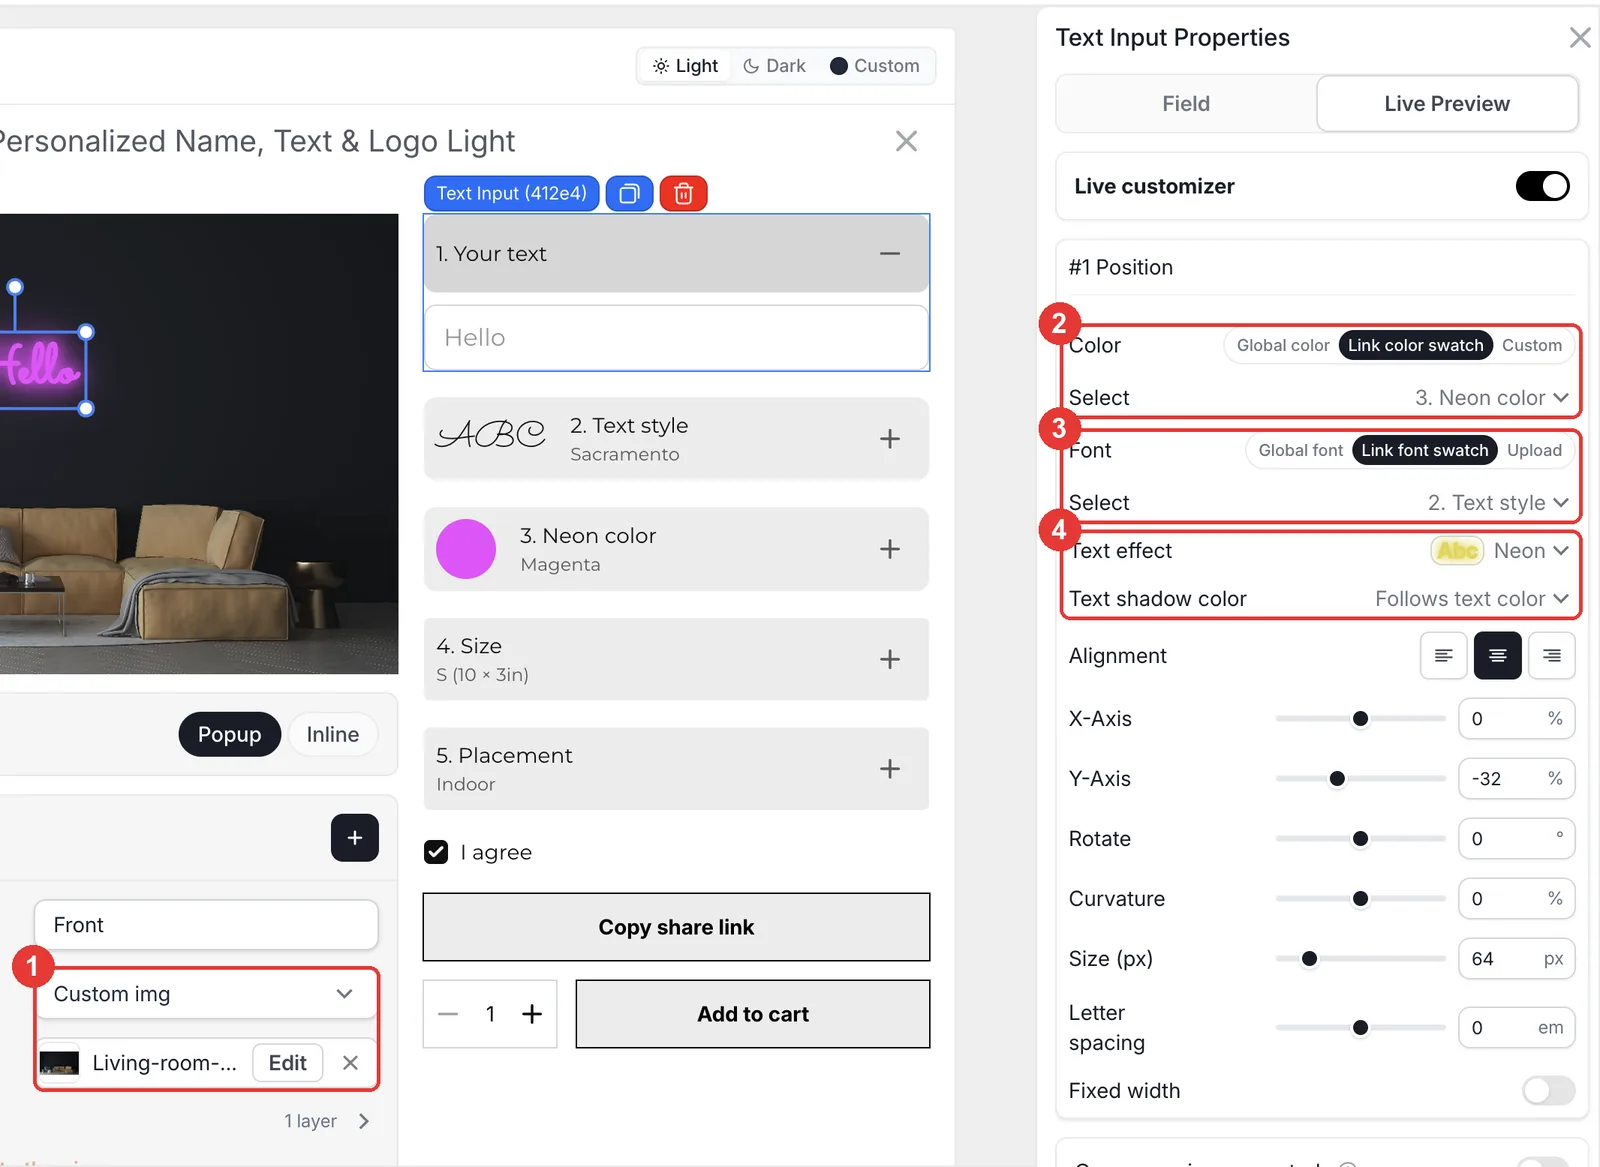
Below the preview, set the view Background to Custom image and upload the room photo. Then select the text input, open Live Preview and turn on Live customizer. Set Color to Link color swatch and pick 3. Neon color, set Font to Link font swatch and pick 2. Text style, then set Text effect to Neon. Leave Text shadow color on Follows text color so the glow matches the tube color.
- Place the text on the empty wall with X-Axis, Y-Axis and Size (64px in the demo).
- Script fonts with connected letters look closest to real neon tubing.
Step 3: Price sizes as a percentage
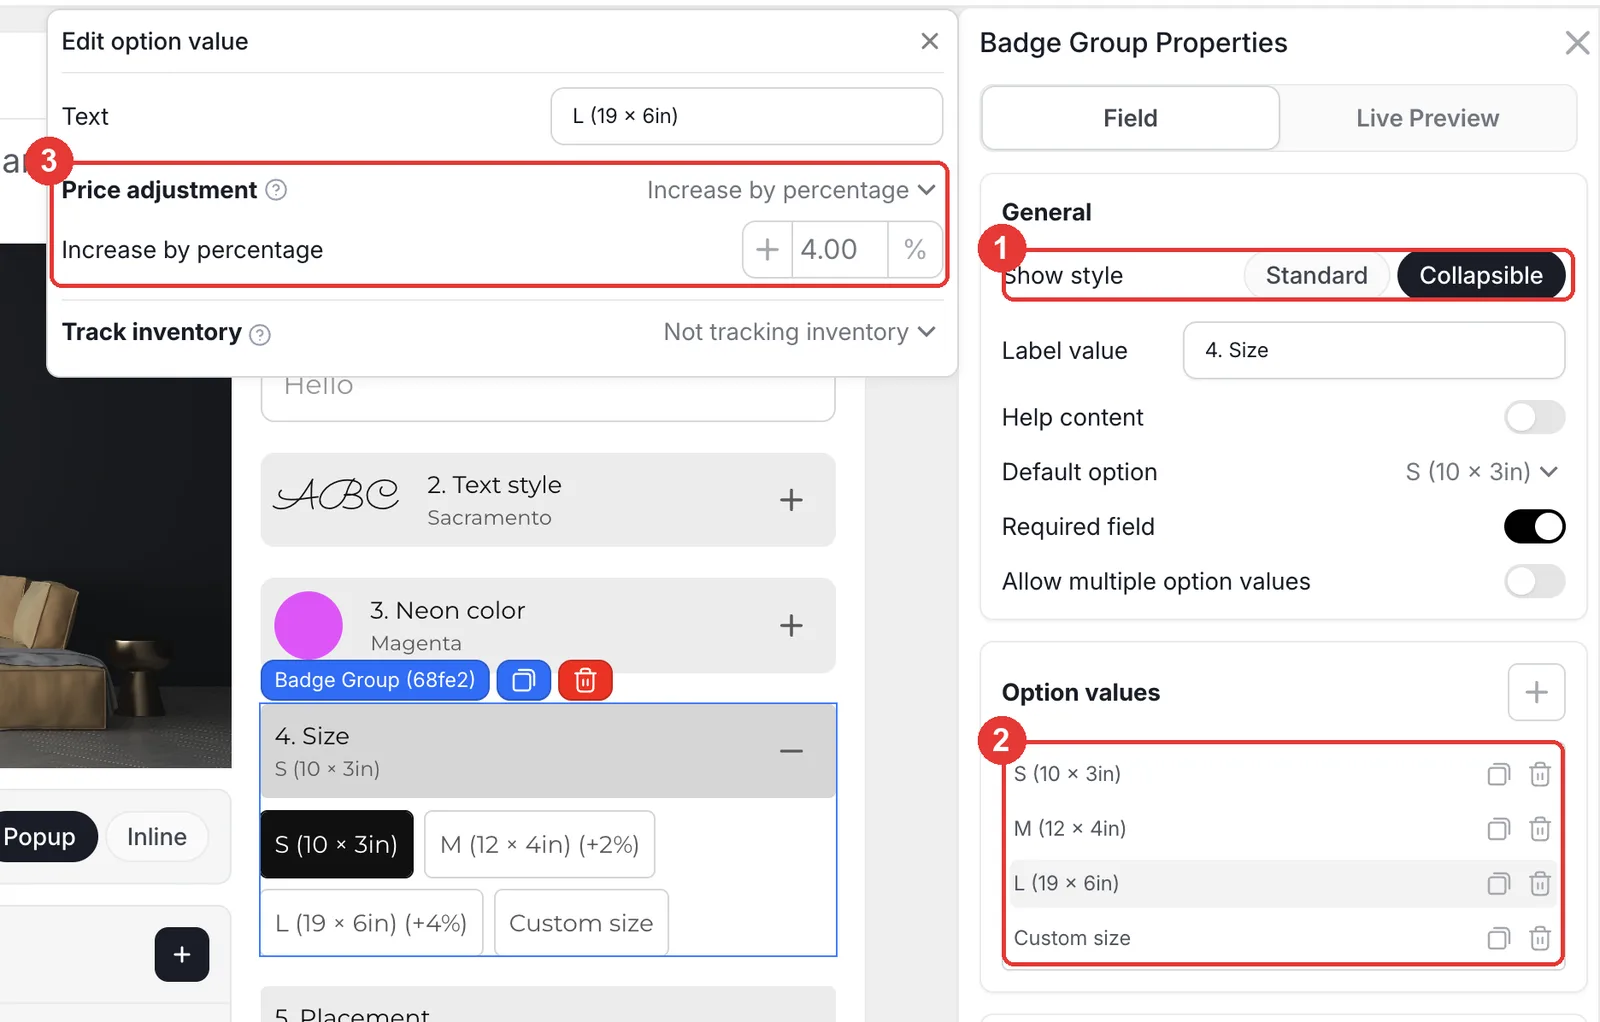
Select the Size badge group and set Show style to Collapsible, which turns each option into a numbered step that opens and closes. Add one value per size, plus Custom size. Click a value to open Edit option value, set Price adjustment to Increase by percentage and enter the amount (2% for M and 4% for L in the demo; real shops often charge far more for bigger signs).
Step 4: Ask for dimensions only for custom sizes
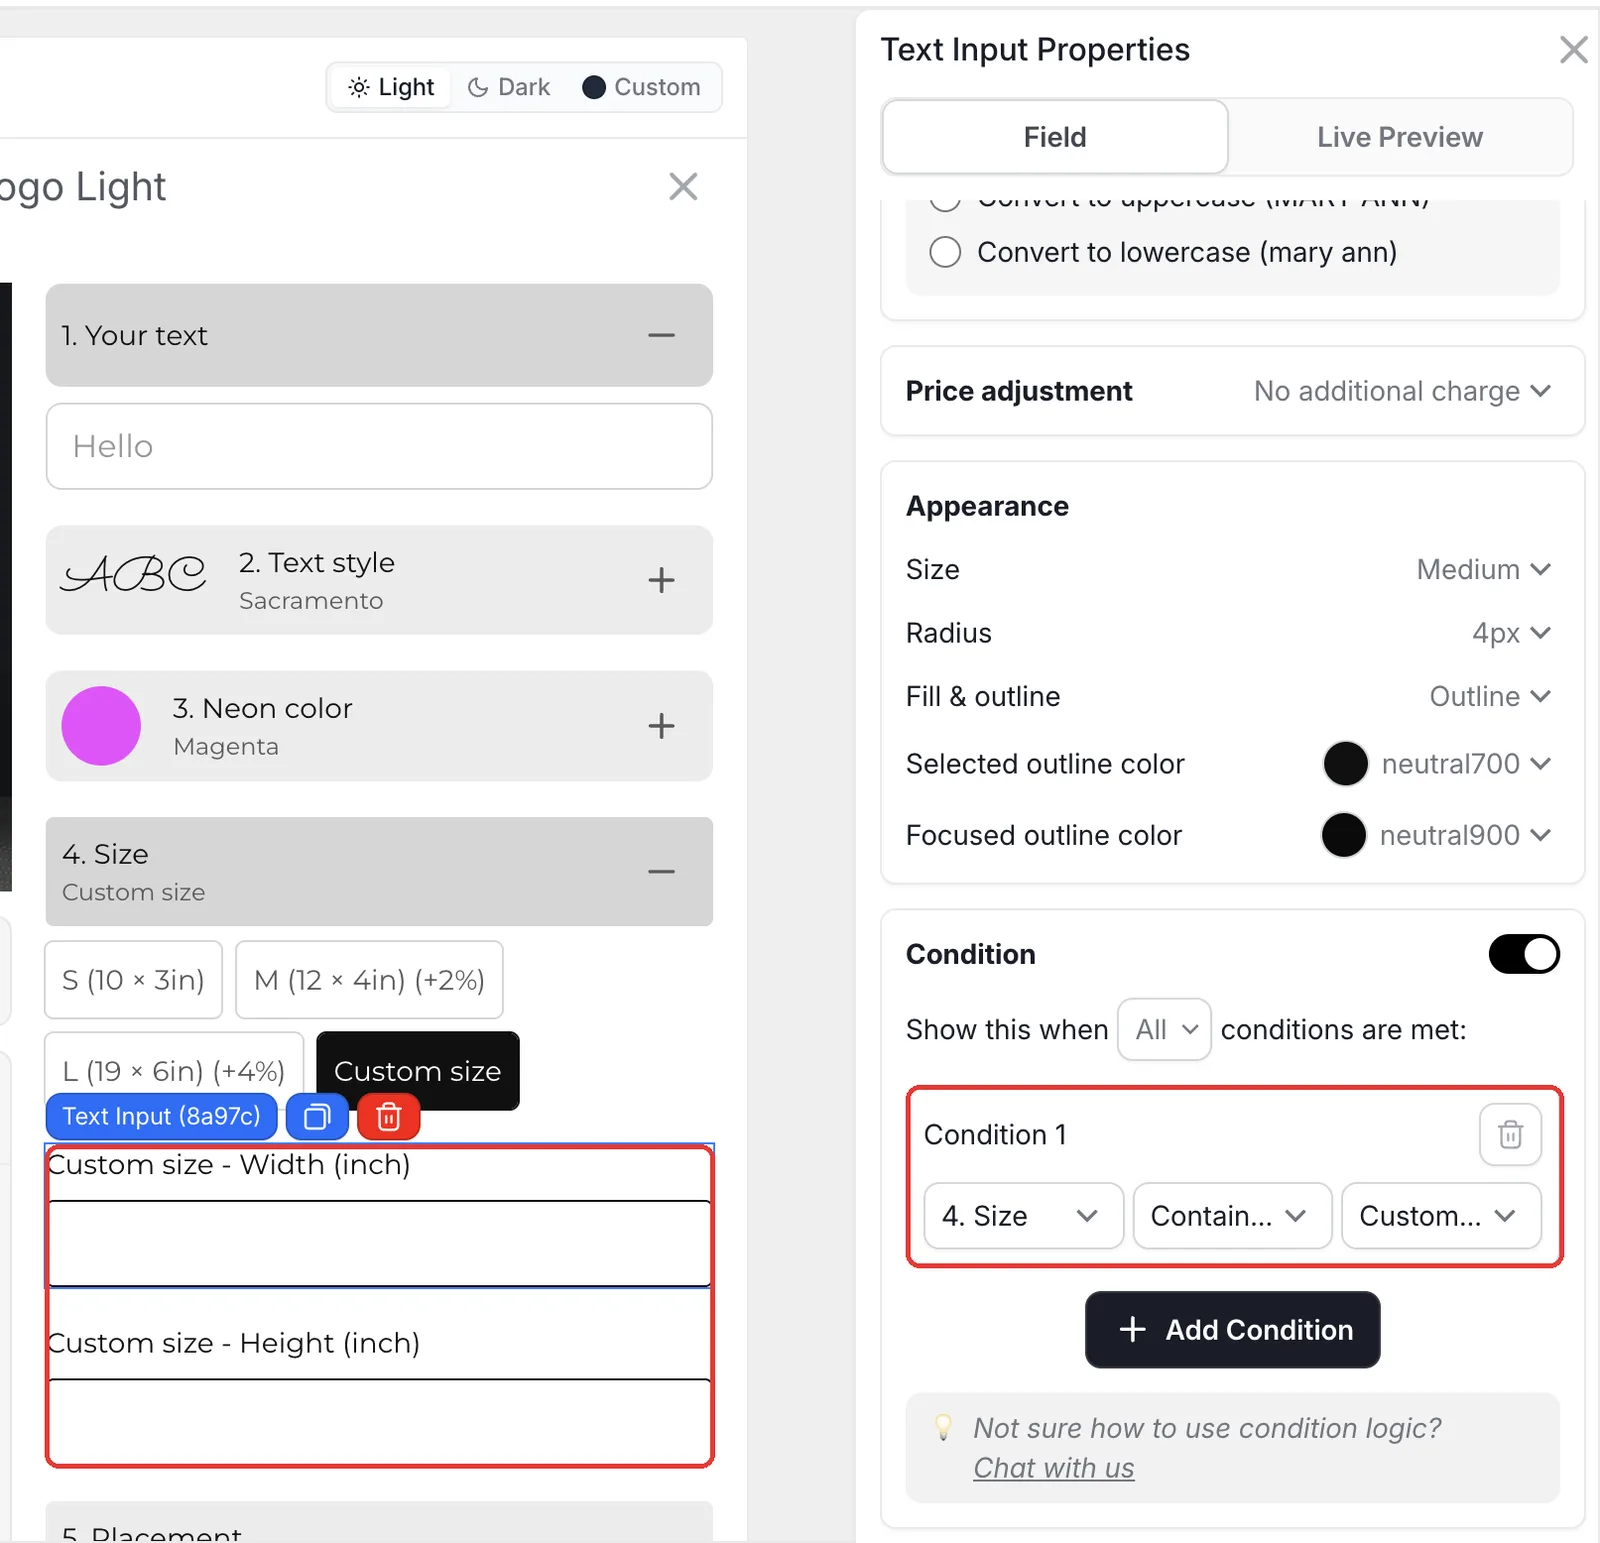
Add two Text Inputs, Custom size - Width (inch) and Custom size - Height (inch). On each, turn on Condition and add the rule 4. Size contains Custom size. The fields appear only when a shopper picks Custom size.
- Turn on Input restrictions with Numbers only so shoppers enter just the number of inches.
Step 5: Add the outdoor upgrade and agreement
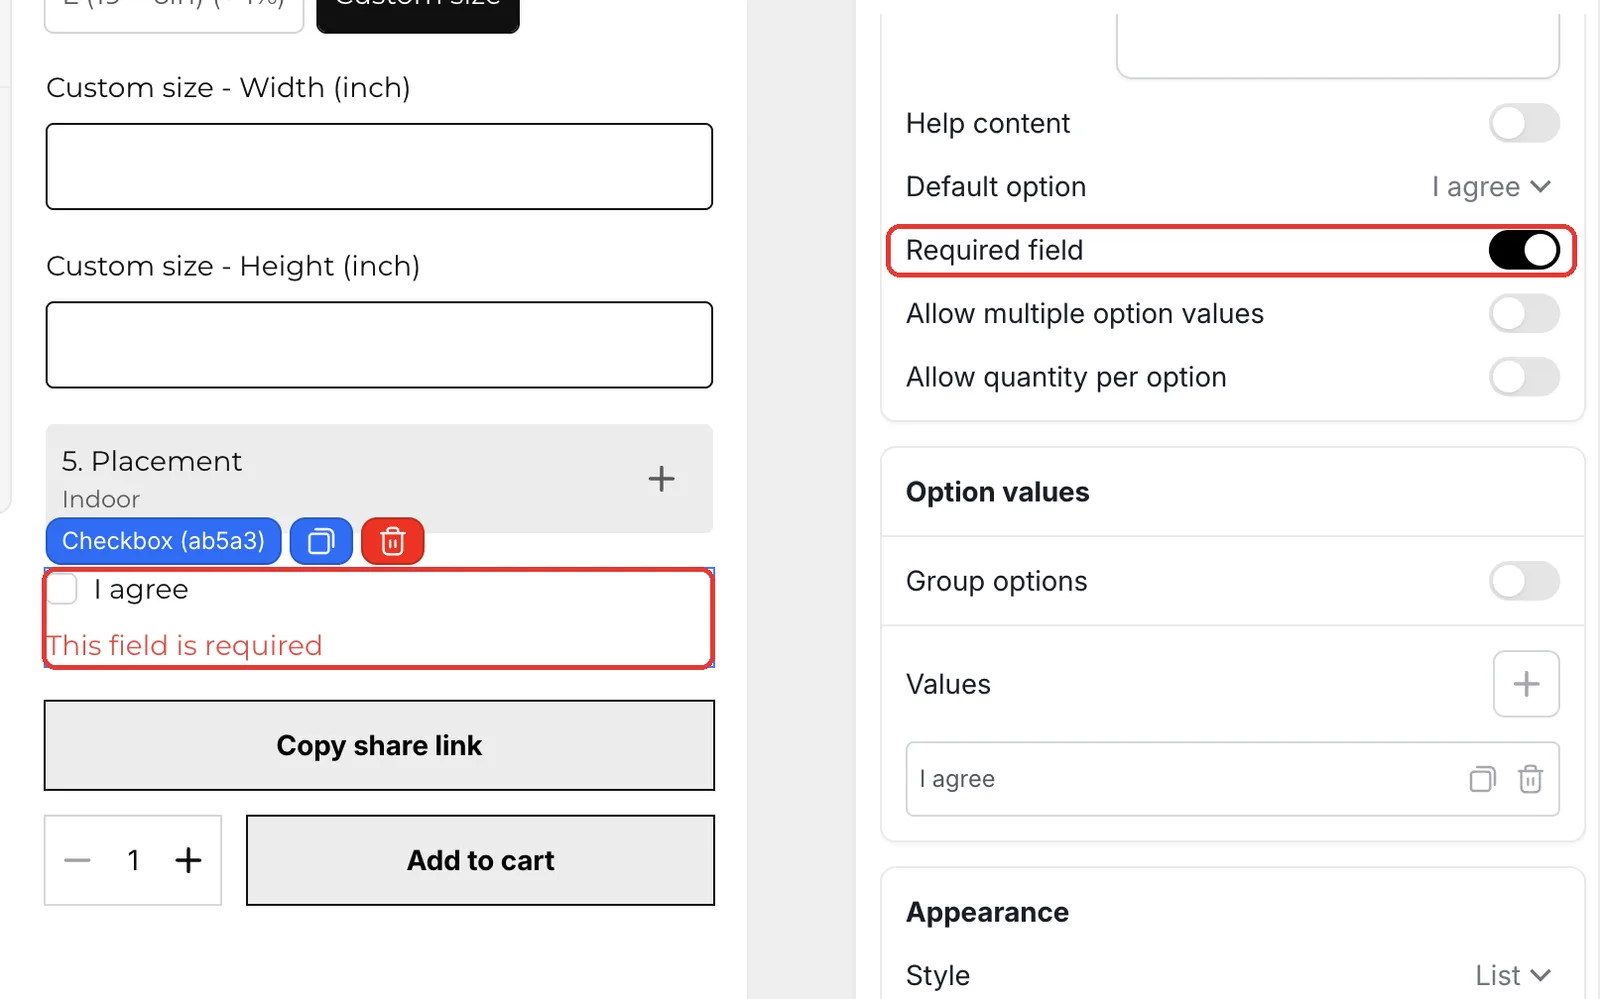
Add a Placement badge group with Indoor and Outdoor (Water-resistant), and give Outdoor an Increase by percentage of 15%. Then add a Checkbox with one value, I agree, set it as the Default option and turn on Required field. Rename the checkbox label to something like "I approved my design", because the label is what appears in the cart and order.
- Use the checkbox's help text to state what the shopper agrees to, for example that the sign is made to order and colors may vary slightly.
- Click Save, then test a standard and a custom size on your live store.
What happens in the cart and after the order?
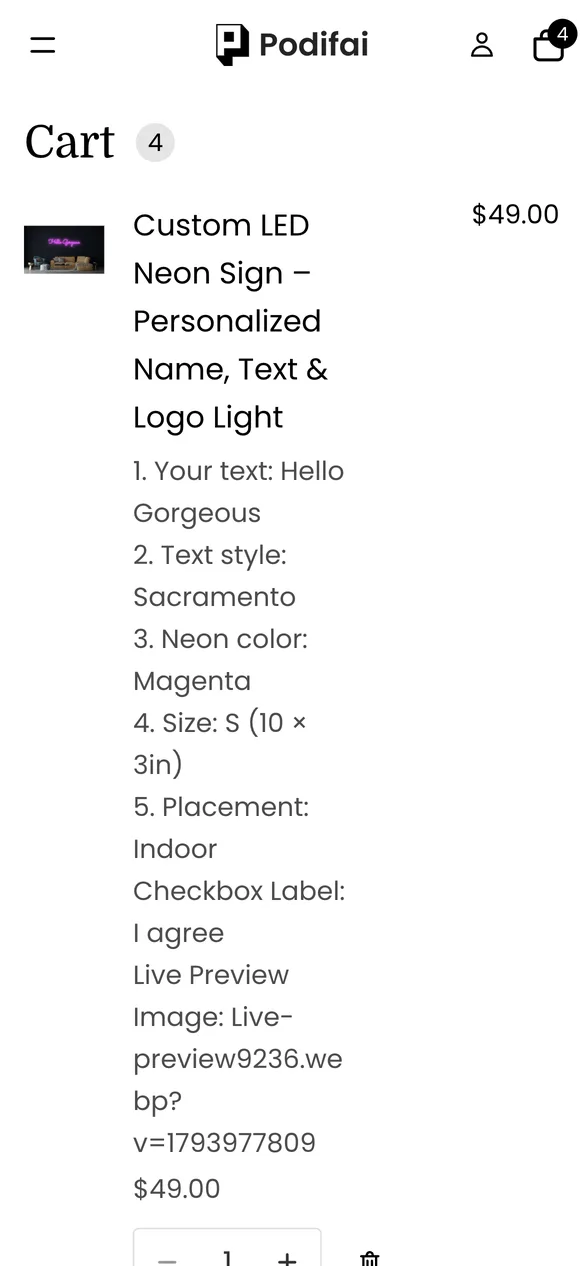
- Every choice, including custom width and height, is saved on the order line as a line item property.
- Percentage add-ons are charged on the same line at checkout.
- A link to the final preview is saved with the order, which helps your sign maker match the font and color.
- With Generate print-ready files on, Podifai creates a transparent PNG of the text, a useful starting point for the tube layout.
Troubleshooting
The text does not glow
Open the text input's Live Preview tab and check that Text effect is set to Neon and Text shadow color is set to Follows text color. See Live Preview text effects.
The size price looks too small
Percentage adjustments use the product's base price. Check the base price in Shopify and the percentage on each size value. See Percentage price adjustments.
Width and height fields never appear
Open each field's Condition and check that the rule points to the Size option and the Custom size value.
Selling tips
- Quote custom sizes before production. Custom size has no price of its own in the demo. If you sell it, either price it high enough to cover large signs or say on the page that you will confirm the final price by email.
- Use a dark background. A dark wall makes every color pop and sells the glow. A bright room photo washes the neon out.
- Explain power and mounting. State the adapter, cable length and mounting method in the product description; those are the questions neon buyers ask most.
What else can you sell with this setup?
The same text effect, swatches and size pricing work for other glowing or lettered products:
- Wedding and event neon signs
- Business logo and storefront signs
- LED name lights for kids' rooms
- Acrylic light boxes and marquee letters
- Wooden and metal word signs
Frequently asked questions
Yes. In the Text Input's Live Preview tab, set Text effect to Neon. Link the color to a Color Swatch and the glow follows the color the shopper picks.
Yes. Open Templates > Podifai Templates, find Custom Neon Signs, click Copy to Product and Apply it to your product. Then replace the room photo and adjust prices.
Yes. On each size value, set Price adjustment to Increase by percentage. The percentage is calculated on the product's base price.
Add a Custom size value to the size options and two Text Inputs for width and height with the condition Size contains Custom size. They only show for custom orders.
Yes. Add a Checkbox with one value and turn on Required field. The product cannot be added to the cart until it is ticked.
Text effects, percentage pricing and conditions are all on the Free plan, which covers up to 3 custom products. Starter ($7.9/month) covers 30 products and Growth ($15.9/month) is unlimited.
More Podifai use cases
- How to Sell Personalized Embroidered Dog Bandanas on Shopify
- How to Sell Custom Photo Phone Cases on Shopify
- How to Sell Monogrammed Leather Keychains on Shopify
- How to Build a Charm Bracelet Builder on Shopify
- How to Sell Custom Hoodies with Front, Back and Sleeve Prints on Shopify
- How to Sell Custom Pickleball Paddles on Shopify
- How to Sell Custom Wedding Invitations on Shopify
- How to Sell Personalized Pens with a Paid Engraving Add-on on Shopify
- How to Sell Custom Trucker Hats on Shopify
Related help docs
Build this customizer on your store
Free for 3 custom products. Start from the ready-made template and change what you need.
 Install Podifai free