How to Sell Custom Photo Phone Cases on Shopify
Set up a custom iPhone case on Shopify: model picker, case colors, photo upload clipped to the case shape, priced text and image add-ons, and live preview.
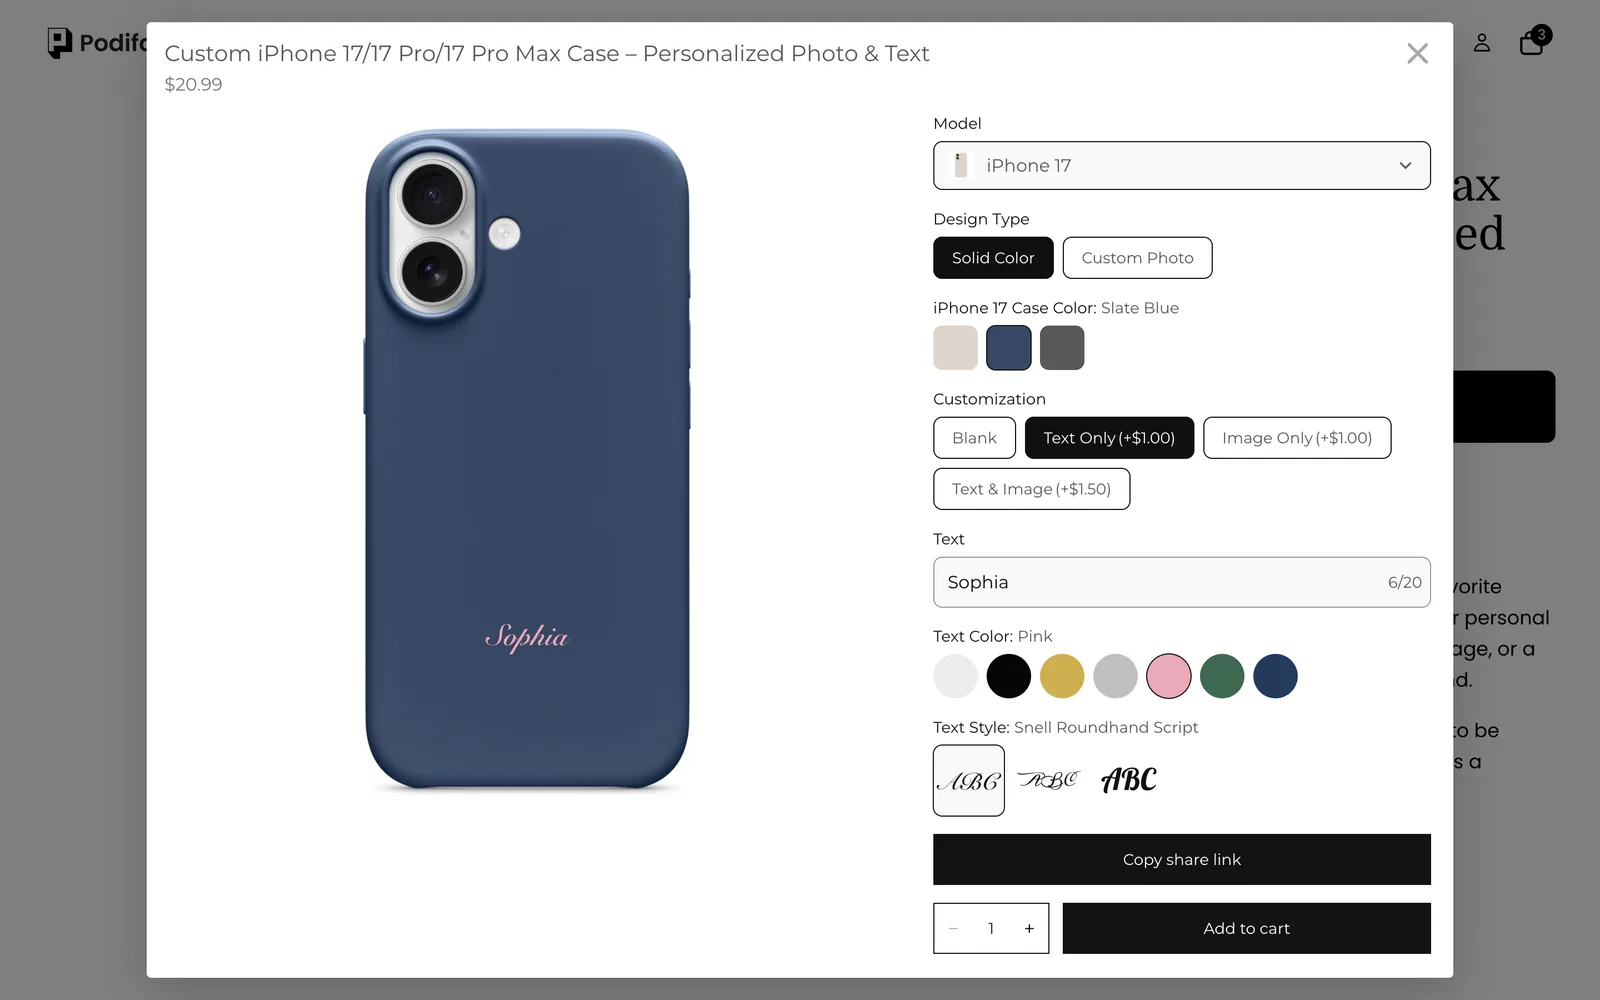
TL;DR: To sell custom phone cases with Podifai, put every model on one Shopify product. A Model dropdown swaps the case photo, a Design Type choice switches between a solid color case and a full photo print, and the shopper's photo is clipped to the exact case outline with an image mask. Text and small artwork are paid add-ons with their own color and font. Start from the ready-made Custom iPhone 17 Phone Case template; every feature used here is on the Free plan.
What does the shopper see?
- Click Customize to open the customizer popup.
- Choose the model: iPhone 17, iPhone 17 Pro or iPhone 17 Pro Max. The preview switches to that case.
- Choose Solid Color to pick a case color (Oat, Slate Blue or Graphite), or Custom Photo to print their own photo across the whole case.
- For a solid case, optionally add Text Only (+$1.00), Image Only (+$1.00) or Text & Image (+$1.50).
- Type up to 20 characters, then pick a text color and font. The preview and price update as they go, then they add to cart.
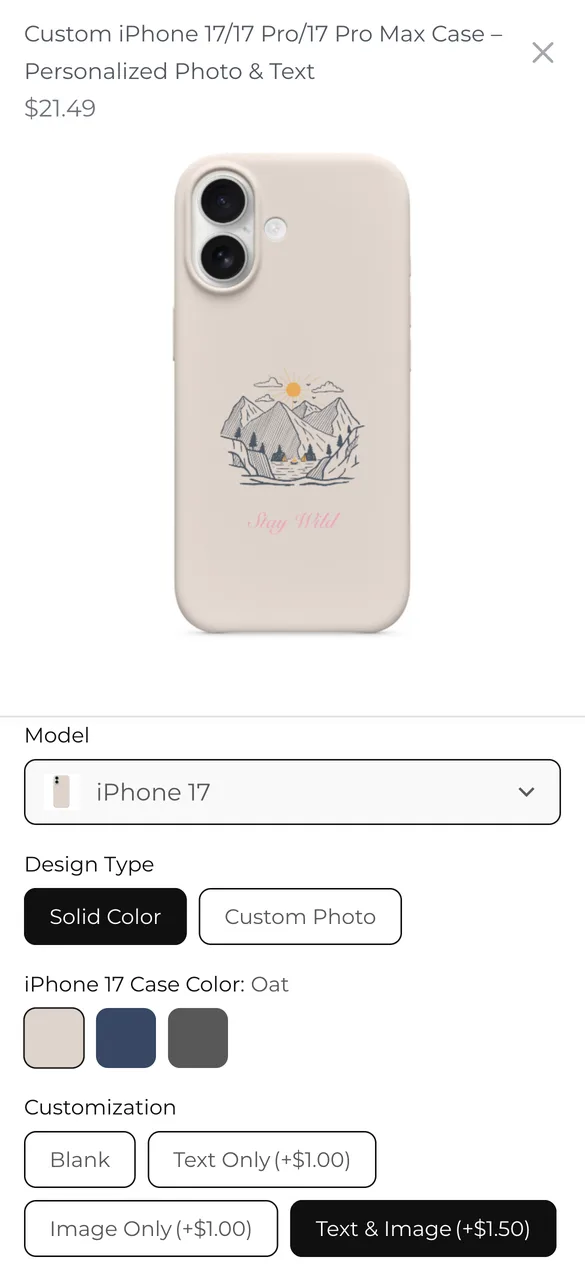
Try it yourself on the live demo product.
What do you need before you start?
1. Install Podifai and turn on the app embed
Install Podifai from the Shopify App Store, then open Online Store > Themes > Edit theme > App embeds and switch on Podifai Customizer. Embeds are saved per theme, so repeat this after switching themes. See Enable App Embed.
2. Create one product for all models
Add one Shopify product, such as "Custom iPhone 17 Case", with your base price ($19.99 in the demo). The models and designs live in Podifai, so you do not need dozens of Shopify variants.
3. Prepare three kinds of images
You need a front photo of each blank case in each color (same size and angle), a transparent PNG outline of each model's printable area for the mask, and optionally a sample design to use as a placeholder. Export the outlines from your supplier's print template so the clipped photo matches what you can actually print. See Image & Asset Requirements.
Should phone models be Shopify variants or Podifai options?
The demo keeps the model, color and design in Podifai, so one Shopify product covers every combination. That is the quickest setup, but it is not right for every shop:
| Your situation | Use | What it gives you |
|---|---|---|
| Every model and color is a separate stock item with its own SKU | Shopify variants | Shopify tracks stock per SKU; Podifai only adds the photo and text |
| Cases are printed on demand from blanks you do not count | Podifai Dropdown and Color Swatch (as in the demo) | One product, no variant limit, preview follows each choice |
| You stock blanks but want one simple product page | Podifai options with Track inventory | Link each model or color value to a Shopify variant, or set a Custom count |
If you use Shopify variants for color, set the view Background to Variant image so the preview follows the selected variant instead of a color swatch.
What is the fastest way to set this up?
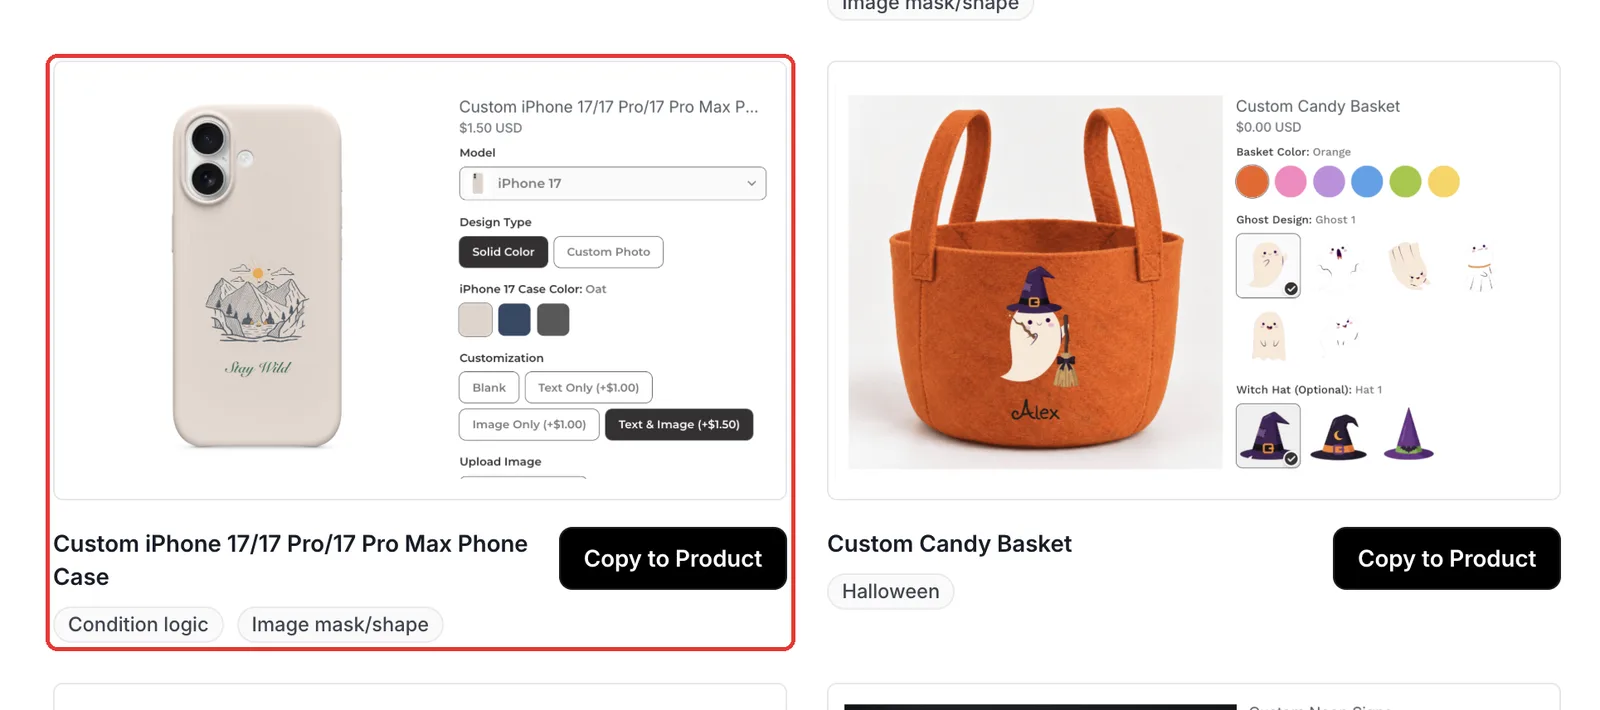
Podifai ships a ready-made Custom iPhone 17/17 Pro/17 Pro Max Phone Case template with the same 13 options as the demo. Open Templates > Podifai Templates, find it and click Copy to Product. In Choose a product, find your case product and click Apply (or Override if it already has Podifai options, which replaces them). The copy is one-time, so later template edits do not change your product. Then swap in your own case photos and mask outlines, adjust colors and prices, and save. The steps below explain each setting.
Which options do you need?
The whole customizer is 7 Podifai options on one Shopify product:
| Option | Podifai type | Key settings | Price |
|---|---|---|---|
| Model | Dropdown | One value per model, each with a blank case photo; full-size live preview layer | No charge |
| Design Type | Badge Group | Solid Color or Custom Photo | No charge |
| Case Color (one per model) | Color Swatch | Color code plus a case photo per color; condition: that model and Solid Color | No charge |
| Upload Image (one per model) | Image Upload | Mask in the case outline; condition: that model and Custom Photo | No charge |
| Customization | Badge Group | Blank, Text Only, Image Only, Text & Image; condition: Solid Color | +$1.00 to +$1.50 |
| Upload Image (artwork) | Image Upload | Small artwork area; condition: an Image option is chosen | Included above |
| Text, Text Color, Text Style | Text Input, Color Swatch, Font Swatch | 20 characters, linked color and font, fixed width with shrink | Included above |
How to set it up in Podifai, step by step
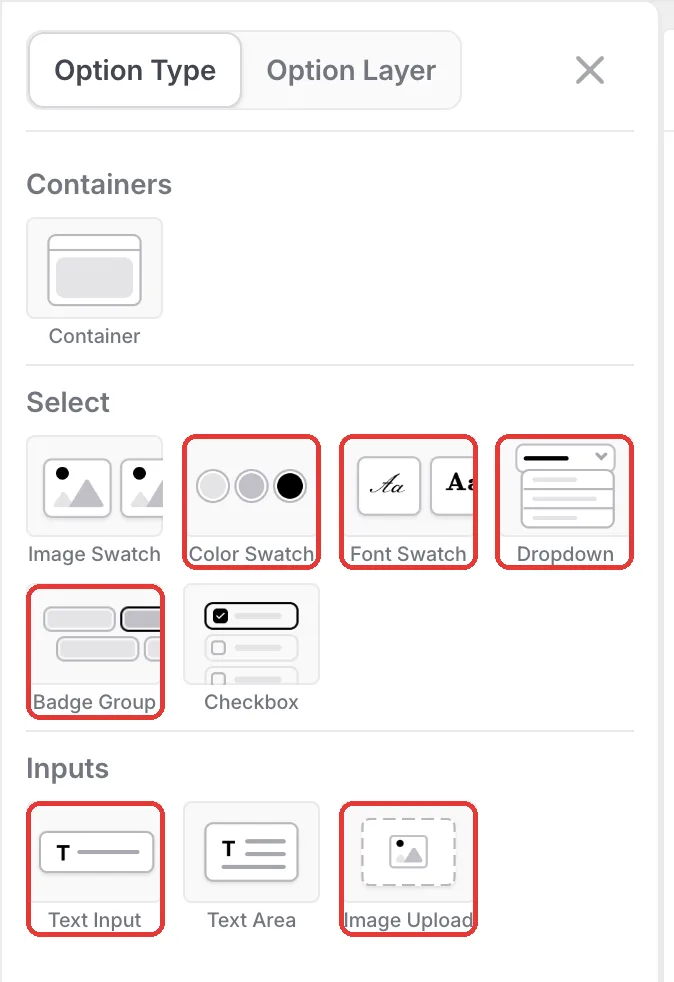
These steps match the live demo product. Red boxes mark what to change; numbers follow the order in the step text.
Step 1: Add the option types
Open the product in the Podifai editor and click the menu icon on the left. From Option Type, add a Dropdown for the model, Badge Groups for the design type and add-ons, Color Swatches for case and text colors, Image Uploads for the shopper's photo and artwork, a Text Input and a Font Swatch. You will add one case-color swatch and one photo upload per model, because each model has its own photos and outline.
Step 2: Make the model dropdown change the case photo
Add one Dropdown value per model and give each value a photo of that blank case, so the dropdown shows a small thumbnail. Open the dropdown's Live Preview tab, turn on Live customizer and set Width/height to 100%. The chosen model's photo now fills the preview.
- Export every model photo at the same canvas size, so switching models does not shift the layout.
- Set Default option to your best-selling model.
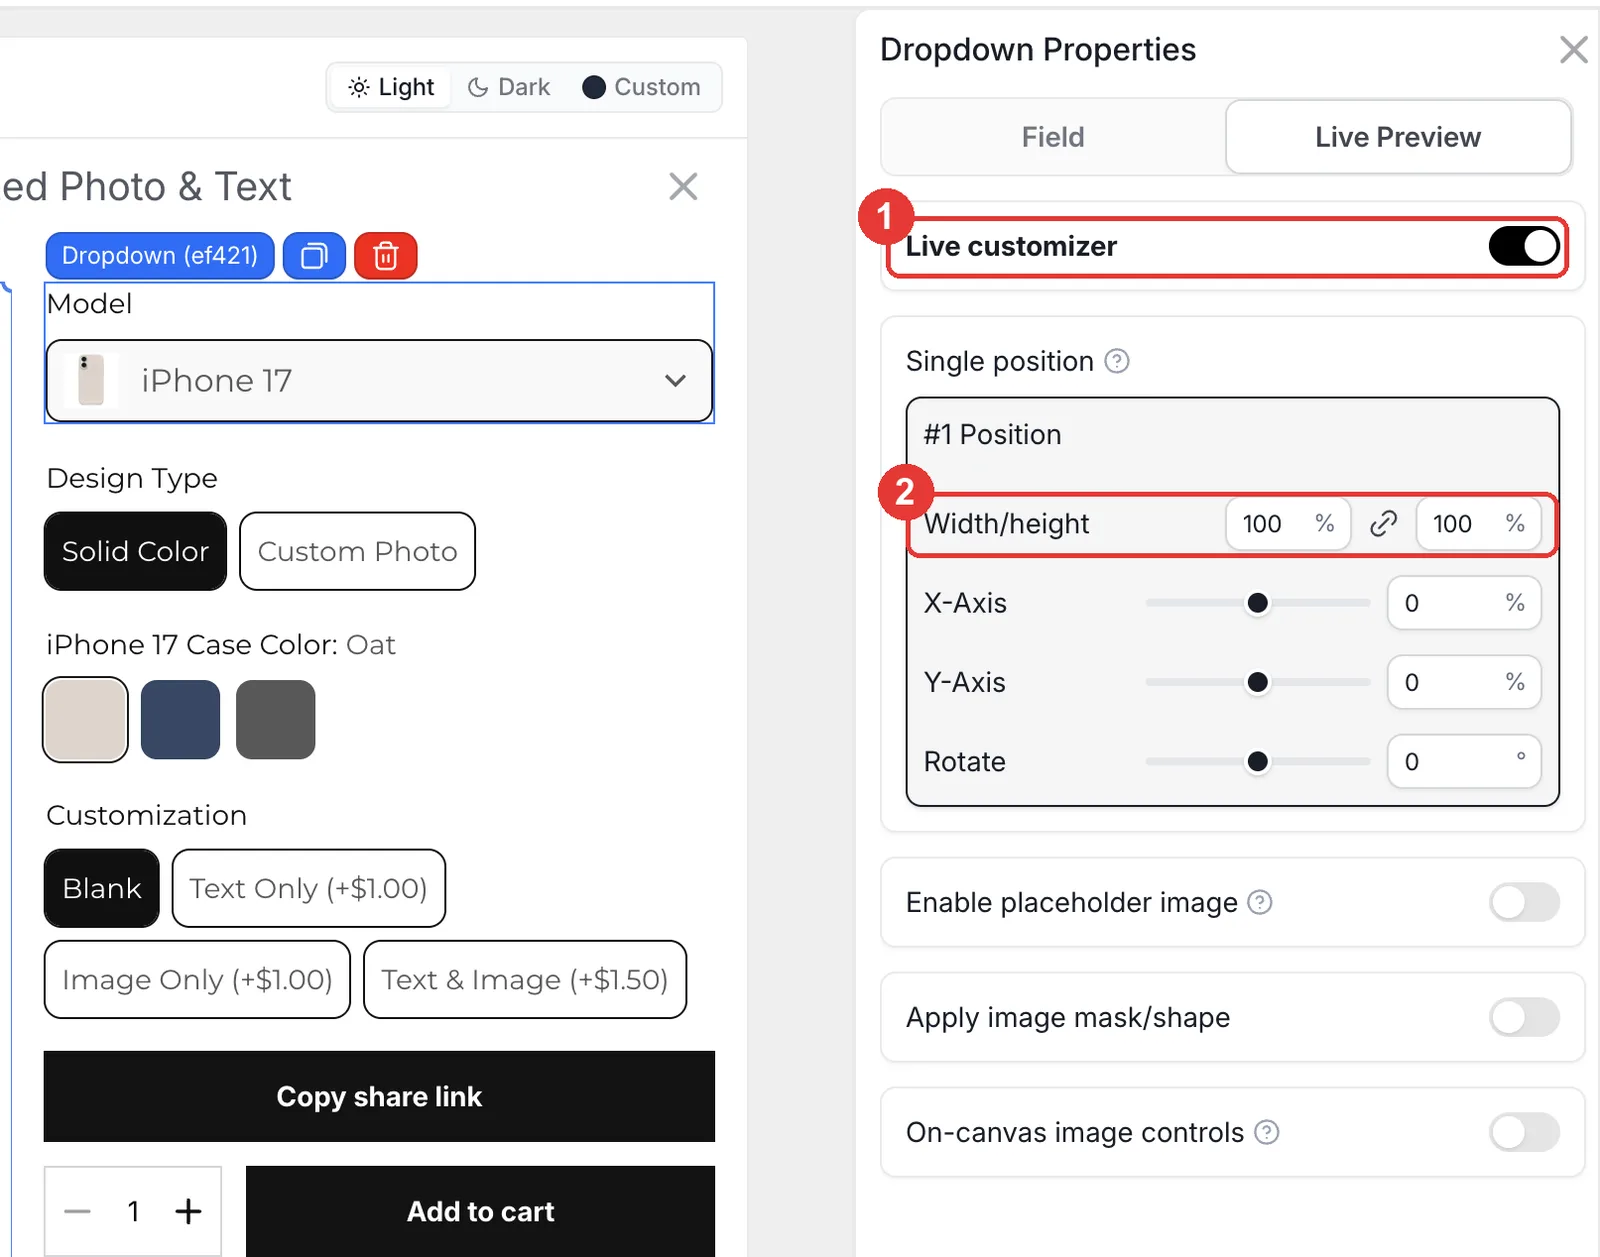
Step 3: Show each case color as a real photo
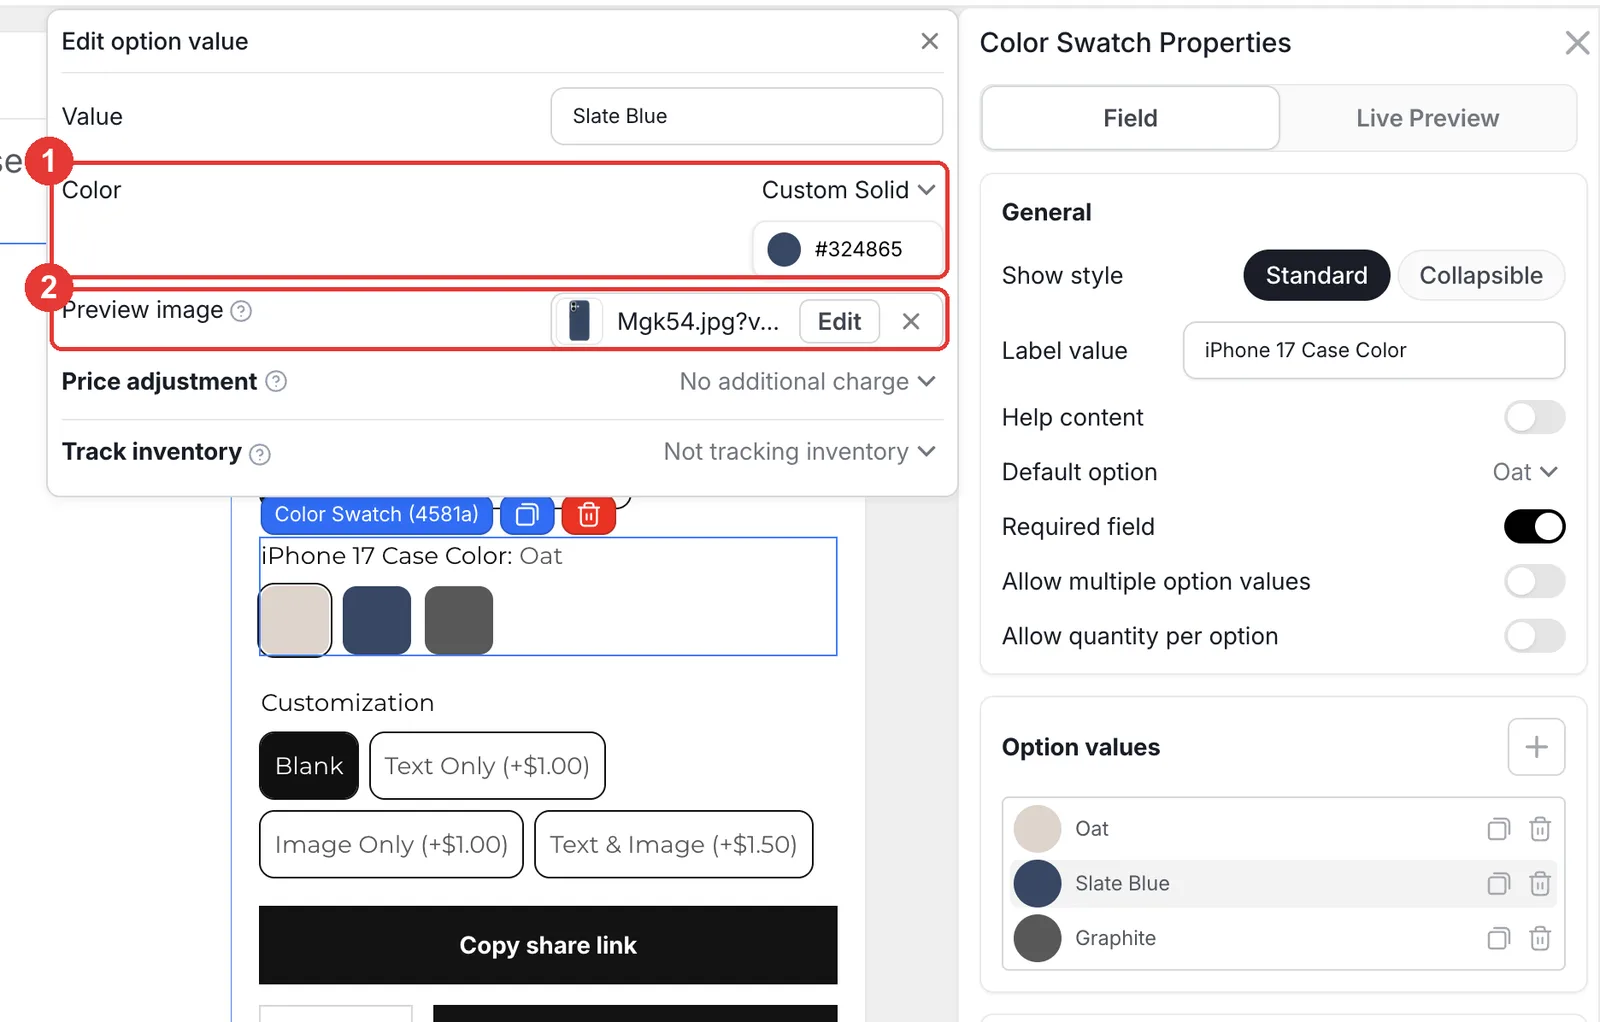
Add a Color Swatch for each model's case colors ("iPhone 17 Case Color" and so on). Click a value to open Edit option value, set the color code for the swatch dot, then upload the photo of the case in that color as Preview image. With Live customizer on at 100%, picking a color swaps the whole case photo, which looks more realistic than tinting.
Step 4: Show the right fields for each model and design
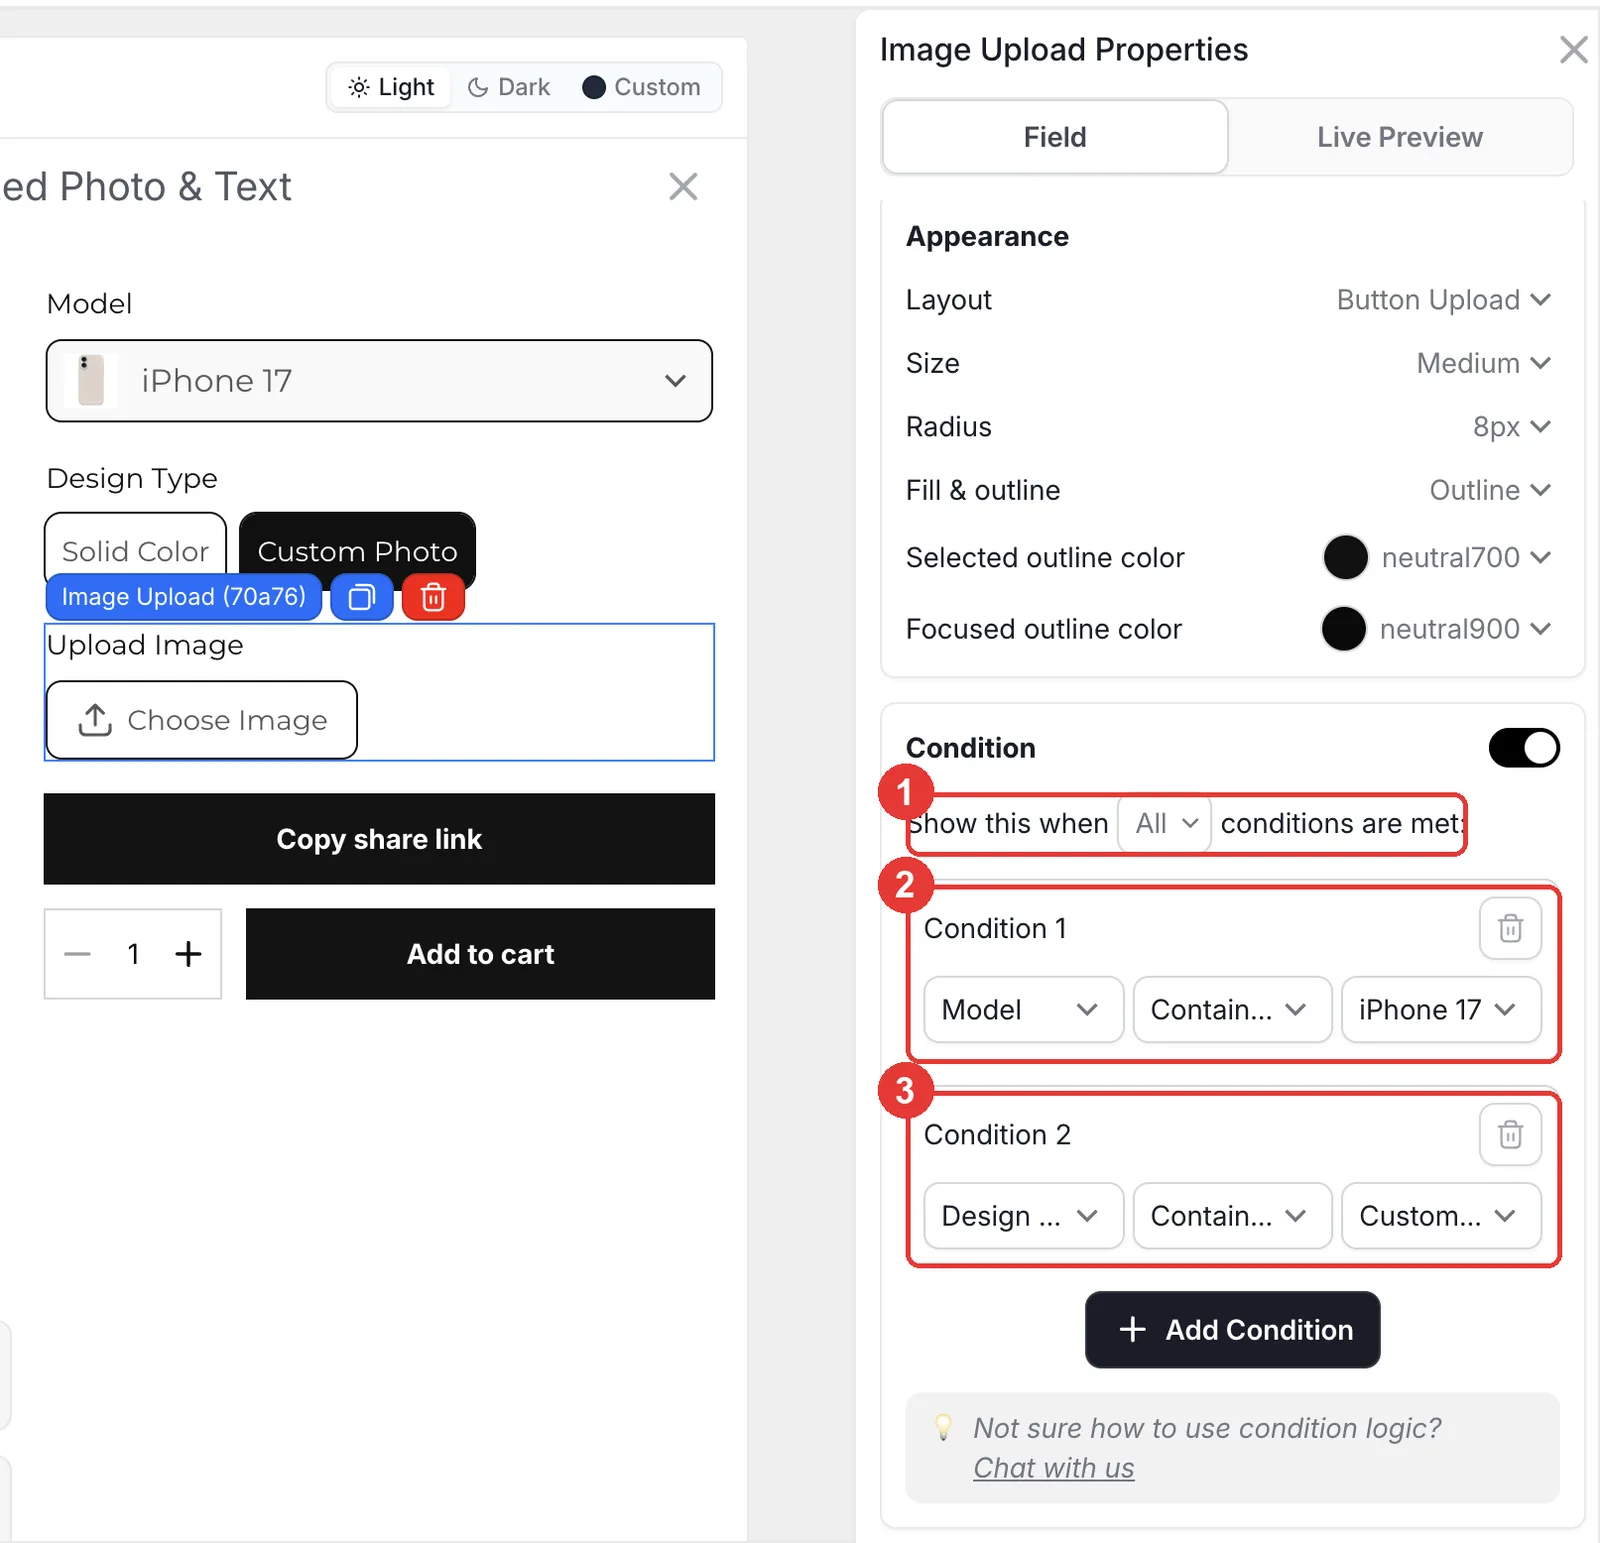
On the iPhone 17 photo upload, turn on Condition, set Show this when to All, and add two rules: Model contains iPhone 17, and Design Type contains Custom Photo. Repeat for each model's upload and color swatch, using Solid Color for the swatches. Shoppers only ever see the one field that matches their phone.
Step 5: Clip the photo to the case outline
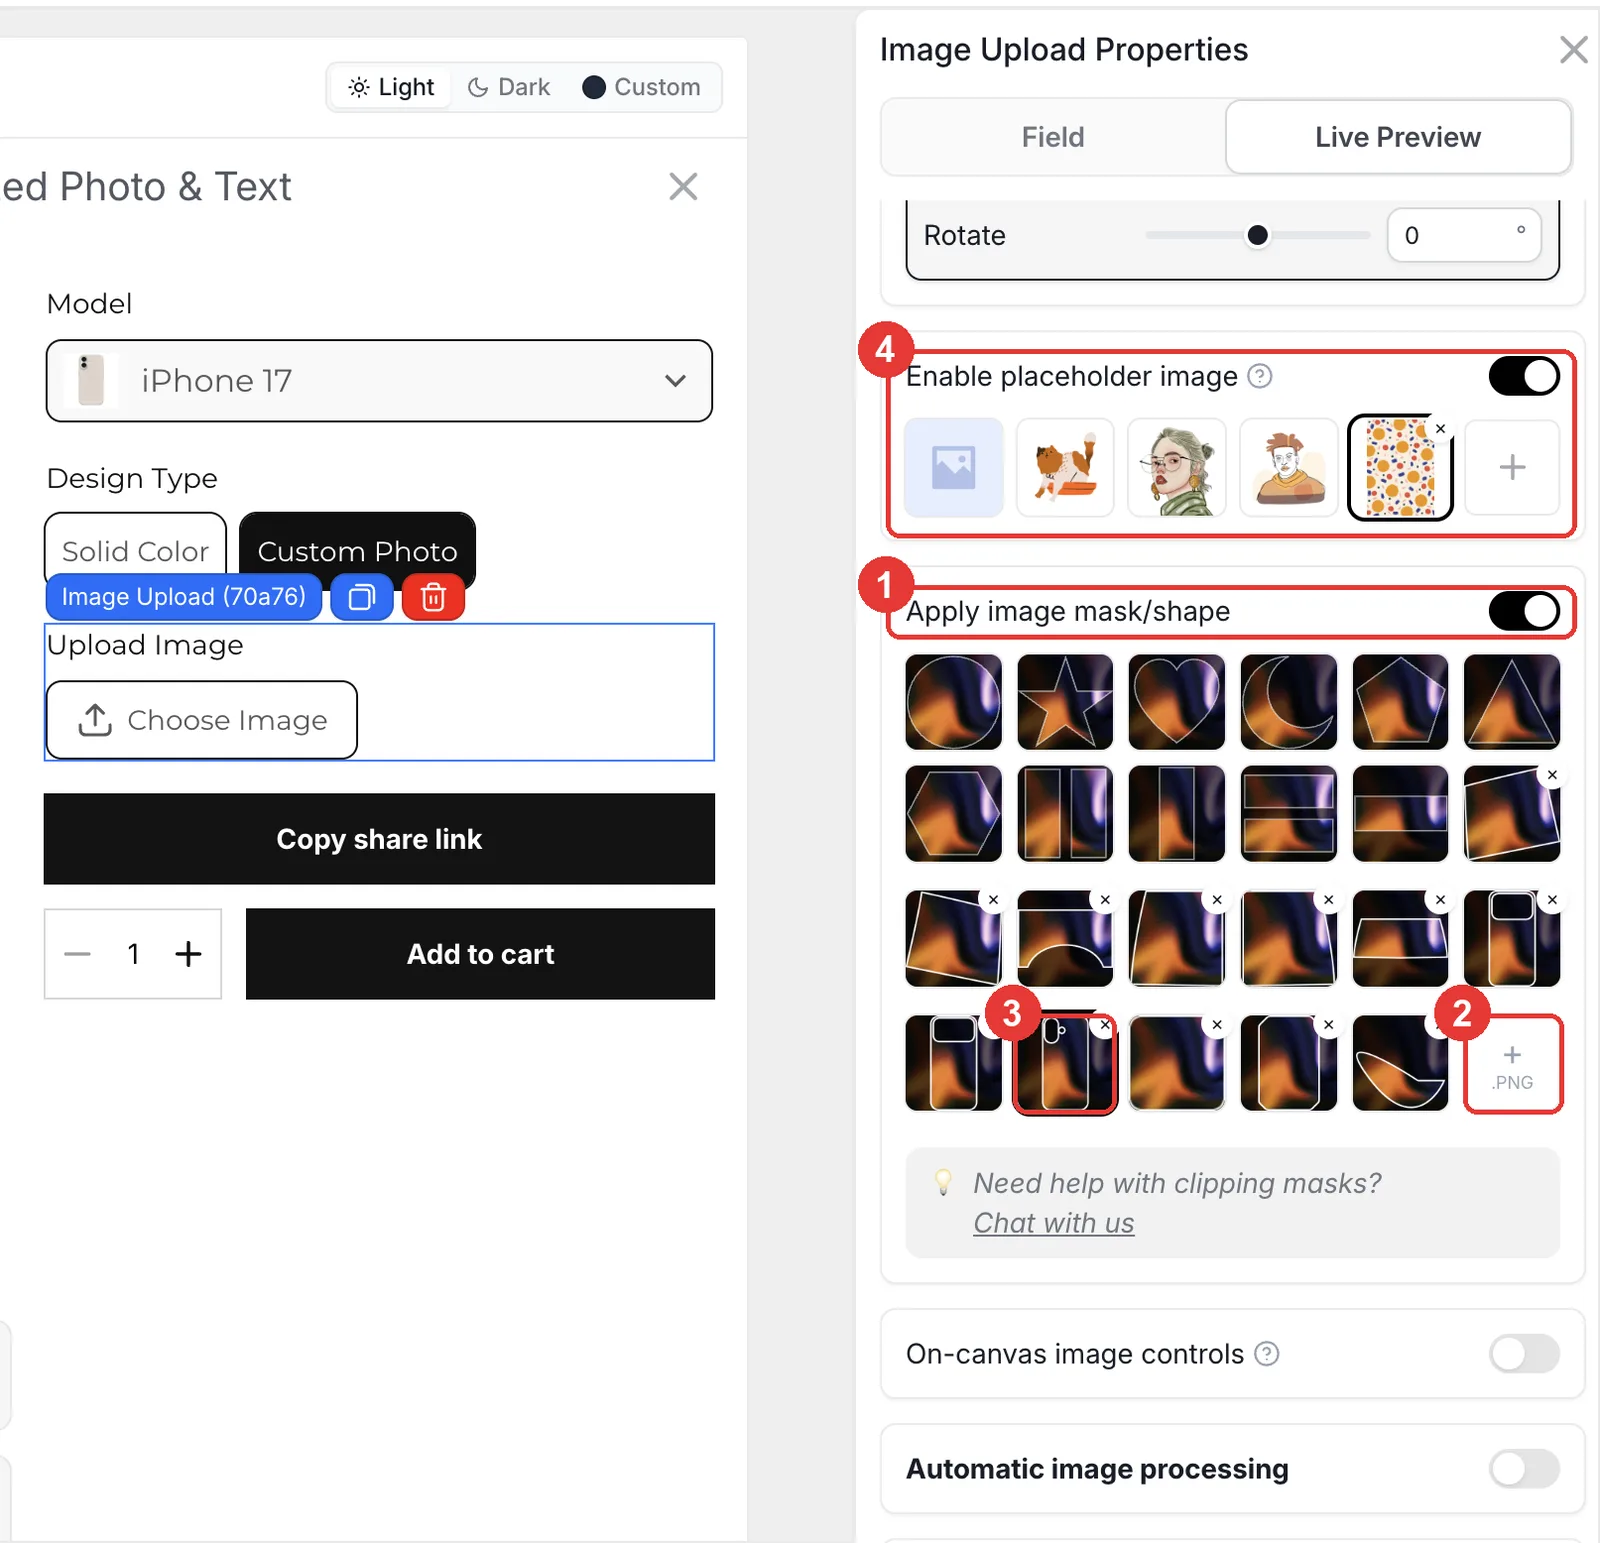
Open the upload's Live Preview tab. Turn on Apply image mask/shape, click + PNG to upload that model's case outline, then select it. The shopper's photo is now trimmed to the printable area, including the camera cut-out. Optionally turn on Enable placeholder image and pick a sample pattern so the case never looks empty before an upload.
- Use one outline per model; the camera bump moves between iPhone 17, 17 Pro and 17 Pro Max.
- Leave a little bleed in your print file even if the preview is clipped tightly.
- Under Automatic image processing you can also remove the background or convert uploads to black and white on upload.
Step 6: Charge for text and artwork add-ons
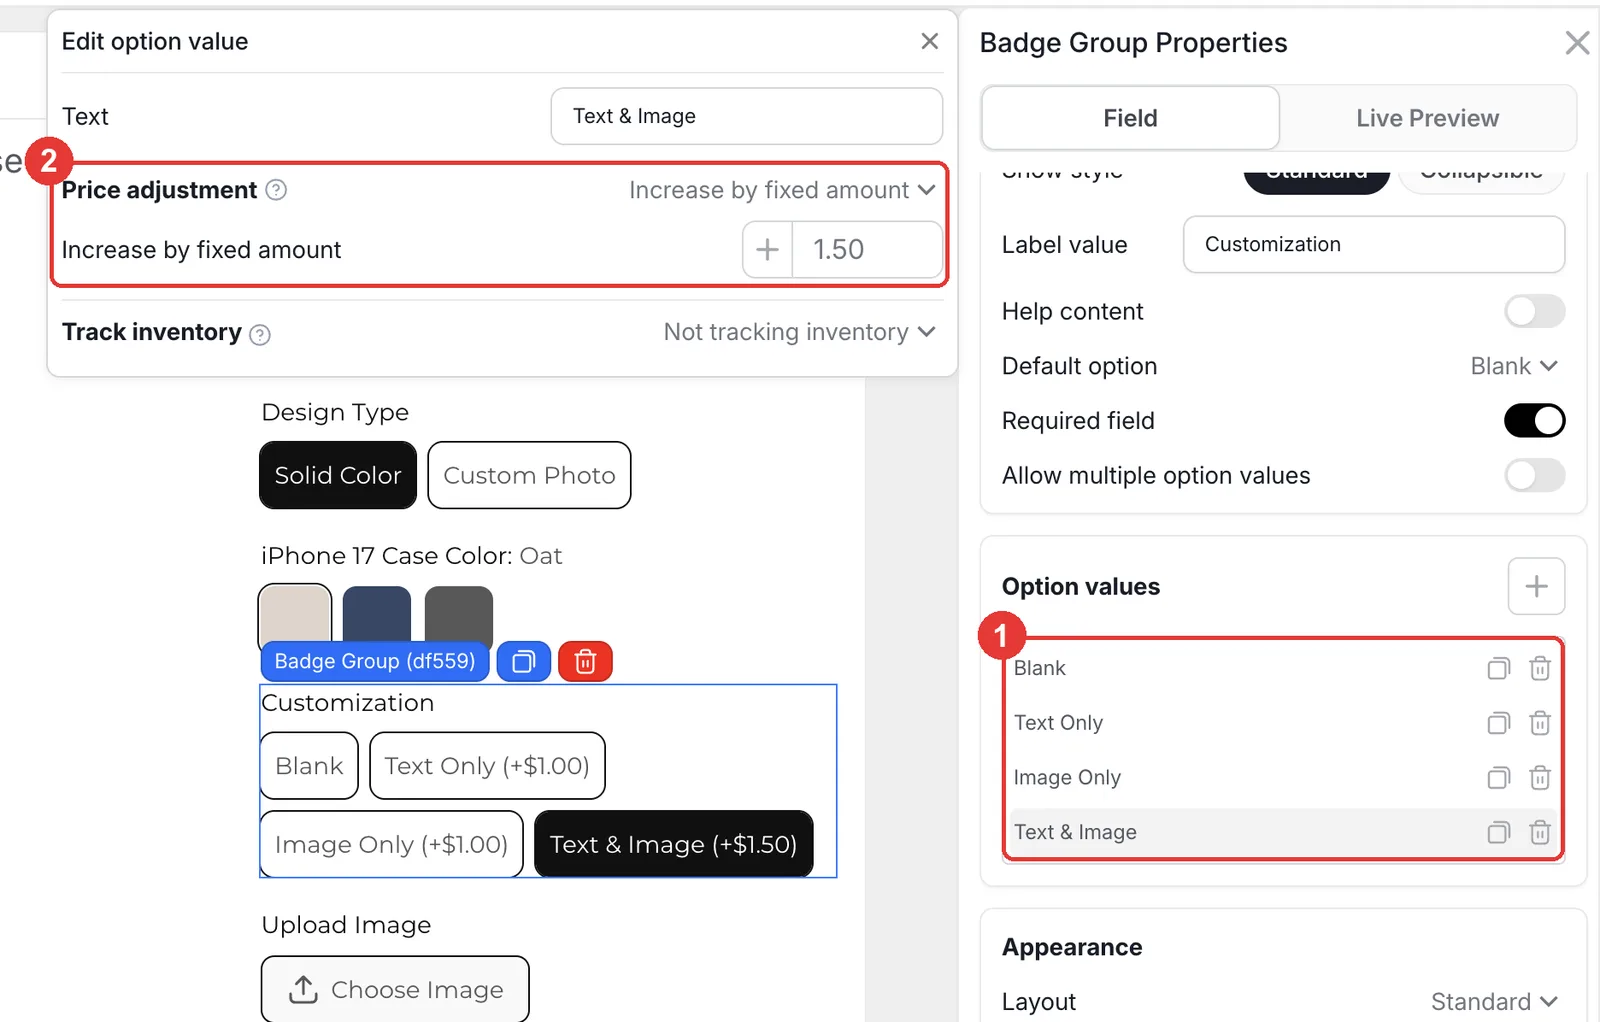
Add a Badge Group called Customization with four values: Blank, Text Only, Image Only and Text & Image. Click a paid value to open Edit option value and set Price adjustment to Increase by fixed amount ($1.00 or $1.50 in the demo). Give it the condition Design Type contains Solid Color, since a full photo case has no room for extra text.
Step 7: Link the text to its color and font
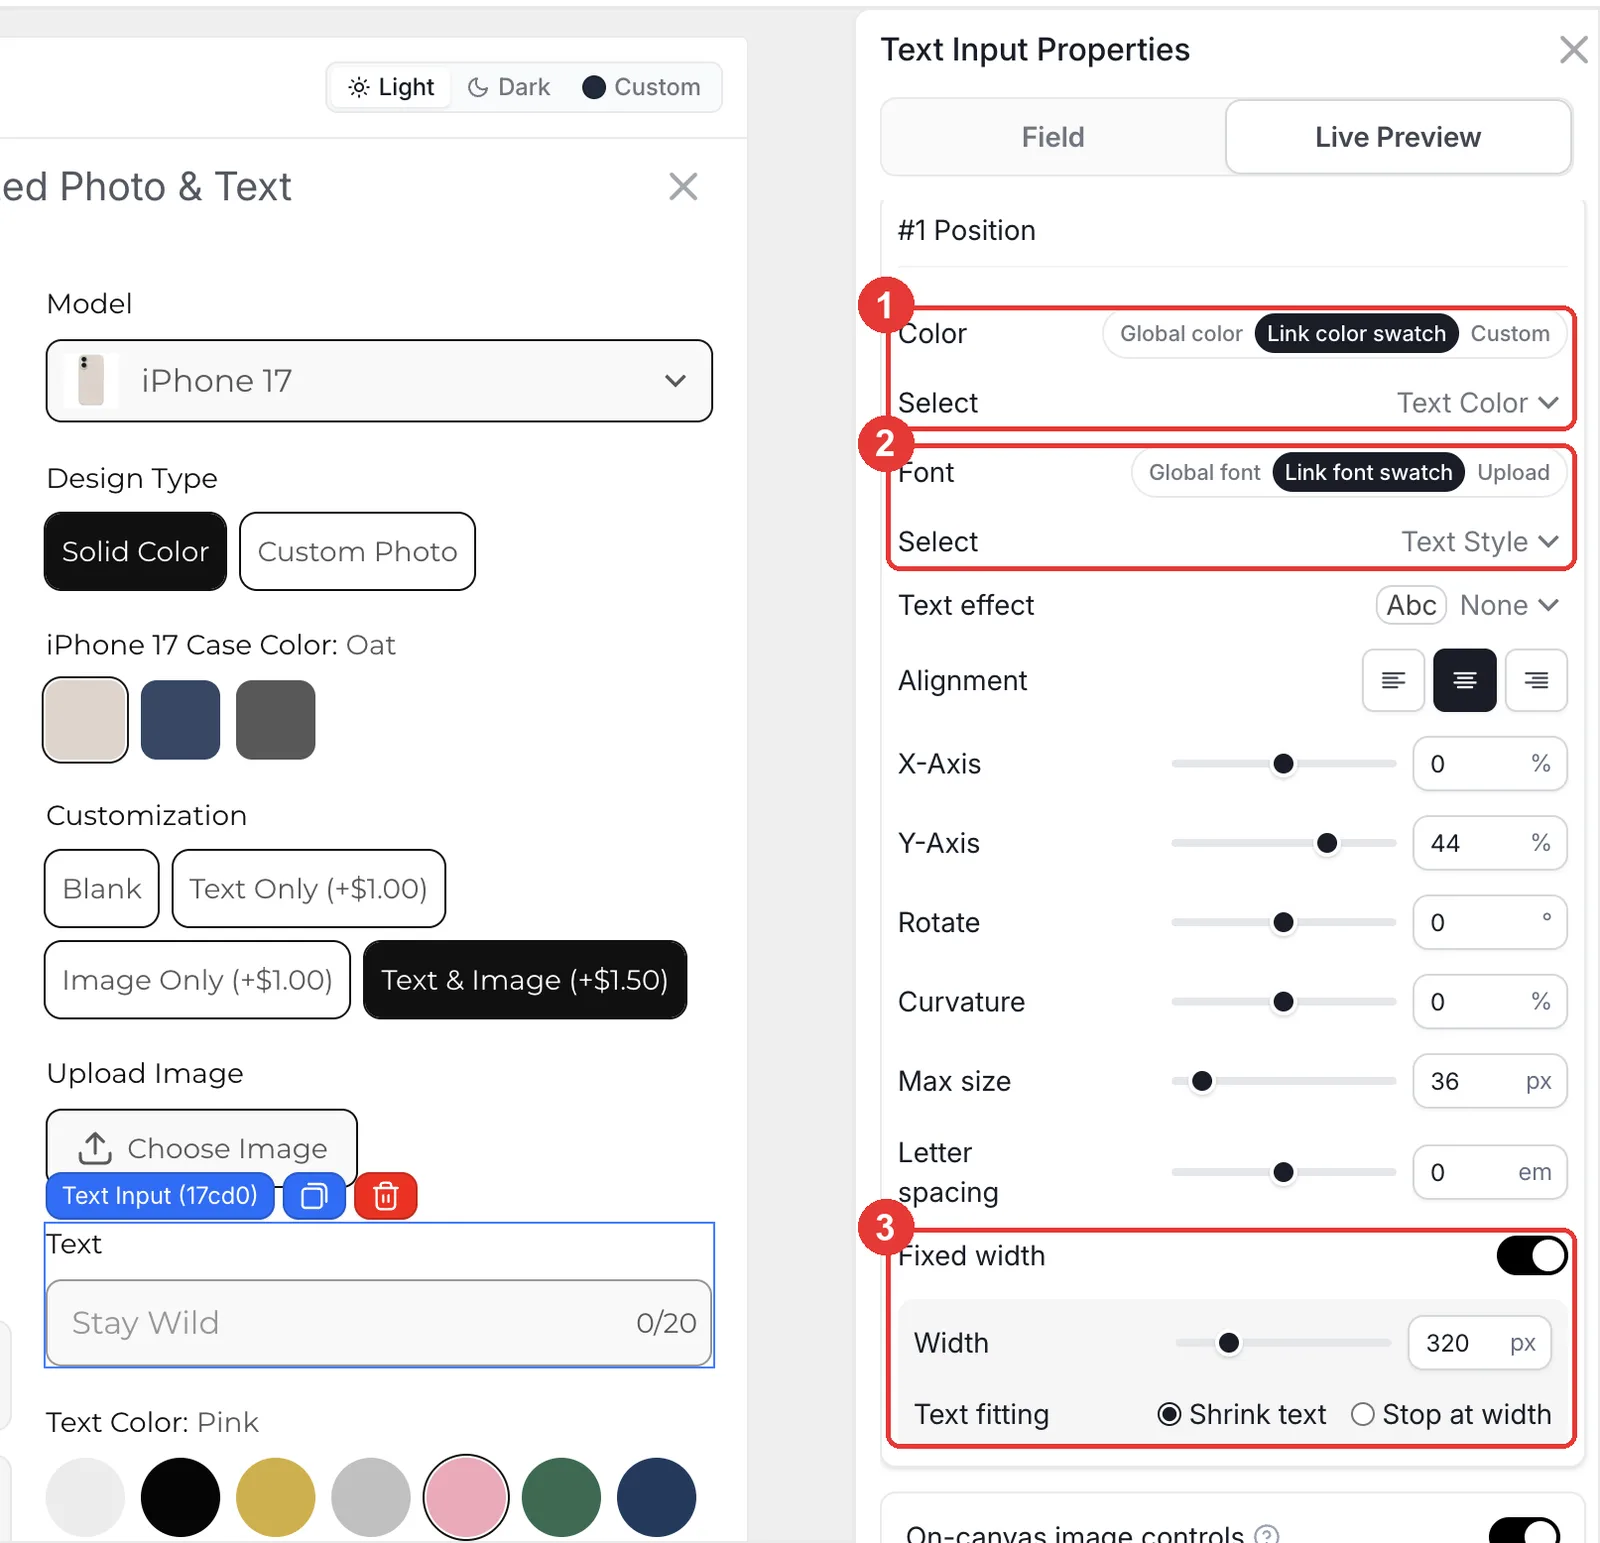
Select the Text Input and open Live Preview. Set Color to Link color swatch and pick Text Color, then set Font to Link font swatch and pick Text Style. Turn on Fixed width (320px in the demo) with Shrink text, so a long name shrinks to fit the case instead of running off the edge. Give the text, color and font fields the condition Customization contains Text Only or Text & Image.
- Before saving, switch through every model with Solid Color and Custom Photo in the editor preview: only one color swatch or upload should show at a time, and the price at the top should change with each add-on.
- Click Save, then run the same check on your live store on desktop and on a phone.
What happens in the cart and after the order?
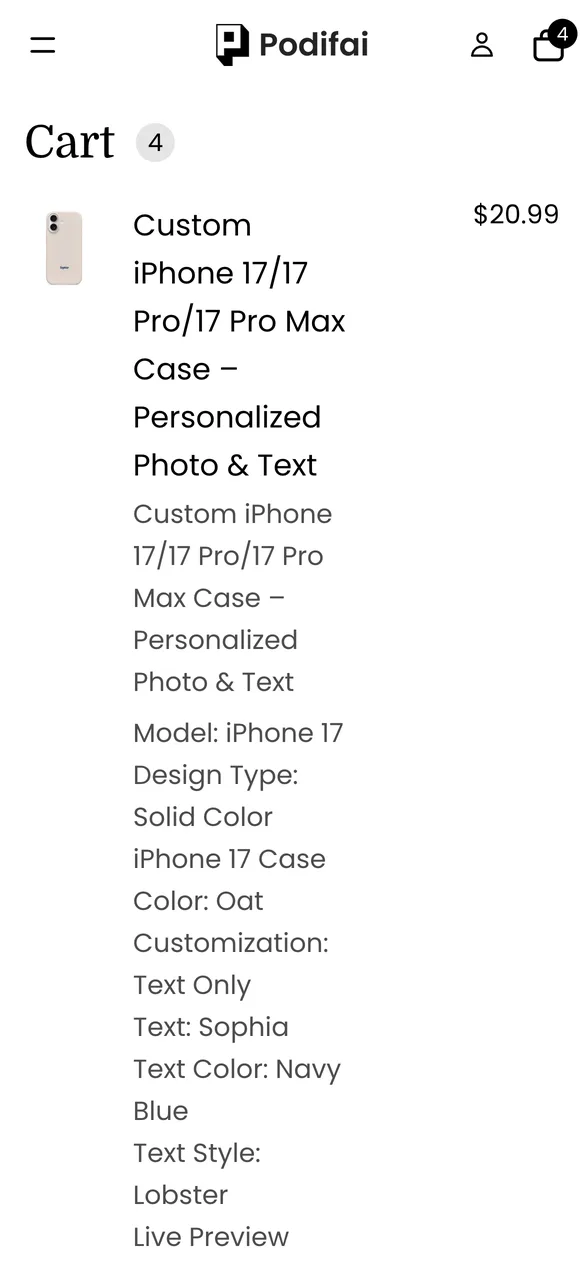
- Model, design type, case color, add-on, text, color and font are saved on the order line as line item properties, visible in Shopify Admin > Orders.
- The add-on price is charged on the same line, so there are no hidden fee products to manage.
- The shopper's original photo and a link to the final preview are saved with the order.
- With Generate print-ready files on, Podifai creates a transparent PNG of the design for each order. Check it against your supplier's template before you print.
Troubleshooting
Two color swatches or two upload buttons appear
One of the per-model fields is missing a rule. Open each case color swatch and photo upload and check that Show this when is set to All and both the Model and Design Type rules are present. See Conditional Logic.
The photo spills over the camera area or the edges
The mask outline does not match the case photo. Export the outline from the same canvas as the case photo, at the same size, and select it again under Apply image mask/shape. See Image masks.
Long text runs off the case
Turn on Fixed width in the Text Input's Live Preview and choose Shrink text, or lower the character limit.
Selling tips
- Ask for a high-resolution photo. Add a help note under the upload such as "Use a photo at least 1500 px tall". Phone photos are usually fine; screenshots and social media images often are not.
- Keep add-on prices simple. Small flat fees like +$1.00 for text are easy to accept. Price the base case to cover printing, and use add-ons only for extra work.
- Confirm the model before you print. Wrong-model orders are the most common phone case return. Put the model first in the form and show it in the order confirmation email.
What else can you sell with this setup?
The same model picker, mask and photo upload work for any product with a fixed printable shape:
- Samsung and Pixel cases
- AirPods and tablet cases
- Laptop sleeves and skins
- Photo coasters and ornaments
- Pet tags and photo keychains
Frequently asked questions
Yes. In Podifai, open Templates > Podifai Templates, find Custom iPhone 17/17 Pro/17 Pro Max Phone Case, click Copy to Product and Apply it to your product. Then replace the case photos and outlines with your own.
Turn on Apply image mask/shape in the Image Upload's Live Preview tab and upload a transparent PNG outline of the case with + PNG. The photo is clipped to that outline in the preview.
Yes. Add a Dropdown with one value per model and use conditions so each model shows its own colors and upload. Use Shopify variants instead if each model has its own SKU and stock.
Give each Color Swatch value a photo of the case in that color as its Preview image, and turn on Live customizer at 100% width and height. Choosing a color swaps the case photo.
Yes. Put the choices in a Badge Group and set a fixed price adjustment on the paid values. The demo charges $1.00 for text or artwork and $1.50 for both.
Yes. Under Automatic image processing on the Image Upload, choose Remove background on upload. The processed image is used in the preview and in the production file.
Every feature used here, including image masks and conditions, is on the Free plan, which covers up to 3 custom products. Starter ($7.9/month) covers 30 products and Growth ($15.9/month) is unlimited.
More Podifai use cases
- How to Sell Personalized Embroidered Dog Bandanas on Shopify
- How to Sell Monogrammed Leather Keychains on Shopify
- How to Sell Custom Neon Signs on Shopify
- How to Build a Charm Bracelet Builder on Shopify
- How to Sell Custom Hoodies with Front, Back and Sleeve Prints on Shopify
- How to Sell Custom Pickleball Paddles on Shopify
- How to Sell Custom Wedding Invitations on Shopify
- How to Sell Personalized Pens with a Paid Engraving Add-on on Shopify
- How to Sell Custom Trucker Hats on Shopify
Related help docs
Build this customizer on your store
Free for 3 custom products. Start from the ready-made template and change what you need.
 Install Podifai free