How to Sell Custom Wedding Invitations on Shopify
Sell custom wedding invitations on Shopify with a live card preview: landscape or portrait layouts, color themes, your own fonts and paper upgrades.
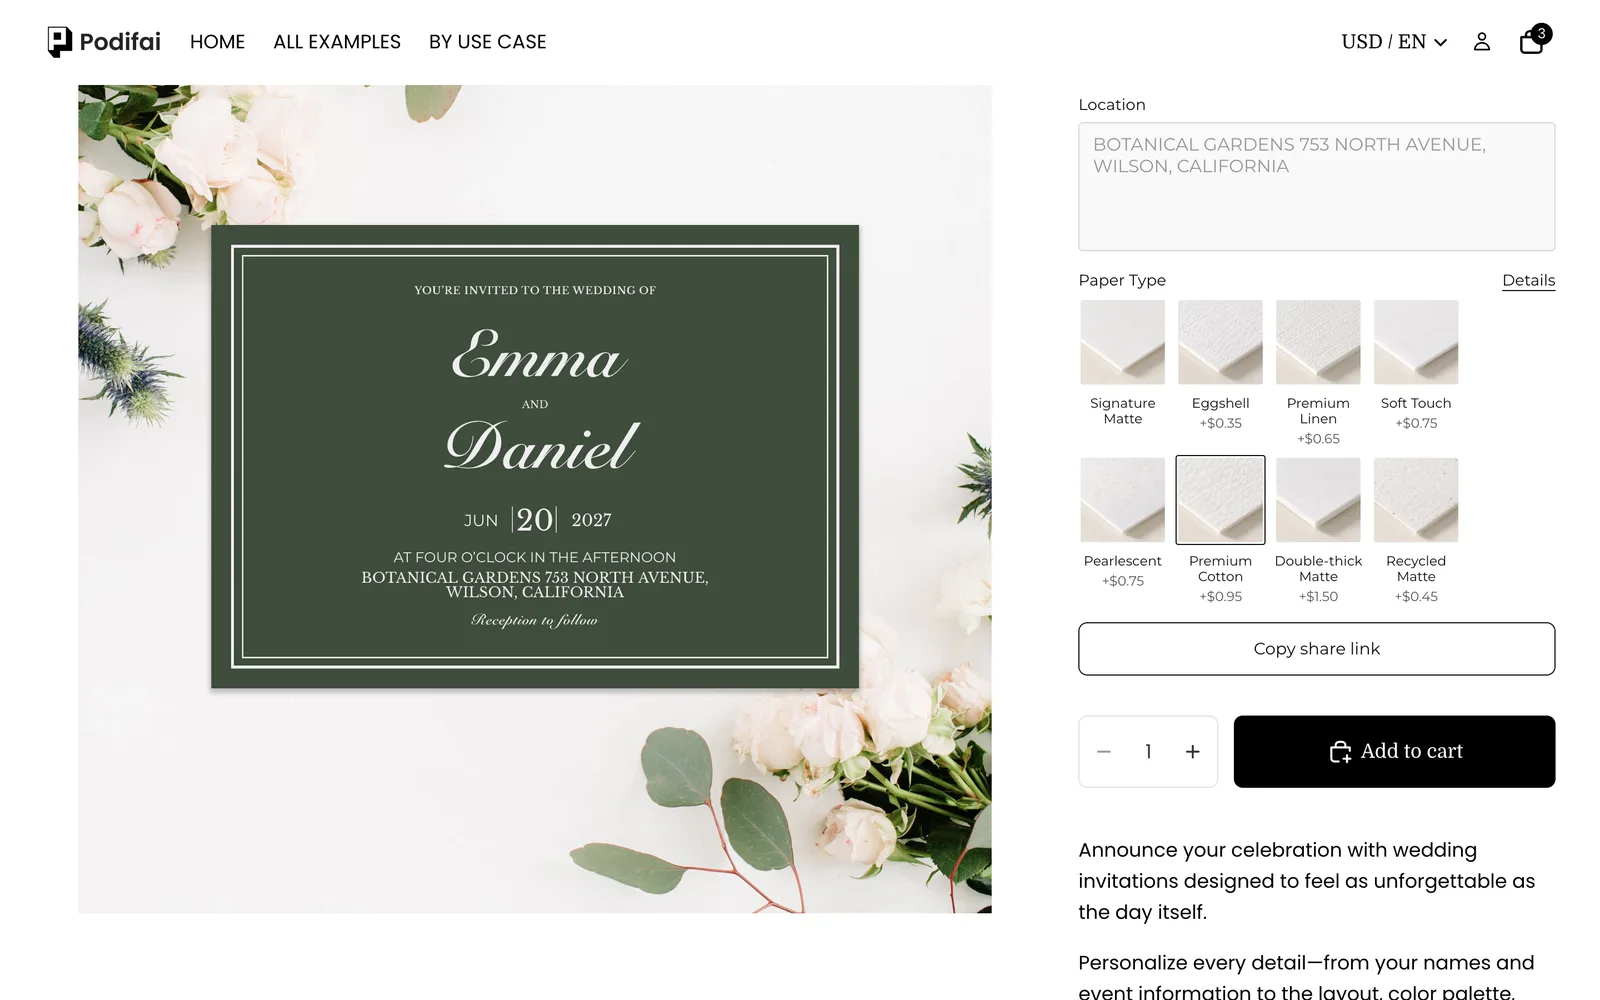
TL;DR: To sell custom wedding invitations with Podifai, price the product per card and let couples fill in a live card. A Design swatch switches between landscape and portrait, and each layout has its own theme colors and its own set of text fields. Use your own uploaded fonts, align the month and year on either side of the date, give the address a fixed width that wraps, and charge a small amount per card for paper upgrades. Start from the Custom Wedding Invitation template; every feature used here is on the Free plan.
What does the shopper see?
- Choose a layout: Landscape (6.25" x 4.5") or Portrait (4.5" x 6.25").
- Pick a color theme (Antique White, Forest Fern, Vintage Truffle, Midnight Graphite) and black or white text.
- Type both names, the month, date and year, the time and the venue. The card fills in as they type.
- Choose the paper: eight finishes from +$0.35 to +$1.50 per card.
- Set the number of cards and add to cart.
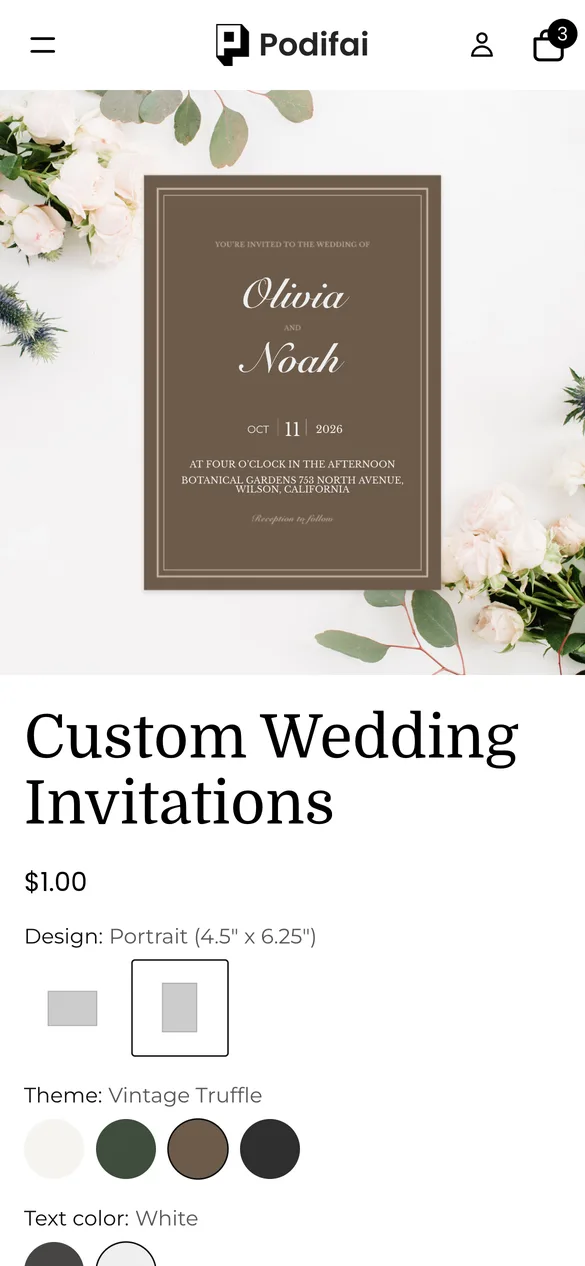
Try it yourself on the live demo product.
What do you need before you start?
1. Install Podifai and turn on the app embed
Install Podifai from the Shopify App Store, then open Online Store > Themes > Edit theme > App embeds and switch on Podifai Customizer. See Enable App Embed.
2. Price the product per card
Set the Shopify price to the cost of one card ($0.35 in the demo), so the quantity box is the number of invitations. If you sell in packs, price per pack and say so in the title.
3. Prepare the card art and fonts
Export one blank card image per layout and color theme (8 in the demo), all at the same size, plus a styled background photo. Have your licensed script and serif fonts as TTF, OTF or WOFF files ready to upload. See Image & Asset Requirements.
Should layouts, colors and paper be Shopify variants or Podifai options?
The demo keeps everything in Podifai, because cards are printed to order and quantity does the rest:
| Your situation | Use | What it gives you |
|---|---|---|
| Layout and color theme | Podifai Image and Color Swatches | Swap the card in the preview without extra variants |
| Paper finish with a surcharge | Podifai Image Swatch with a price per value (as in the demo) | The surcharge multiplies with the number of cards |
| Pre-printed stock you count | Shopify variants | Only if you keep finished cards in stock |
Podifai prices apply per unit, so a +$0.65 paper on 50 cards adds $32.50.
What is the fastest way to set this up?
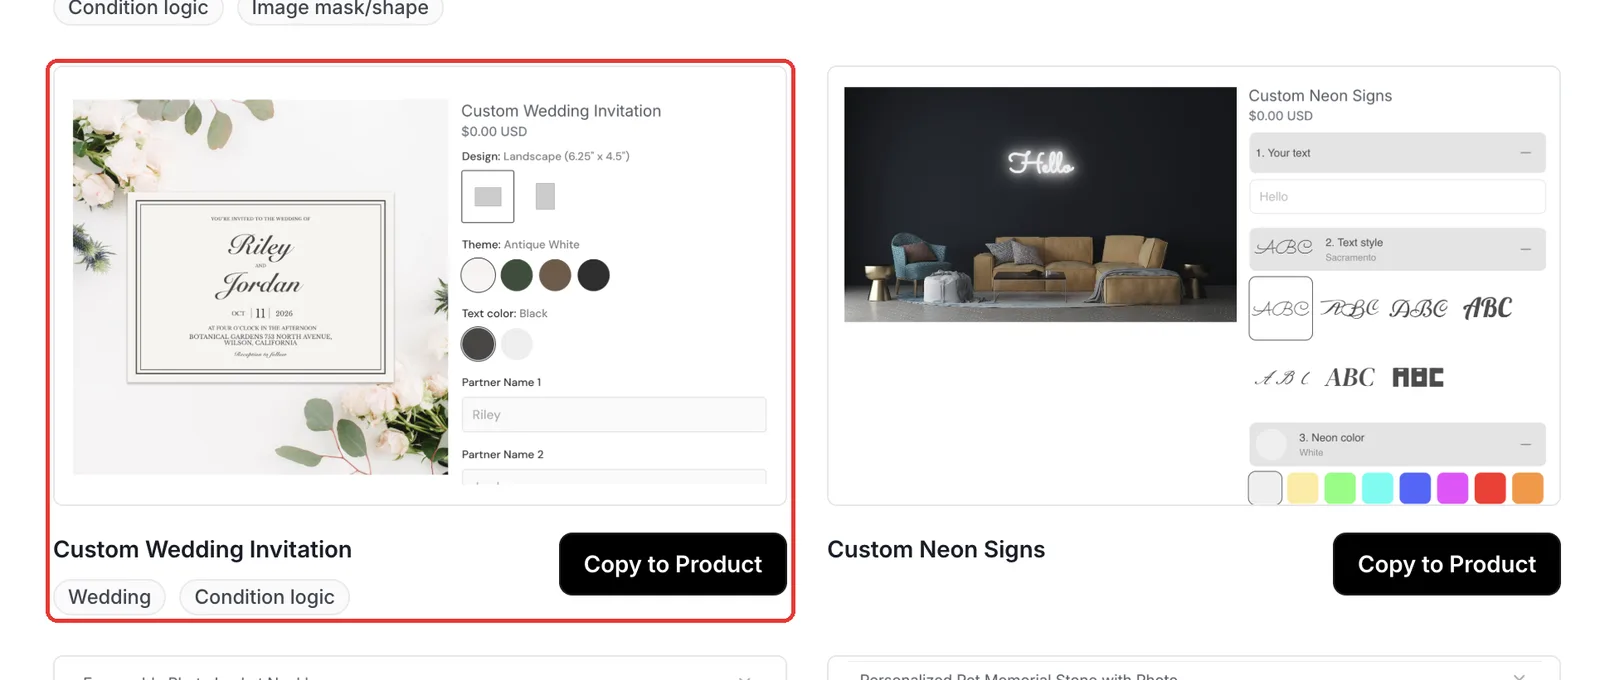
Podifai ships a ready-made Custom Wedding Invitation template with both layouts, four themes, all text fields and eight paper types. Open Templates > Podifai Templates, find it, click Copy to Product, choose your product and click Apply (or Override, which replaces existing Podifai options). Then upload your own card images and fonts, set your paper prices and save.
Which options do you need?
The whole customizer is 6 Podifai options on one Shopify product:
| Option | Podifai type | Key settings | Price |
|---|---|---|---|
| Design | Image Swatch | Landscape or Portrait | No charge |
| Theme (one per layout) | Color Swatch | 4 card colors, each with a full-size card image | No charge |
| Text color | Color Swatch | Black or White, linked to every text field | No charge |
| Names, Month, Date, Year, Time (one set per layout) | Text Input | Uploaded fonts; month right-aligned, year left-aligned; 3/2/4-character limits | No charge |
| Location (one per layout) | Text Area | Fixed width 360px, max 3 lines, wrap text | No charge |
| Paper Type | Image Swatch | 8 papers with a Details help link | +$0 to +$1.50 per card |
How to set it up in Podifai, step by step
These steps match the live demo product. Red boxes mark what to change; numbers follow the order in the step text.
Step 1: Add the option types
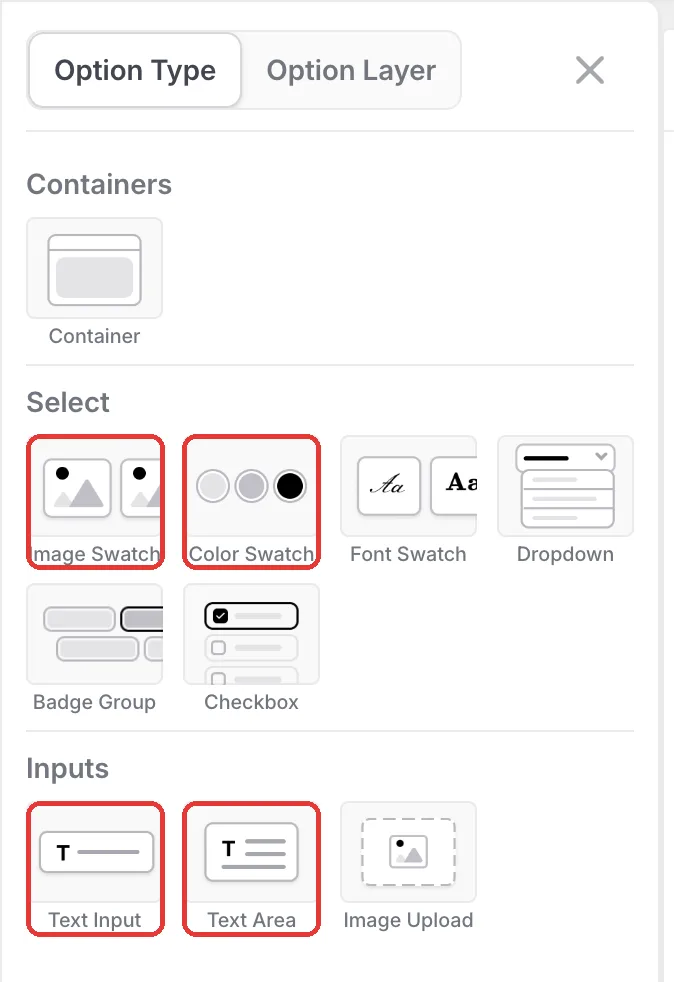
Open the product in the Podifai editor and click the menu icon on the left. Add Image Swatches for the layout and paper, Color Swatches for the theme and text color, Text Inputs for names and date parts, and a Text Area for the venue. Build the landscape set first, then use Duplicate for the portrait copies.
Step 2: Switch between landscape and portrait
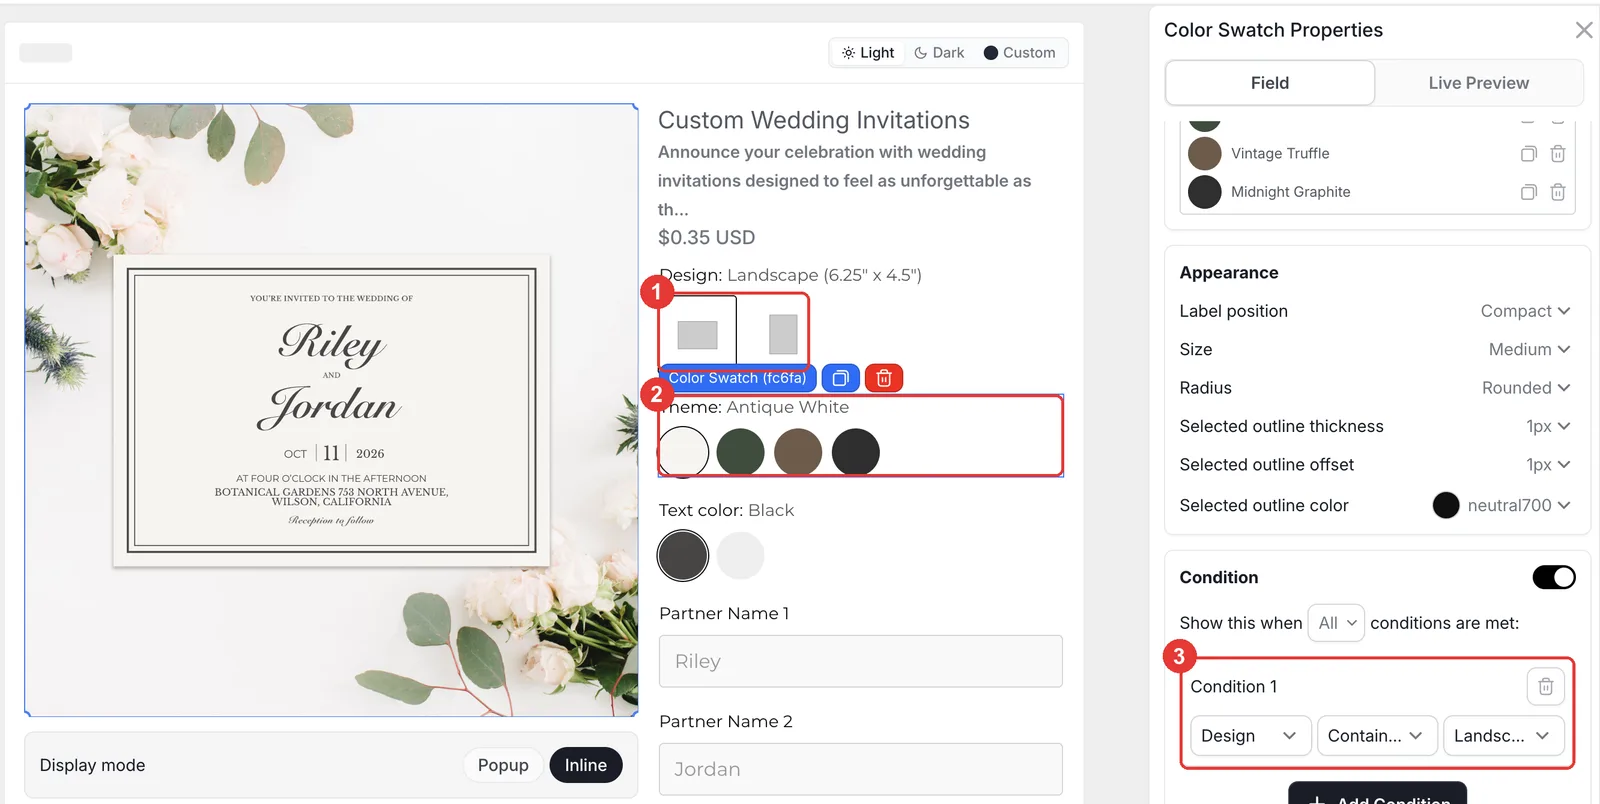
Add a Design image swatch with Landscape and Portrait. Add one Theme color swatch per layout, give each color value its card image, and turn on Live customizer at 100% so the card fills the preview. Then give the landscape Theme the condition Design contains Landscape, and the portrait one Design contains Portrait. Do the same for every text field, because the text sits in different places on each layout.
Step 3: Line up the date around the day
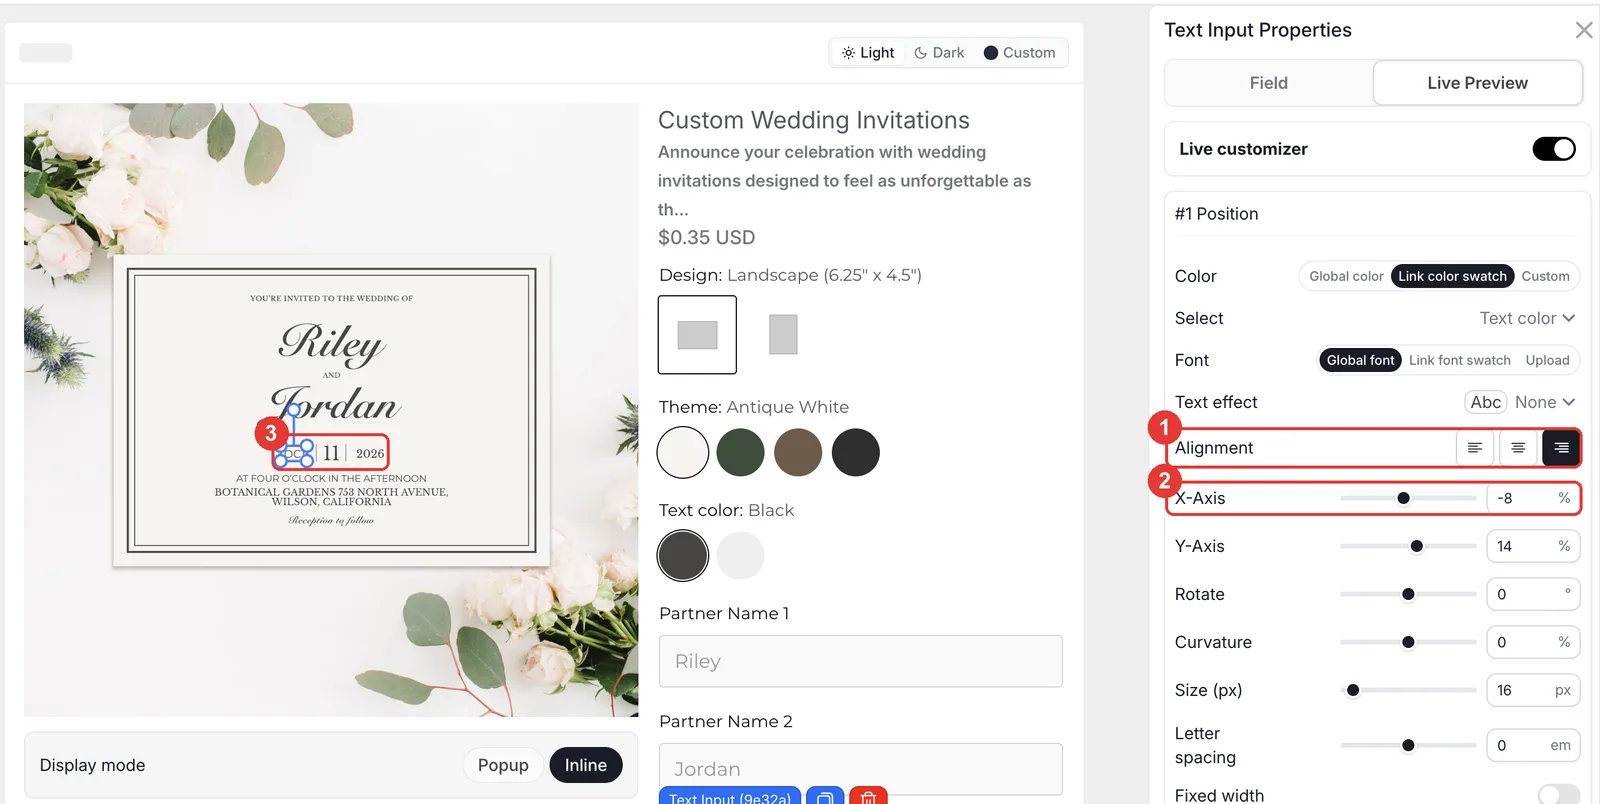
Split the date into three fields so each can be styled: Month (max 3 characters), Date (max 2) and Year (max 4). In Month's Live Preview tab set Alignment to right and X-Axis to −8%; in Year's set Alignment to left and X-Axis to 8%. The day sits in the middle in a larger size, and longer or shorter words never collide with it.
Step 4: Keep long addresses inside the card
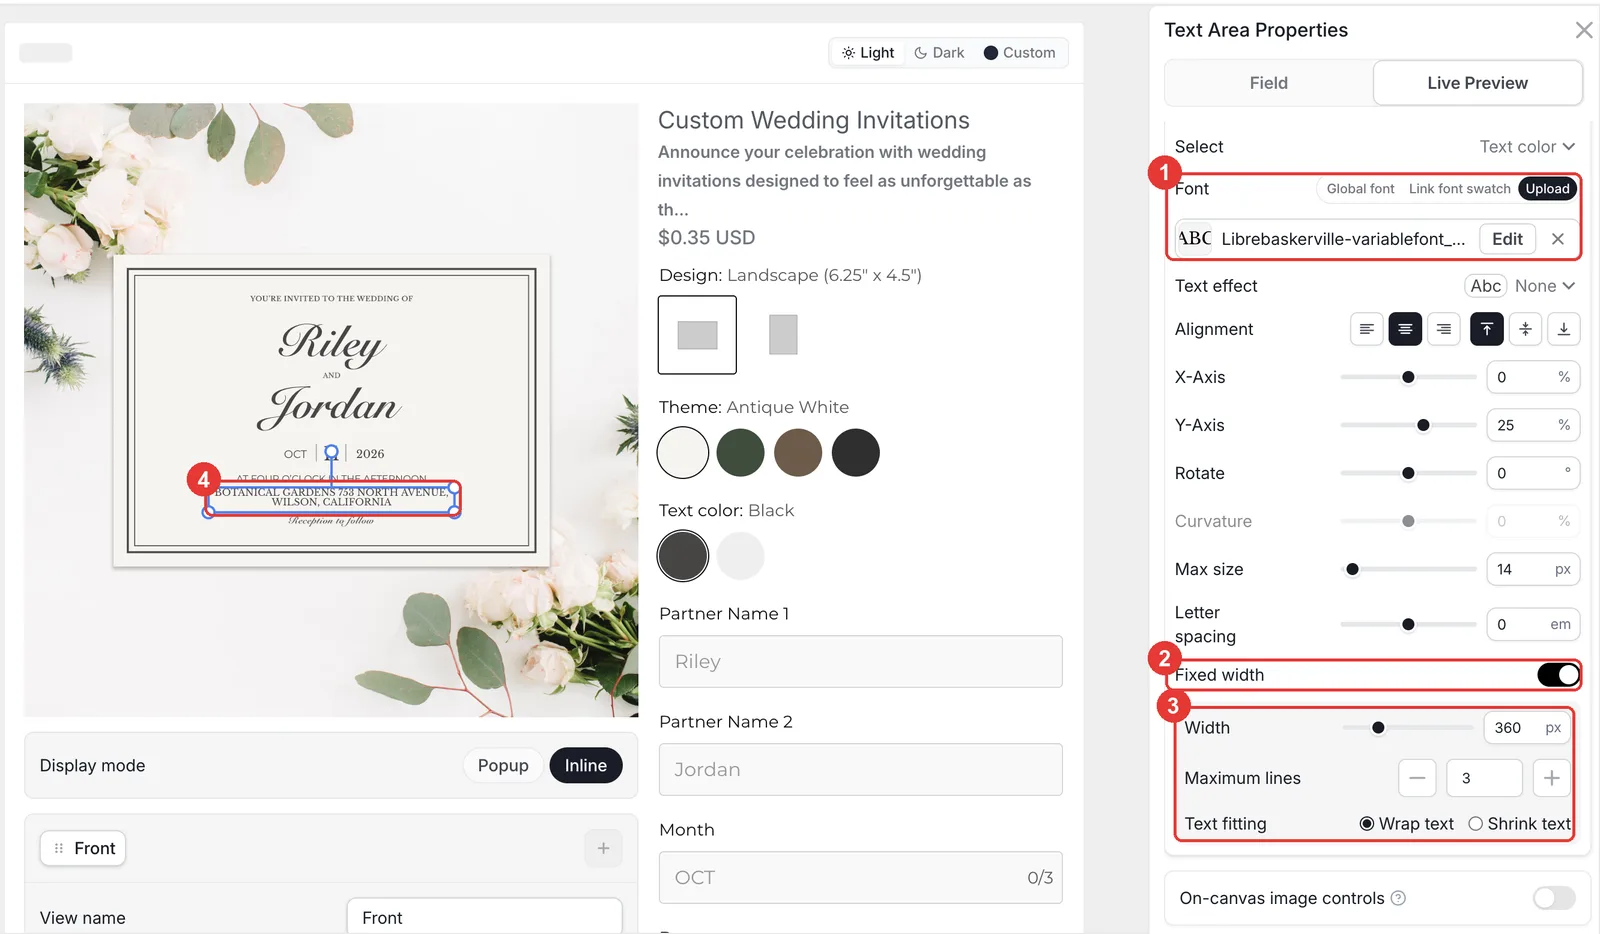
Select the Location text area and open Live Preview. Under Font choose Upload and add your font file. Turn on Fixed width, set Width to 360px and Maximum lines to 3, and choose Wrap text. Long venue names now break onto new lines within the card instead of running off the edge.
- Use Shrink text instead for one-line fields such as the time, so long wording gets smaller rather than wrapping.
- Link every text field's Color to the Text color swatch, so one choice changes the whole card.
Step 5: Charge for paper upgrades
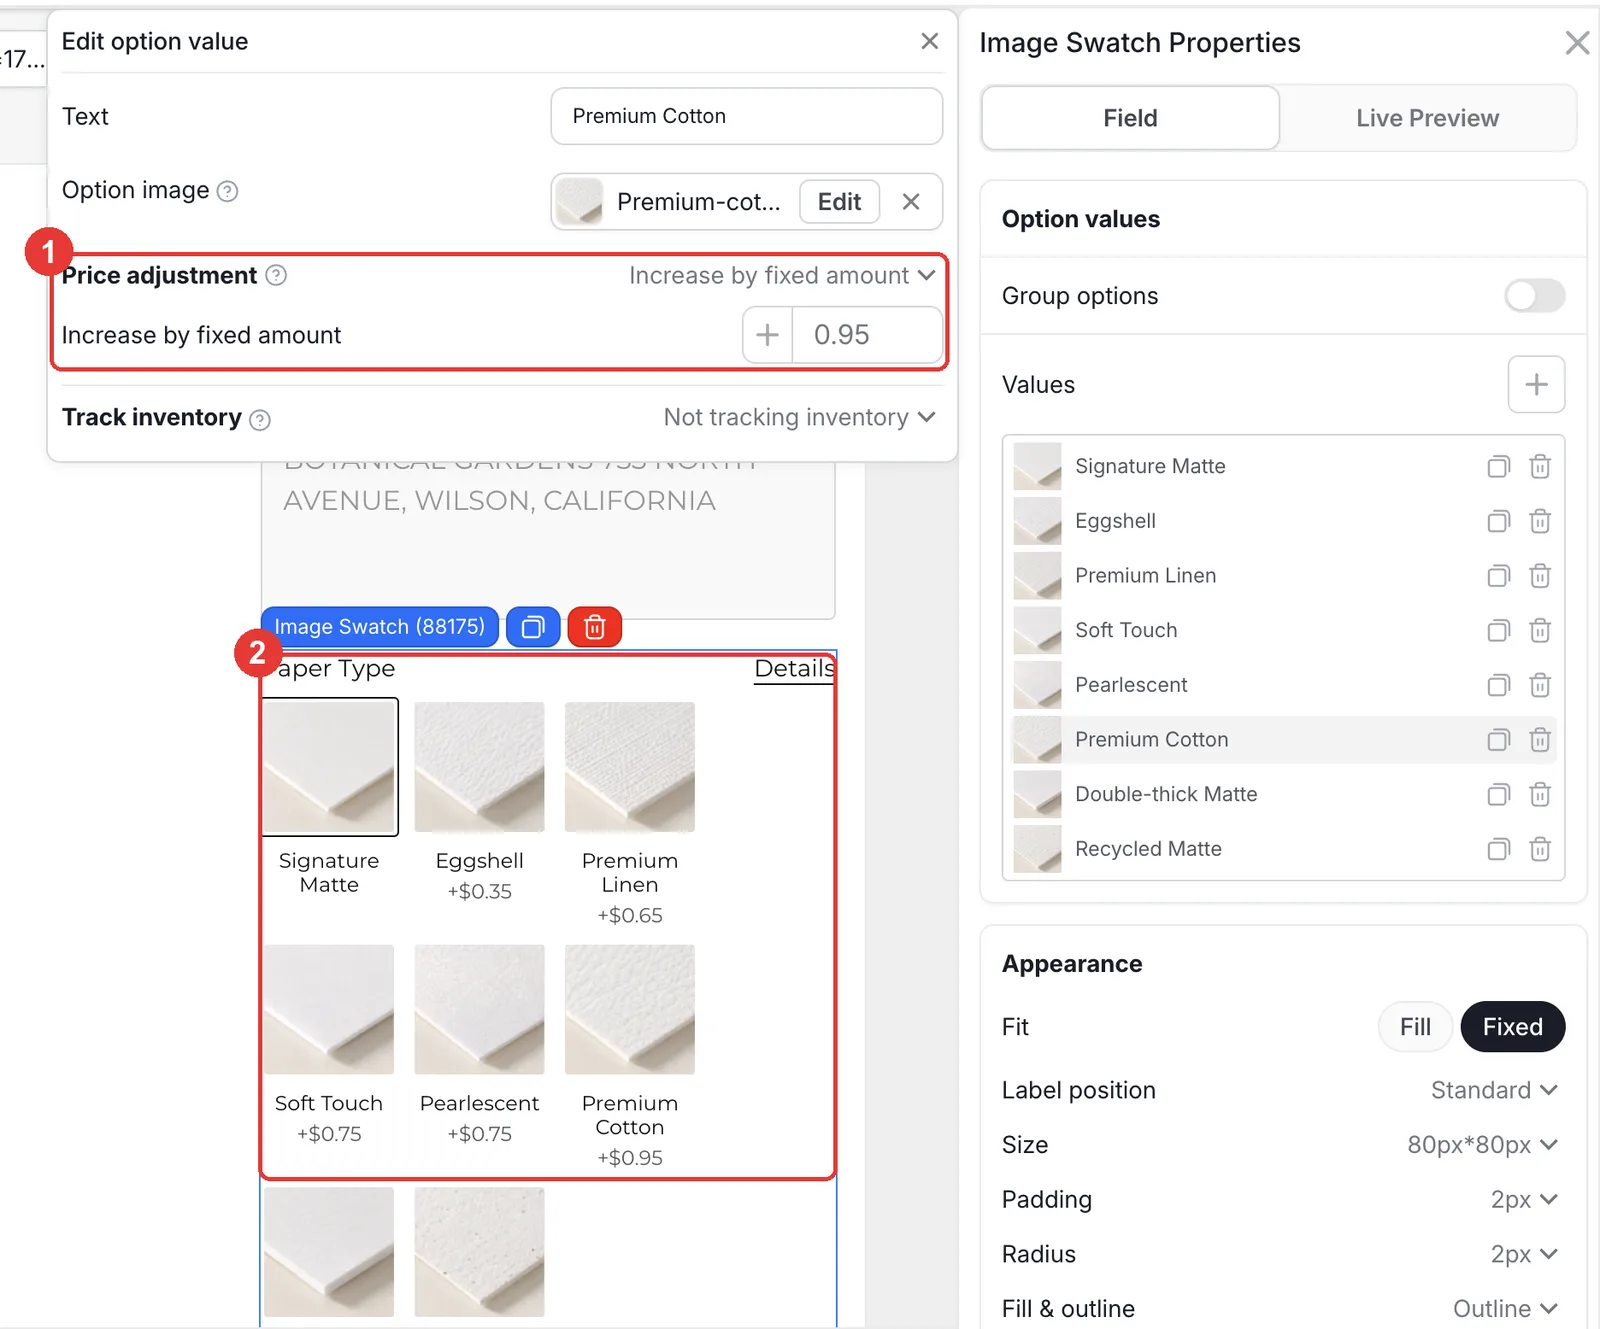
Add a Paper Type image swatch with a photo of each paper. Click a paper to open Edit option value and set Price adjustment to Increase by fixed amount. Shoppers see the price under each paper, and it is added once per card. Turn on Help content with a Details link to a page about your papers. Click Save and test both layouts on the storefront.
What happens in the cart and after the order?
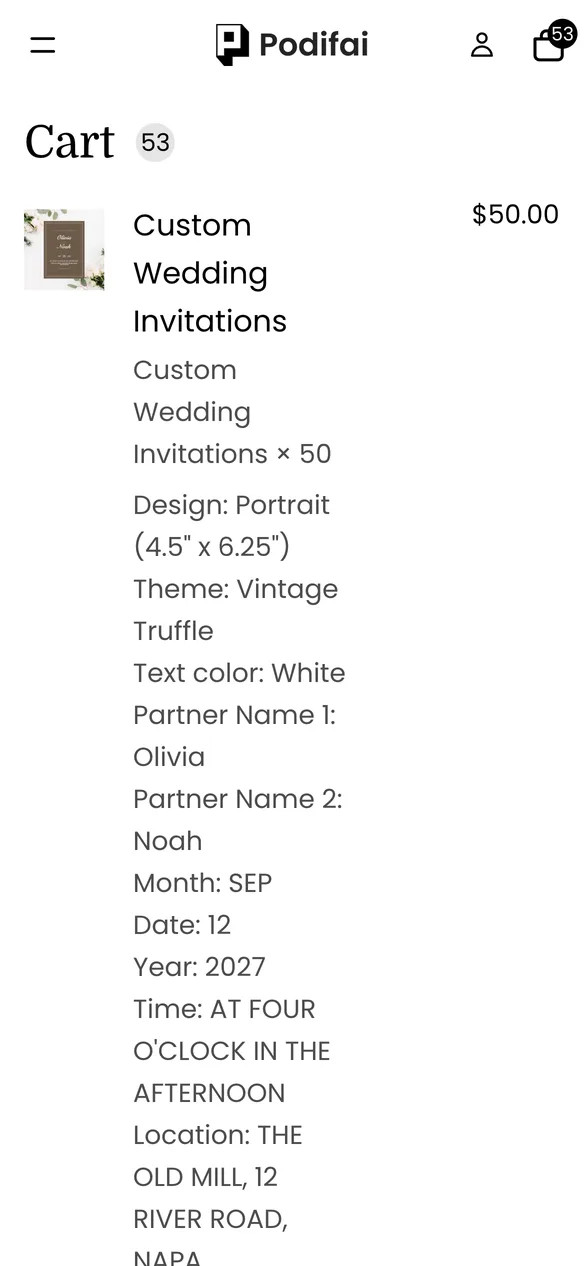
- Layout, theme, every line of text and the paper type are saved on the order line as line item properties.
- The paper surcharge is multiplied by the number of cards automatically.
- A link to the final card preview is saved with the order for proofing.
- With Generate print-ready files on, Podifai creates a transparent PNG of the text layer, ready to place on your print template.
Troubleshooting
Text from the other layout shows on the card
A text field is missing its Design condition. Each landscape field needs Design contains Landscape, and each portrait field Design contains Portrait. See Conditional Logic.
Add to cart does nothing
A required field is empty. Placeholder text such as "OCT" is only a hint; shoppers still have to type their own value. Make optional lines like the time not required if that suits you.
The address runs off the card
Turn on Fixed width with Wrap text and a maximum number of lines on the Location text area. See Fixed text width.
Selling tips
- Set a minimum order. Invitations rarely sell one at a time. State a minimum (such as 25 cards) in the description, or sell packs.
- Check contrast before you print. Black text on dark themes is hard to read. Mention which text color suits each theme, or limit the choices.
- Offer a printed proof. Wedding stationery gets checked by many people. A proof email before printing, using the saved preview link, avoids costly reprints.
What else can you sell with this setup?
The same layouts, aligned text and per-unit paper pricing work for any printed stationery:
- Save the dates and RSVP cards
- Birth announcements and party invitations
- Business cards and thank-you cards
- Place cards and table numbers
- Custom labels and stickers
Frequently asked questions
Yes. With Podifai they type names, date, time and venue into a live card preview, pick a layout, color and paper, and order any number of cards.
Yes. Open Templates > Podifai Templates, find Custom Wedding Invitation, click Copy to Product and Apply it to your product, then add your own card images and fonts.
Yes. In a text field's Live Preview tab, set Font to Upload and add a TTF, OTF or WOFF file.
Add a Design swatch, then build one set of theme and text fields per layout and show each set with a condition on the Design choice.
Give each paper value a fixed price adjustment. Because the product is priced per card, the surcharge is applied once per card.
Custom fonts, conditions, text alignment and per-value pricing are on the Free plan, which covers up to 3 custom products. Starter ($7.9/month) covers 30 products and Growth ($15.9/month) is unlimited.
More Podifai use cases
- How to Sell Personalized Embroidered Dog Bandanas on Shopify
- How to Sell Custom Photo Phone Cases on Shopify
- How to Sell Monogrammed Leather Keychains on Shopify
- How to Sell Custom Neon Signs on Shopify
- How to Build a Charm Bracelet Builder on Shopify
- How to Sell Custom Hoodies with Front, Back and Sleeve Prints on Shopify
- How to Sell Custom Pickleball Paddles on Shopify
- How to Sell Personalized Pens with a Paid Engraving Add-on on Shopify
- How to Sell Custom Trucker Hats on Shopify
Related help docs
Build this customizer on your store
Free for 3 custom products. Start from the ready-made template and change what you need.
 Install Podifai free